
Introduction#
Are you a maker or an embedded systems enthusiast looking to create applications that work across different development boards with Espressif SoCs like ESP32 or ESP32-S3? Whether you’re using the ESP-WROVER-KIT, M5Stack-CoreS3, ESP32-S3-BOX-3, or other compatible boards, the ESP Board Support Package (ESP-BSP) makes your life easier. In this article, we’ll walk you through how to get started with ESP-BSP, enabling you to focus on your project’s functionality without worrying about hardware differences.
What is ESP-BSP?#
ESP-BSP is a collection of Board Support Packages featuring Espressif’s or M5Stack development boards. It provides a convenient way to start a ESP-IDF based project for a specific development board without the need to manually look for drivers and other details. By using ESP-BSP, you can:
- Streamline Hardware Integration: Simplify code and reduce complexity.
- Enhance Development Speed: Quickly set up and start working on your projects.
- Access Standardized APIs: Ensure consistency across your projects.
Getting Started with ESP-BSP#
The following example covers steps for building application for ESP32-S3-BOX-3 which is supported by ESP-BSP.
Hardware Setup#
Ensure you have the following hardware:
- ESP32-S3-BOX-3 development board.
- USB-C Cable for power and programming.
Prerequisites#
Before you begin, make sure you have ESP-IDF v5.3, the official development framework for the ESP32, properly installed and sourced in your shell.
Pre-compiled binaries#
The pre-compiled binaries for the following example are also available via ESP Launchpad and can be flashed directly from the web browser.
Try it with ESP LaunchpadCreating Project from Example#
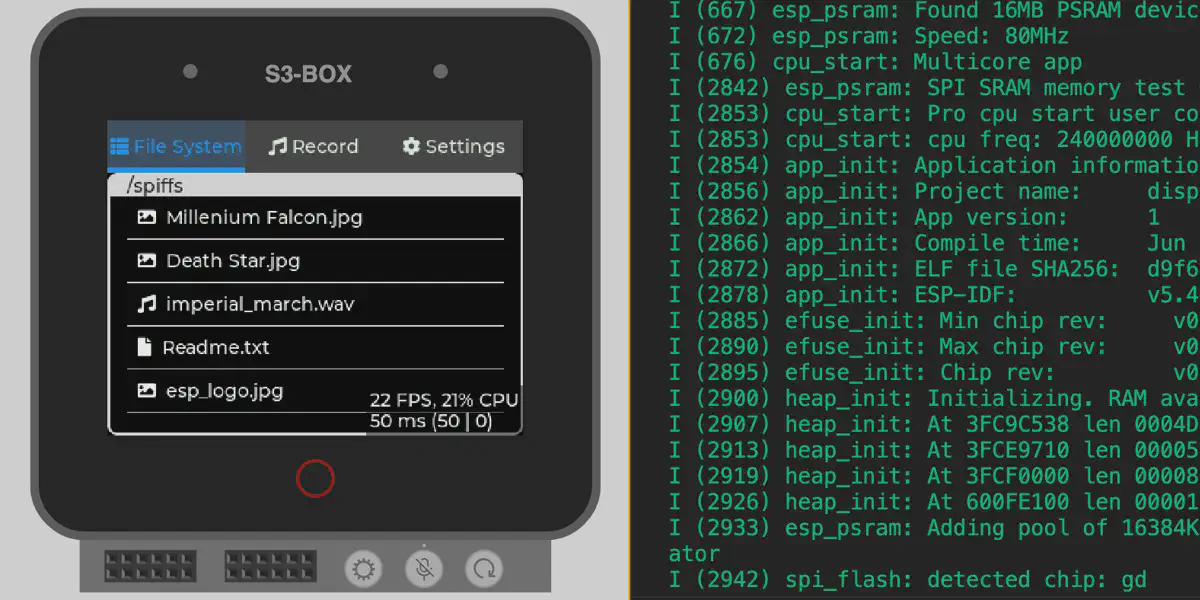
Let’s create a simple project using the display_audio_photo example, which is available for the ESP32-S3-BOX-3. This example showcases how to use the display, touch, and audio features.
First, let’s see the whole build in Asciinema recording:
Initialize a New Project:
Use the
idf.pytool to create a new project from the example:idf.py create-project-from-example "espressif/esp-box-3^1.2.0:display_audio_photo" cd display_audio_photoSet the Target:
Ensure the correct target is set for your project:
idf.py set-target esp32s3Note: For users of ESP-IDF 5.3 or newer, it is necessary to add the following dependency with the corrected I2C driver (error message at runtime:
CONFLICT! driver_ng):idf.py add-dependency "espressif/esp_codec_dev==1.1.0"Check the Configuration of Dependencies:
Check that file
main/idf_component.ymlcontains dependency on BSP specific to you board.Configuration for ESP32-S3-BOX-3:
## IDF Component Manager Manifest File
dependencies:
    espressif/esp-box-3: "^1.2.0"
    esp_jpeg: "^1.0.5~2"
    esp_codec_dev:
        public: true
        version: "==1.1.0"
## Required IDF version
idf:
    version: ">=5.0.0"
Configuration for ESP32-S3-BOX:
## IDF Component Manager Manifest File
dependencies:
    espressif/esp-box: "^3.1.0"
    esp_jpeg: "^1.0.5~2"
    esp_codec_dev:
        public: true
        version: "==1.1.0"
## Required IDF version
idf:
    version: ">=5.0.0"
Configuration for M5Stack-CoreS3:
## IDF Component Manager Manifest File
dependencies:
    espressif/m5stack_core_s3: "^1.1.0"
    esp_jpeg: "^1.0.5~2"
    esp_codec_dev:
        public: true
        version: "==1.1.0"
## Required IDF version
idf:
    version: ">=5.0.0"
Build and Flash the Project:
Compile and flash your application to the ESP32-S3-BOX-3:
idf.py build flash monitorNote: Use
Ctrl+]to quit the monitor application.Note: Some models of M5Stack CoreS3 have QUAD SPI RAM, in that case please use the following command for the build, which will take into account specific settings for M5Stack CoreS3 from the file:
idf.py build -DSDKCONFIG=sdkconfig.bsp.m5stack_core_s3
Exploring the Example#
Once the application is running, you’ll see the following features in action:
- Display: Shows images, text files, and more.
- Touch: Interacts with the display.
- Audio: Plays sound files.
Let’s look at the source code of the example. The Board Support Package provides an API that allows you to initialize a board. The application code is cleaner and does not require board-specific details, such as pins hard-coded in the application code.
#include "esp_log.h"
#include "bsp/esp-bsp.h"
#include "app_disp_fs.h"

static const char *TAG = "example";

void app_main(void)
{
    /* Initialize and mount SPIFFS */
    bsp_spiffs_mount();

    /* Initialize I2C (for touch and audio) */
    bsp_i2c_init();

    /* Initialize display and LVGL */
    bsp_display_start();

    /* Set default display brightness */
    bsp_display_brightness_set(APP_DISP_DEFAULT_BRIGHTNESS);

    /* Add and show LVGL objects on display */
    app_disp_lvgl_show();

    /* Initialize SPI flash file system and show list of files on display */
    app_disp_fs_init();

    /* Initialize audio */
    app_audio_init();

    ESP_LOGI(TAG, "Example initialization done.");
}
Simulating the ESP32-S3-BOX-3 with Wokwi#
You can also simulate the application with ESP-BSP for ESP32-S3-BOX-3 using the Wokwi simulator from your development environment using a plugin for VS Code, Espressif IDE, or JetBrains IDEs. This allows you to test your applications without needing the physical hardware.
To set up the simulation, you need to add two files to your project: wokwi.toml and diagram.json in the root of the project.
Content of wokwi.toml
[wokwi]
version = 1
elf = "build/uf2.bin"
firmware = "build/uf2.bin"
Content of diagram.json
{
  "version": 1,
  "author": "Wokwi.com",
  "editor": "wokwi",
  "parts": [
    {
      "type": "board-esp32-s3-box-3",
      "id": "esp32",
      "top": -24.91,
      "left": -388.54,
      "attrs": { "psramSize": "16", "flashSize": "16" }
    }
  ],
  "connections": [ [ "$serialMonitor:RX", "esp32:G14", "", [] ], [ "$serialMonitor:TX", "esp32:G11", "", [] ] ],
  "dependencies": {}
}
Use the following command to build the UF2 image for your project. The Wokwi simulator will pick up this binary and run it.
idf.py uf2
Now you can start the simulation in your favorite IDE.
Conclusion#
With ESP-BSP, you can quickly develop and port your applications across various boards with Espressif SoC, saving time and effort. Whether you’re building a new project or upgrading an existing one, ESP-BSP simplifies your development process.