
Introduction#
In any Wi-Fi-enabled application, the first step is always to establish a connection between the device and the router. In Wi-Fi terminology, the device is referred to as a Station (STA), while the router functions as an Access Point (AP). In most applications, the Espressif module operates as a station, connecting to an existing router. However, before it can do so, the end user must perform provisioning—providing the module with the router’s SSID and password.
There are multiple ways to handle provisioning, but the two most common methods are via Bluetooth and via Wi-Fi. When using Wi-Fi for provisioning, the process typically follows these steps:
- The Espressif module starts a soft-AP (temporary access point).
- The user connects to this soft-AP.
- The module serves an HTTP page that prompts the user to enter the SSID and password.
- The user provides the necessary credentials.
- The module shuts down the soft-AP and switches to station mode, connecting to the router.
Even if your application primarily runs the Espressif module in station mode, you’ll still might need to set up a soft-AP for provisioning.
Because provisioning is such a common requirement, this tutorial will be followed by another tutorial that explains how to set up an HTTP server to collect the SSID and password from the user.
This and the following tutorials use a simple provisioning technique, which is inherently less secure.
For real-world applications, it is better to use a robust provisioning solution, such as the Unified Provisioning framework. It allows configuring ESP devices with Wi-Fi credentials and custom settings using various transport methods (Wi-Fi SoftAP or Bluetooth LE) and security schemes.
This tutorial lays the groundwork for building more advanced Wi-Fi connectivity applications by ensuring a smooth and reliable connection setup.
In the steps that follow, we will:
- Create a new project based on the
hello_worldexample. - Rename the project and remove any unnecessary libraries and configurations.
- Start the Soft-AP and set up handlers to manage Wi-Fi events.
- Verify the connection using your smartphone
In this tutorial, we will also encounter
- menuconfig - The tool which handles the configuration in ESP-IDF projects
- Event loops – A design pattern used throughout the Espressif ESP-IDF framework to simplify the management of complex applications.
- esp-netif – Espressif’s abstraction layer for TCP/IP networking.
- Non-volatile storage (NVS) – For saving credentials
Prerequisites#
Before starting this tutorial, ensure that you
- Can compile and flash the
hello_worldexample. Two main methods followed below are usingidf.pydirectly (CLI approach) or using the VS Code ESP-IDF Extension. If required, you can follow the instructions in the ESP-IDF Getting Started guide. - Have an Espressif evaluation board or another compatible board for flashing the code. In this tutorial we will use the ESP32-C3-DevkitM-1 but any Espressif evaluation board will work just as well. If you built your own board, you might need an ESP-PROG programmer.
- Understand the difference between a Wi-Fi access point and a Wi-Fi station.
- (Optional) Have a basic knowledge of the logging system in Espressif.
If you’re not quite comfortable with any of the above steps yet, consider checking out the ESP-IDF with ESP32-C6 Workshop. These resources can help you get hands-on experience with setup, flashing, and basic debugging before diving into this tutorial.
Starting a new project from hello_world#
To start a new project and prepare for the following steps, we will perform these actions:
- Create a new project using the
hello_worldexample as a starting point. - Set the target core (in our case,
ESP32-C3) - Select right port (here
/dev/tty.usbserial-11320) - Build, flash, and start a monitor with
hello_world.
To start, create a new project from hello_world.
Below you can find a refresher for VS Code and using the CLI.
Most commands in VSCode are executed through the Command Palette, which you can open by pressing CTRL+SHIFT+P (or CMD+SHIFT+P if you’re on mac-os). In the following, commands to enter in the Command Palette are marked with the symbol >.
> ESP-IDF: New Project
Follow the instructions to create a new project using thehello_worldas a template> ESP-IDF: Set Espressif Device Target
Choose your SoC. In this tutorial we useesp32c3- If you are using an evaluation board or a USB-UART bridge, select
The ESP32-C3 Chip via builtin USB-JTAG - If you’re using one of the
ESP-PROGprogrammers, choose the most appropriate option.
- If you are using an evaluation board or a USB-UART bridge, select
> ESP-IDF: Select Port to Use (COM, tty, usbserial)
Choose the port assigned to the board. Check with your os device manager if unsure> ESP-IDF: Build, Flash and start a Monitor on your device
If you’re using a simple text editor and the CLI commands, you can follow the instruction on the get-started guide (linux/mac-os | windows ).
If everything runs smoothly, we should see the compilation finish successfully, followed by the firmware flashing and the hello_world example running, displaying Hello world! and restarting after 10 seconds.
We have just compiled the code and flashed it onto the internal flash memory of the Espressif module. On boot, the module now runs the hello_world example, sending a ‘Hello, World’ message to the serial port (connected to the programmer), along with a countdown until the module restarts. This step ensures that the entire process is working correctly. Now, we can begin modifying the code to implement the soft-AP.
Renaming the Project and Cleaning Up#
Now, we will rename the project and remove all the necessary commands and library.
Update the content of hello_world_main.c to the following code:
#include <stdio.h>
#include "sdkconfig.h"

void app_main(void)
{
    printf("Hello tutorial!\n");

}
Then build, flash, and monitor again to confirm that everything is working correctly.
Before moving on, rename the file hello_world_main.c → basic_soft_ap.c for clarity.
Update CMake to ensure it compiles the new file instead of the old one. Open main/CMakeLists.txt and change the content to
idf_component_register(SRCS "basic_http_server.c"
                    PRIV_REQUIRES
                    INCLUDE_DIRS "")
After making these changes:
- Perform a full clean: Run in the command palette
ESP-IDF: Full Clean Project - Build, flash and open a monitor again.
Disable NVS#
To keep things as simple as possible, in this tutorial we will not use Non-Volatile Storage (NVS), which is commonly used with Wi-Fi to store credentials and access calibration data under the hood.
By default, some configuration variables have NVS enabled, which may cause warnings or errors. To avoid this, we need to disable them in menuconfig.
To access menuconfig, type ESP-IDF: SDK Configuration Editor in the command palette and hit Enter.
In the menuconfig search bar type NVS then uncheck the following options
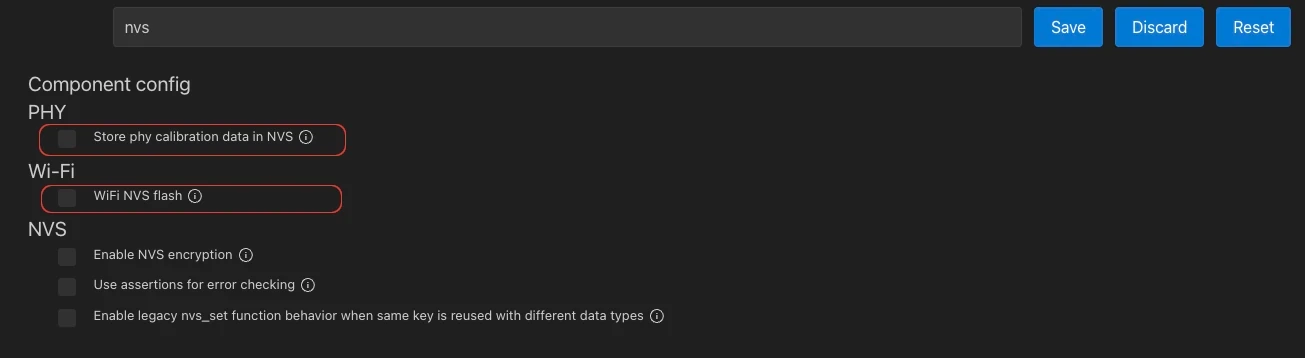
NVS options to be disabled
To access menuconfig, call idf.py menuconfig
Now your project should resemble the bare-minimum example in the repository below.
Starting the soft-AP#
To set up a soft-AP, we will need to:
- Define soft-AP parameters:
To keep things easy, we will use some#defines for SSID, password and the other soft-AP parameters. - Initialize the IP Stack:
We’ll callesp_netif_init()to initialize the network interface. - Initialize the event loop:
We’ll callesp_event_loop_create_default()to initialize the standard event loop. - Register handlers for soft-AP:
We’ll register the event handlers needed for a soft-AP application.
Espressif IP stack is managed through the unified interface called esp_netif. This interface was designed to provide an agnostic abstraction for different IP stacks. Currently, the only TCP/IP stack available through this interface is lwIP.
For most applications, creating a default network with the default event loop is sufficient – this is the approach used in this tutorial.
Define soft-AP parameters#
Best practices dictate that we should avoid hard-coding credentials directly in our code. Instead, credentials should be stored in the Non-Volatile Storage (NVS) partition. This approach is commonly used in the ESP-IDF examples and is the recommended way to manage credentials.
For the sake of simplicity in this tutorial, however, we will define the AP credentials directly in the code as simple defines.
First, you need to define all the necessary values for initialization, including:
- SSID (Wi-Fi network name)
- Password
- Wi-Fi Channel
- Maximum number of connections
This is done using the #define statements:
#define ESP_WIFI_SSID "esp_tutorial"
#define ESP_WIFI_PASS "test_esp"
#define ESP_WIFI_CHANNEL 1
#define MAX_STA_CONN 2
Initialize the IP stack#
To initialize the IP stack, we just need to call the two functions
esp_netif_init();
esp_netif_create_default_wifi_ap();
Initialize the event loop#
Espressif’s Wi-Fi component relies on an event loop to handle asynchronous events. Therefore, we need to:
- Start the default event loop.
- Create and register an event handler function to process Wi-Fi events.
For now, this function will simply print the event_id.
To keep things clean, we will create a function called wifi_init_softap where we will encapsulate all the steps listed above required to start the soft-AP.
void wifi_init_softap()
{
    esp_netif_init();
    esp_event_loop_create_default();
    esp_netif_create_default_wifi_ap();

    wifi_init_config_t cfg = WIFI_INIT_CONFIG_DEFAULT(); // always start with this

    esp_wifi_init(&cfg);

    esp_event_handler_instance_register(WIFI_EVENT,
                                                        ESP_EVENT_ANY_ID,
                                                        &wifi_event_handler,
                                                        NULL,
                                                        NULL);

    wifi_config_t wifi_config = {
        .ap = {
            .ssid = ESP_WIFI_SSID,
            .ssid_len = strlen(ESP_WIFI_SSID),
            .channel = ESP_WIFI_CHANNEL,
            .password = ESP_WIFI_PASS,
            .max_connection = MAX_STA_CONN,
            .authmode = WIFI_AUTH_WPA2_PSK,
            .pmf_cfg = {
                .required = true,
            },
        },
    };


    esp_wifi_set_mode(WIFI_MODE_AP);
    esp_wifi_set_config(WIFI_IF_AP, &wifi_config);
    esp_wifi_start();

    ESP_LOGI(TAG, "wifi_init_softap finished. SSID:%s password:%s channel:%d",
             ESP_WIFI_SSID, ESP_WIFI_PASS, ESP_WIFI_CHANNEL);
}
ESP_LOGI is a logging command which prints an information message on the terminal. If you’re unsure about it, check the logging library documentation.
Handle Wi-Fi Events#
At this point, the function handling Wi-Fi events is as follows:
static void wifi_event_handler(void* arg, esp_event_base_t event_base,
                                  int32_t event_id, void* event_data){
    printf("Event nr: %ld!\n", event_id);
}
Now compile, flash, start a monitor and run the project. We should start seeing several event numbers appearing on the terminal.
Testing the Connection with a Smartphone#
At this point, take your smartphone, open the Wi-Fi list, and select the SSID esp_tutorial. When we do so, we should see on the terminal Event nr: 14!.
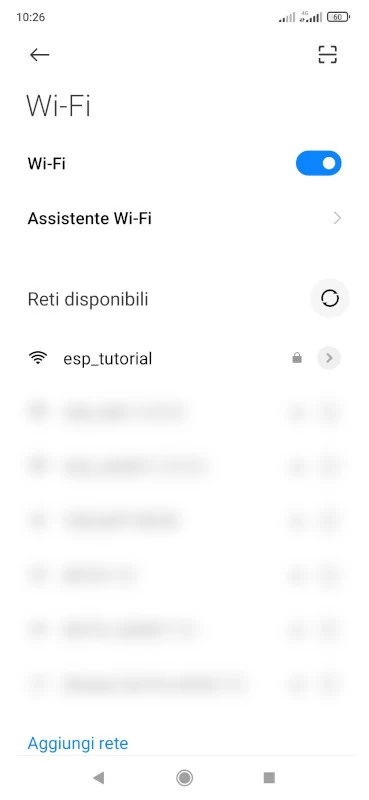
Listing of APs
If we check on the esp-idf source code related to the event codes (here), we will find that 14 corresponds to WIFI_EVENT_AP_STACONNECTED.
This indicates that a station (STA) has connected to the soft-AP.
We can use the event_id to distinguish between different events and then process the additional data you available in event_data.
This allows us to handle specific Wi-Fi events appropriately, such as when a station connects or disconnects from the soft-AP.
event_data is a void pointer, you need to cast it to the proper structure if you want to extract data. Here you can find two examples.You can find the complete code at the link soft-ap tutorial code.
Conclusion#
In this tutorial, you learned how to:
- Create a new project based on the
hello_worldexample. - Initialize the
esp_netiflibrary. - Start the standard event loop to handle Wi-Fi events.
- Configure and launch a soft-AP, allowing devices to connect via Wi-Fi.
- Verify event handling by monitoring the terminal for connection events.
This serves as a foundation for building more advanced Wi-Fi applications, such as MQTT clients, HTTP servers, or other networked solutions.
Next step#
Next Step: Check the basic http tutorial