

Introduction#
This article is Part 2 of our soft-AP tutorial. If you’re unfamiliar with what a soft-AP is or how to set one up, we recommend starting with the Part 1.
In this part, the main source file will be called basic_http_server.c. If you’re starting here, you can use the same main filename, while if you’re coming from Part 1, there is no need to change it. Just keep in mind that when you read basic_http_server.c we’re talking about your basic_soft_ap.c.
You can find the complete code in the tutorial-http-server folder in this GitHub repository.
In this tutorial, we’ll walk through the following steps:
- Set up a basic HTTP server
- Create a URI route that serves an HTML page
- View the HTML page in a web browser
Quick Start (If You Missed Part 1)#
If you’re in a hurry, you can do the following steps before starting:
- Create a new basic project (e.g.,
hello_worldorblink). - Replace the main file with the version provided in this GitHub repo.
- Disable NVS, as explained in this section of the previous article.
Alternatively, you can simply clone the repository and navigate to the tutorial_soft_ap folder.
HTTP server setup#
The HTTP server library provided by ESP-IDF is called esp_http_server. To use it, you’ll need to:
- Include the library - Make sure it’s added in both your
CMakeLists.txtfile and in yourbasic_http_server.csource file. - Configure and start the server - Initialize the server with default settings and start it so it can handle incoming HTTP requests.
Let’s go through these steps in detail.
Include the library#
The HTTP server functionality in ESP-IDF is provided by the esp_http_server library. To use it in your project, you’ll need to ensure that CMake recognizes it as a required component.
For more information, check out the official API reference.
Include the HTTP server header in your
basic_http_server.cfile:#include "esp_http_server.h"Add
esp_http_serverto yourCMakeLists.txtunder thePRIV_REQUIRESlist. This tells the build system to include the necessary components.
Your CMakeLists.txt should look like this:
idf_component_register(SRCS "basic_http_server.c"
                       PRIV_REQUIRES esp_wifi esp_http_server
                       INCLUDE_DIRS ".")
With this setup, your project is ready to use the HTTP server API.
Configure the HTTP Server#
To set up and manage the HTTP server in ESP-IDF, you’ll need two key components:
httpd_handle_t: A handle that represents the server instancehttpd_config_t: A configuration structure that defines how the server behaves
To keep things organized, we’ll encapsulate the server setup in a dedicated function:
httpd_handle_t start_webserver()
This function initializes and starts the server, then returns the server handle. You’ll call it from main() to keep your code modular and easy to maintain.
Minimal Implementation#
Here’s a basic version of the start_webserver() function:
httpd_handle_t start_webserver() {
    httpd_config_t config = HTTPD_DEFAULT_CONFIG();
    httpd_handle_t server = NULL;
    httpd_start(&server, &config);
    return server;
}
After calling httpd_start(), the server handle is initialized and can be used to manage the server, e.g. registering URI handlers or shutting it down.
The httpd_config_t structure holds various server parameters. To simplify configuration, ESP-IDF provides the HTTPD_DEFAULT_CONFIG() macro, which populates the structure with default values. If you’re curious about the specific defaults, you can take a look at the macro definition on GitHub.
In your main() function, you can start the server like this:
httpd_handle_t server = start_webserver();
Returning the server handle allows you to perform additional operations, like stopping the server or adding URI routes, as we’ll explore in the next sections.
Error Handling#
The httpd_start() function returns an esp_err_t result, which you can use to check if the server started successfully. If it fails, you can log the error or take appropriate action (like halting the app).
Here’s the updated version of start_webserver() with basic error handling:
httpd_handle_t start_webserver() {
    httpd_handle_t server = NULL;
    httpd_config_t config = HTTPD_DEFAULT_CONFIG();

    if (httpd_start(&server, &config) == ESP_OK) {
        ESP_LOGI(TAG, "Server started successfully, registering URI handlers...");
        return server;
    }

    ESP_LOGE(TAG, "Failed to start server");
    return NULL;
}
This makes your server setup more robust and easier to debug. If you’re unsure about ESP_LOGI and ESP_LOGE macros, you can check Espressif’s loggin library documentation.
HTTP URI Management#
We’ve started the HTTP server, but we haven’t defined any URI routes yet. In this section, we’ll walk through how to handle requests by setting up a basic route.
We will take the following steps:
- Connect to the server and observe the default response
- Implement and register a URI handler
- Check the result in a browser
Connect to the Server#
Before we can serve any content, let’s connect to the soft-AP and try accessing the HTTP server from a browser.
Connect to the Soft-AP#
This step is covered in detail in the previous article, where you’ll find instructions on how to connect your smartphone or laptop to the Soft-AP network created by your Espressif device.
Find the IP Address of the Soft-AP#
Every device connected to the Soft-AP receives an IP address, including the access point itself. In a typical setup, this IP behaves like the “router” address.
For Espressif devices, the default IP address of the Soft-AP is usually 192.168.4.1.
You can verify this in the terminal output. Look for a log line like this:
I (766) esp_netif_lwip: DHCP server started on interface WIFI_AP_DEF with IP: 192.168.4.1
This confirms that the DHCP server is running and the Soft-AP is accessible at 192.168.4.1.
Visit the Address in a Browser#
Now, open a web browser on your connected device and enter the IP address (e.g., http://192.168.4.1) in the address bar, as shown in Fig.1:
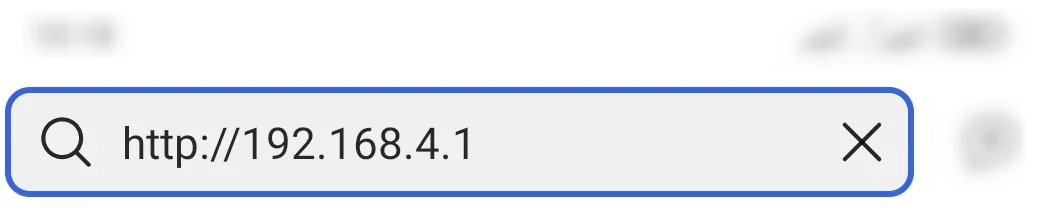
Fig. 1 – Entering the IP address in the browser
When no specific route is entered and you just typed the IP address, you’re implicitly requesting the / route.
At this stage, since no URI handlers have been registered, you’ll see an error message in your browser like:
Nothing matches the given URI
And in the terminal, the following warning will appear:
W (20566) httpd_uri: httpd_uri: URI '/' not found
W (20566) httpd_txrx: httpd_resp_send_err: 404 Not Found - Nothing matches the given URI
This means the server is running, but it doesn’t yet know how to respond to requests for / or any other route.
In the next step, we’ll fix that by registering a URI handler for /, so we can serve actual content.
Implement and register the URI handler#
To demonstrate how to implement a URI handler, we’ll return an HTML page when the user visits the / route. An overview of the required components is shown in Fig. 2.
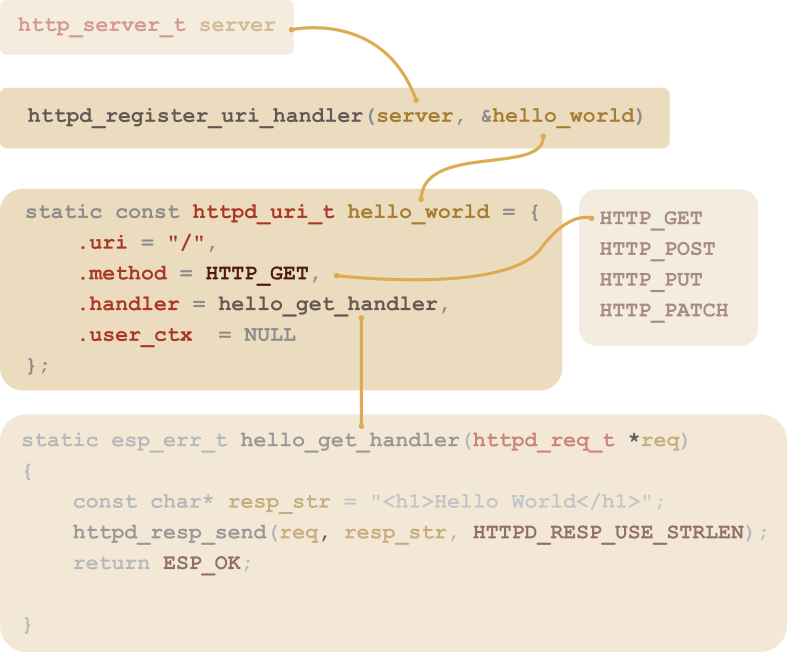
Fig.2 - URI registration and management overview
To register a route, we use the function:
esp_err_t httpd_register_uri_handler(httpd_handle_t server,
                                     const httpd_uri_t *hello_world_uri);
This function requires the server handle (in our case the variable server) and a pointer to an httpd_uri_t structure.
The httpd_uri_t structure defines the properties of the URI being registered.
For our example, the structure is defined as follows:
static const httpd_uri_t hello_world_uri= {
    .uri       = "/",               // the address at which the resource can be found
    .method    = HTTP_GET,          // The HTTP method (HTTP_GET, HTTP_POST, ...)
    .handler   = hello_get_handler, // The function which process the request
    .user_ctx  = NULL               // Additional user data for context
};
The last piece we need is the request handler function, which must follow this signature:
static esp_err_t processing_function (httpd_req_t)
In our simple example, the function looks like this.
static esp_err_t hello_get_handler(httpd_req_t *req)
{
    const char* resp_str = "<h1>Hello World</h1>";
    httpd_resp_send(req, resp_str, HTTPD_RESP_USE_STRLEN);
    return ESP_OK;

}
Note the embedded HTML in the response string.
We use httpd_resp_send to send the response. This function takes the request object and the response string.
Your code should now resemble this one.
View the web page in the browser#
Open the web browser again on your connected device and enter the IP address in the address bar. As shown in Fig.3, you should now get the HTML page that we sent in the hello_get_handler function.

Fig. 3 – HTML page displayed
You can now change the HTML and add additional routes.
Conclusion#
You’ve now set up a basic HTTP server on your Espressif device in soft-AP mode. We covered how to include the esp_http_server library, start the server, connect to it, and register a simple URI handler to return an HTML response.
This forms a solid foundation for building more interactive web-based interfaces on your device. You can now easily expand by adding more routes, returning different data formats, or handling user input.
Check out the full example on GitHub, and keep experimenting!