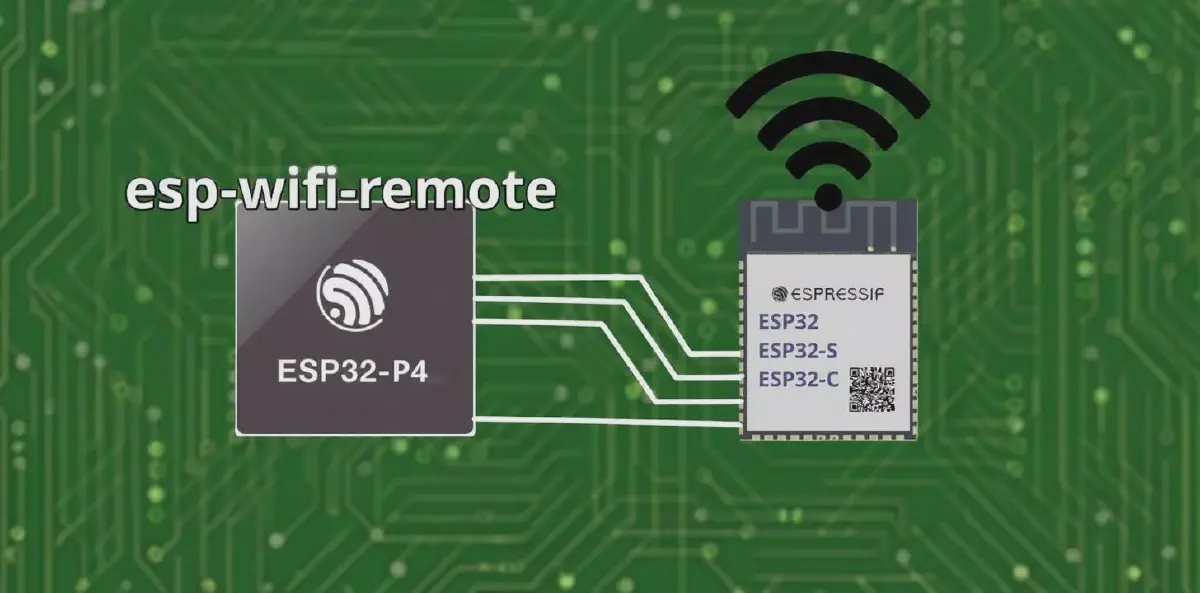

The ESP-IDF esp_wifi API powers Wi-Fi connectivity across ESP32 chips. However, the new chip series, such as ESP32-P4 or ESP32-H2 lack native Wi-Fi hardware. The esp-wifi-remote component enables the use of standard Wi-Fi APIs on ESP32 chips that natively don’t have Wi-Fi functionality. By connecting an external device that provides Wi-Fi connectivity, you can use the esp_wifi APIs like on any Wi-Fi-enabled ESP32 chip. This compatibility lets you leverage existing knowledge and codebase with minimal changes.
Also, esp-wifi-remote can be used with Wi-Fi-enabled ESP32 chips to create an additional Wi-Fi interface.
Terminology#
Before diving into the details, let’s establish the key terminology used throughout this post:
- Backend Solution: The communication layer that handles the transport of Wi-Fi commands, events, and data between host and slave devices. Examples include esp-hosted, eppp, and AT-based implementations.
- Host-side: The device running your application code (e.g., ESP32-P4, ESP32-H2, or ESP32 with Wi-Fi).
- Slave-side: The Wi-Fi-capable device that provides the actual Wi-Fi hardware and functionality.
Understanding the Wi-Fi Experience#
Let’s examine the traditional Wi-Fi experience, then see how esp-wifi-remote enables the same experience with external Wi-Fi hardware:
Traditional Wi-Fi scenario#
- Users call
esp_wifi_...()API to control the local Wi-Fi
esp-wifi-remote with non Wi-Fi Chips#
- Users call
esp_wifi_...()API to control the remote Wi-Fi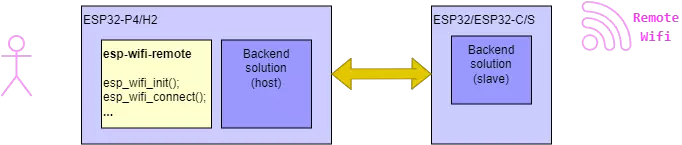
esp-wifi-remote with Wi-Fi-capable Chips#
- Users call
esp_wifi_...()API to control the local Wi-Fi - Users call
esp_wifi_remote_...()API to control the remote Wi-Fi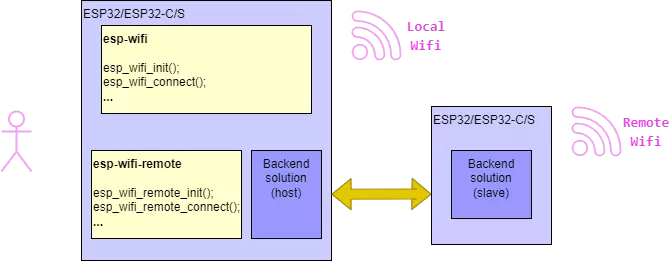
This dual Wi-Fi scenario is useful for applications that need multiple wireless connections. It is also useful for initial exploring of esp-wifi-remote functionality with just two “common” ESP32 chips. For basic setup, you only need two evaluation boards.
Wi-Fi Remote component breakdown#
esp_wifi_remote is a thin layer that translates esp_wifi API calls into the appropriate implementation. Key aspects:
- API
- Remote Wi-Fi calls: Set of esp_wifi API namespaced with
esp_wifi_remoteprefix - Standard Wi-Fi calls: esp_wifi API directly translates to esp_wifi_remote API for targets with no Wi-Fi.
- Remote Wi-Fi calls: Set of esp_wifi API namespaced with
- Configuration:
- Standard Wi-Fi library Kconfig options
- Selection of the backend solution
Wi-Fi configuration#
You can configure remote Wi-Fi the same way as local Wi-Fi. Kconfig options are structured identically but located under ESP Wi-Fi Remote component.
Local vs. Remote Wi-Fi configuration#
Kconfig option names are the same, but identifiers are prefixed differently to differentiate between local and remote Wi-Fi.
💡 Adapt options from sdkconfig If you’re migrating your project from a Wi-Fi enabled device and used specific configuration options, please make sure the remote config options are prefixed with
WIFI_RMT_instead ofESP_WIFI_, for example:
CONFIG_ESP_WIFI_TX_BA_WIN -> CONFIG_WIFI_RMT_TX_BA_WIN
CONFIG_ESP_WIFI_AMPDU_RX_ENABLED -> CONFIG_WIFI_RMT_AMPDU_RX_ENABLED
...
⚠️ All Wi-Fi remote configuration options are available, but some of them are not directly related to the host side configuration and since these are compile time options, wifi-remote cannot automatically reconfigure the slave side in runtime. It is important to configure the options on the slave side manually and rebuild the slave application. Make sure that the host side configuration corresponds to the slave side, e.g.
CONFIG_WIFI_RMT_TX_BA_WINon the host side is equal to theCONFIG_ESP_WIFI_TX_BA_WINon the slave side.
The backend solutions could perform a consistency check but cannot reconfigure the slave project.
Choosing the backend solution#
The default and recommended option as your backend solution for most use-cases is esp_hosted, providing the best performance, integration, maturity, and support.
You can also switch to eppp or at based implementation or implement your own backend solution.
Here are the reasons you might prefer some other implementation than esp_hosted:
- Your application is not aiming for the best network throughput.
- Your slave (or host) device is not an ESP32 target and you want to use some standard protocol:
- choose
eppp: it uses PPPoS protocol and works seamlessly withpppdon linux. - choose
at: it uses standard AT commands and integrates nicely withesp-atas a slave device.
- choose
- You prefer encrypted communication between host and slave devices, especially when passing Wi-Fi credentials.
- You might need some customization on the slave side.
To choose the backend solution, go to the Wi-Fi Remote component configuration menu and select the preferred one by:
$ idf.py menuconfig

> (Top) → Component config → Wi-Fi Remote → Choose WiFi-remote implementation
> (X) ESP-HOSTED
> ( ) EPPP
> ( ) CUSTOM
Select ESP-HOSTED or EPPP for the respective backend, or CUSTOM for a custom implementation, including at based backend.
To use at backend, you need to manually add wifi_remote_over_at to your project dependency list by:
idf.py add-dependency "espressif/wifi_remote_over_at"
Comparison of backend solution components#
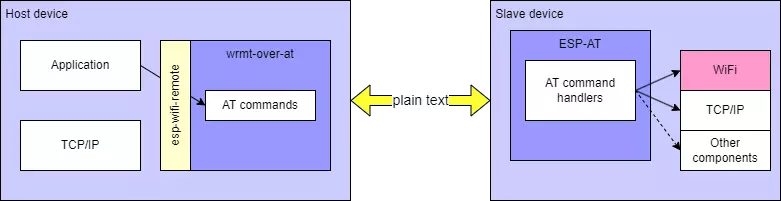
This section compares backend solutions, focusing on how different methods marshall (i.e., encode and transmit) Wi-Fi commands, events, and data to the slave device.
Principle of operation
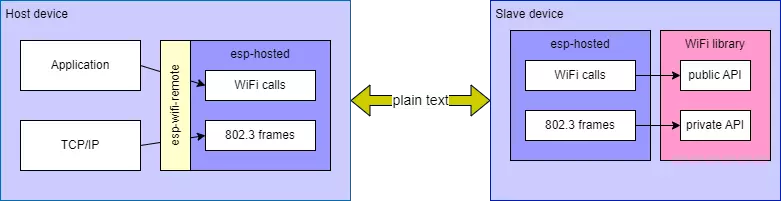
esp-hosted uses a plain text channel to send and receive Wi-Fi API calls and events. It uses other plain text channels for data packets (Wi-Fi station, soft-AP, BT/BLE). The TCP/IP stack runs only on the host side and esp-hosted passes Ethernet frames (802.3) from host to slave, where they are queued directly to the Wi-Fi library.
wifi_remote_over_eppp creates a point to point link between host and slave device, so each side have their IP addresses. Wi-Fi API calls and events are transmitted using SSL/TLS connection with mutual authentication. The data path uses plain text peer to peer connection by means of IP packets. Both host and slave devices run TCP/IP stack. The slave device runs network address translation (NAT) to route the host IP packets to the Wi-Fi network – this is a limitation, since the host device is behind NAT, so invisible from the outside and the translation has a performance impact (to overcome this, you can enable Ethernet frames via custom channels, so the data are transmitted the same way as for esp-hosted method, using 802.3 frames).
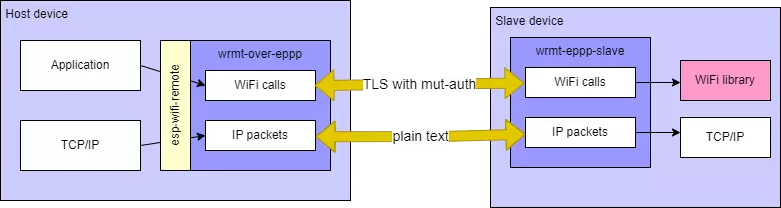
wifi_remote_over_at uses esp-at project as the slave device, so the host side only runs standard AT commands. It’s implemented internally with esp_modem component that handles basic Wi-Fi functionality. Note that not all configuration options provided by esp-wifi-remote are supported via AT commands, so this method is largely limited.
Performance
The best throughput is achieved with esp_hosted implementation.
| Backend Solution | Maximum TCP throughput | More details |
|---|---|---|
| esp_hosted_mcu | up to 50Mbps | esp-hosted |
| wifi_remote_over_eppp | up to 20Mbps | eppp-link |
| wifi_remote_over_at | up to 2Mbps | esp-at |
Wi-Fi Remote internals#
The esp-wifi component interface depends on Wi-Fi hardware capabilities. esp-wifi-remote follows these dependencies based on the slave Wi-Fi hardware. Some wireless and system capability flags are replaced internally with SOC_SLAVE prefix. Host-side config options are prefixed with WIFI_RMT for use in esp-wifi-remote headers. See Wi-Fi remote documentation for details.
📝 These options and flags are only related to the host side, as
esp-wifi-remoteis a host side layer. For slave side options, please refer to the actual backend solution implementation.
Other connectivity options#
This blog post focuses on Wi-Fi connectivity solutions, specifically esp-wifi-remote only. We are not going to cover other wireless connectivity options like esp-extconn or custom implementations, nor do we cover Bluetooth or BLE. Below is a brief overview with references and links for those interested in exploring these alternatives.
esp-extconn#
This solution doesn’t fall into esp-wifi-remote category and needs a special target for the slave side (ESP8689), but provides the best throughput (up to 80Mbps). See esp-extconn repository
Custom connectivity other options#
You can also implement your own Wi-Fi connectivity using these components:
| component | Repository | Brief description |
|---|---|---|
| esp-modem | esp-protocols | AT command and PPP client |
| esp-at | esp-at | serving AT commands on ESP32 |
| eppp-link | esp-protocols | PPP/TUN connectivity engine |
Summary#
esp-wifi-remote bridges the gap between Wi-Fi-enabled and non-Wi-Fi ESP32 chipsets, providing a seamless development experience that maintains API compatibility while extending Wi-Fi functionality to previously Wi-Fi-less devices.
The below tips emerge from this exploration:
1. Use esp-hosted as your backend solution – Provides optimal performance, mature integration, and comprehensive support.
2. Consider alternative backends for specific scenarios:
- If sending Wi-Fi commands between host and slave unencrypted is not acceptable: Check out
wifi_remote_over_epppbackend or esp-extconn. - If you need to use some standard communication protocol (e.g. using non-ESP slave): Check out
wifi_remote_over_epppfor PPPoS protocol, orwifi_remote_over_atfor AT commands.
3. Mind the Wi-Fi slave configuration – esp-wifi-remote operates as a compile-time configuration system. Developers must manually configure slave-side Wi-Fi options and rebuild the slave application. When migrating from Wi-Fi-enabled devices, configuration options must be prefixed with WIFI_RMT_ instead of ESP_WIFI_.
4. Bootstrap your experience with Wi-Fi chips – To get started without the actual ESP32-P4, just connect your two common ESP chips with three wires and run the two station example (using dual Wi-Fi interfaces).