
Why MCP?#
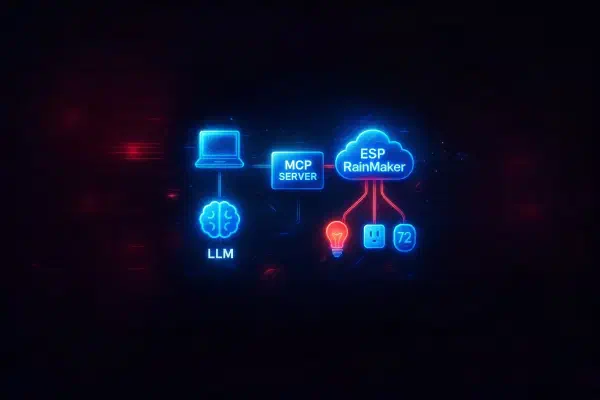
Model Context Protocol (MCP) is a standard that lets AI agents connect to external data sources, tools, and workflows. Instead of guessing from training data or search results, AI agents act on real, up-to-date context.
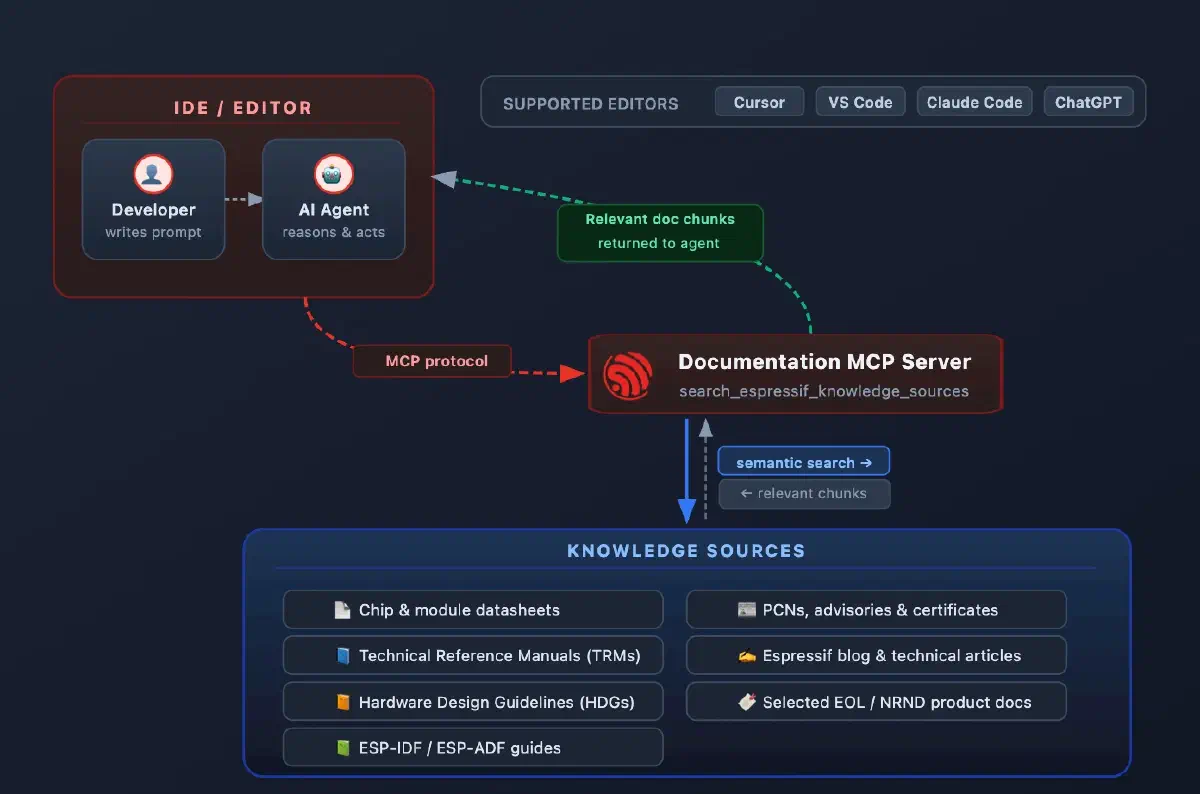
The Espressif Documentation MCP server implements this standard for Espressif’s documentation. Once installed in Cursor, VS Code, Claude Code, or other AI applications, the MCP server gives your AI agent direct access to official Espressif documentation. In practice, this means you can:
- Stay in your AI applications — query the full Espressif documentation corpus through your AI agents without switching to a browser or a PDF viewer
- Work faster and more accurately — get implementation guidance, code examples, and bugfix suggestions grounded in official documentation, rather than relying on web search results or agent training data
- Reduce hallucinations — agent outputs are based on real, current Espressif documentation rather than fabricated or obsolete content
MCP Server Capabilities#
The Espressif Documentation MCP server provides the following tools to AI agents:
| Tool | Description |
|---|---|
search_espressif_sources (query, language) | Performs semantic retrieval against the latest Espressif documentation in English and Chinese. It returns the most relevant text fragments with source URLs, providing official reference for your AI assistants. |
The MCP server shares the same knowledge sources as the Espressif Documentation chatbot, including:
- Chip and module datasheets
- Technical Reference Manuals (TRM)
- Hardware Design Guidelines (HDG)
- SDK documentation, such as the latest version of ESP-IDF Programming Guide
- Product Change Notices (PCN), advisories, and certificates
- Espressif blog posts and technical articles
- Documentation for selected end-of-life (EOL) or not-recommended-for-new-design (NRND) products
- Selected M5Stack documentation
MCP Server vs. Chatbot#
Both the MCP server and the Espressif Documentation chatbot provide access to up-to-date Espressif documentation, but they are designed for different scenarios.
| Use Case | MCP Server | Documentation Chatbot |
|---|---|---|
| Integrated into IDE workflow | ✅ | ❌ |
| Modify project code | ✅ | ❌ |
| Perform structured reasoning over docs | ✅ | ⚠️ Limited |
| Quick documentation Q&A | ⚠️ | ✅ |
| Learning & exploration | ⚠️ | ✅ |
| Non-technical users | ❌ | ✅ |
In short:
- Use the MCP server for integrating documentation into your development workflow.
- Use the chatbot for learning and documentation exploration.
How to Install the MCP Server#
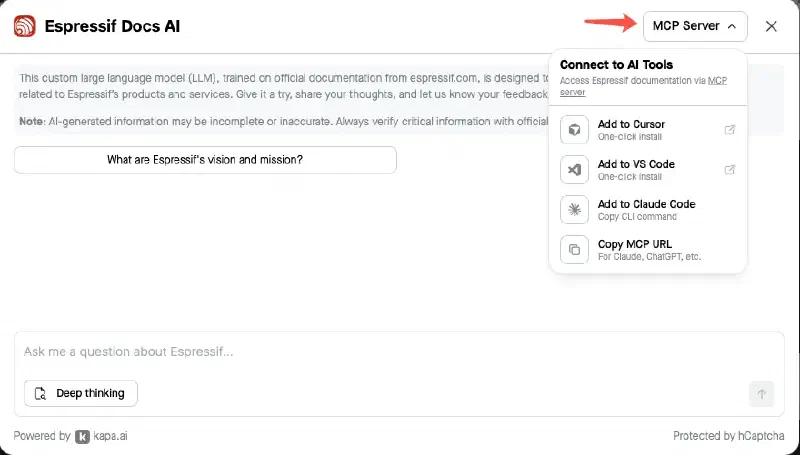
Click “MCP Server” in the upper-right of the widget. Choose where to use the MCP server and follow the corresponding instructions below.
- Open Cursor on your PC.
- In the Espressif Documentation chatbot widget under “MCP Server”, click “Add to Cursor”. You may need to allow the website to open Cursor.
If clicking “Add to Cursor” does nothing:
Add the following to your ~/.cursor/mcp.json file:
{
  "mcpServers": {
    "espressif-docs": {
      "url": "https://mcp.espressif.com/docs"
    }
  }
}
Save the file, restart Cursor, and open the Cursor Settings page. Continue from Step 4.
On Linux, clicking Add to Cursor or editing the ~/.cursor/mcp.json file may have no effect if the system has not registered the cursor:// URL protocol handler.
To verify, run the following command in a terminal:
xdg-open "cursor://test"If nothing happens or an error is shown, the URL handler is not registered. This is a system-level issue and must be fixed before the MCP server can be added via browser.
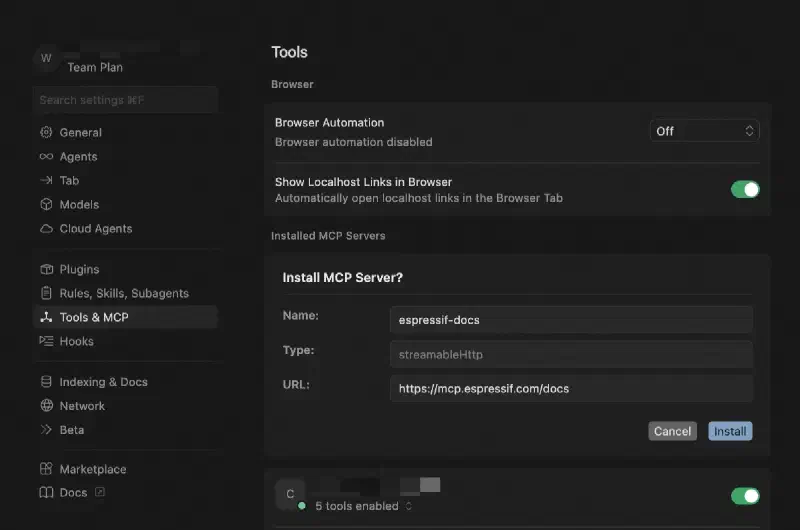
In the Cursor Settings page that opens, click “Install” under “Install MCP Server?”
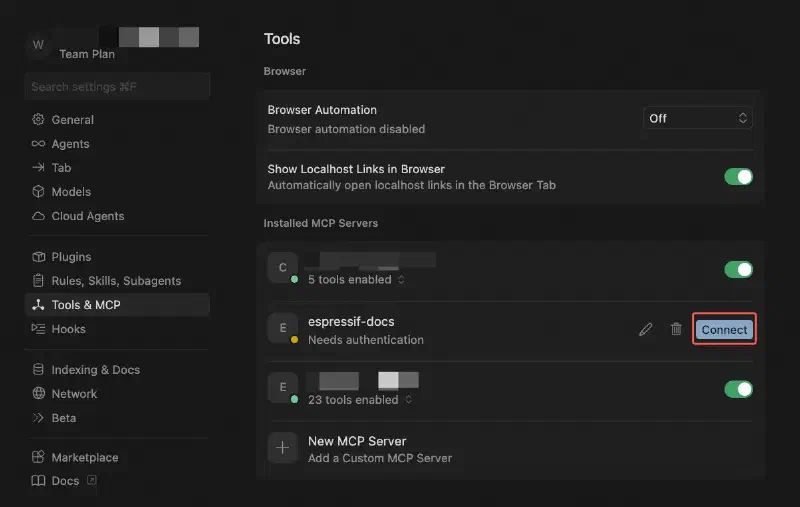
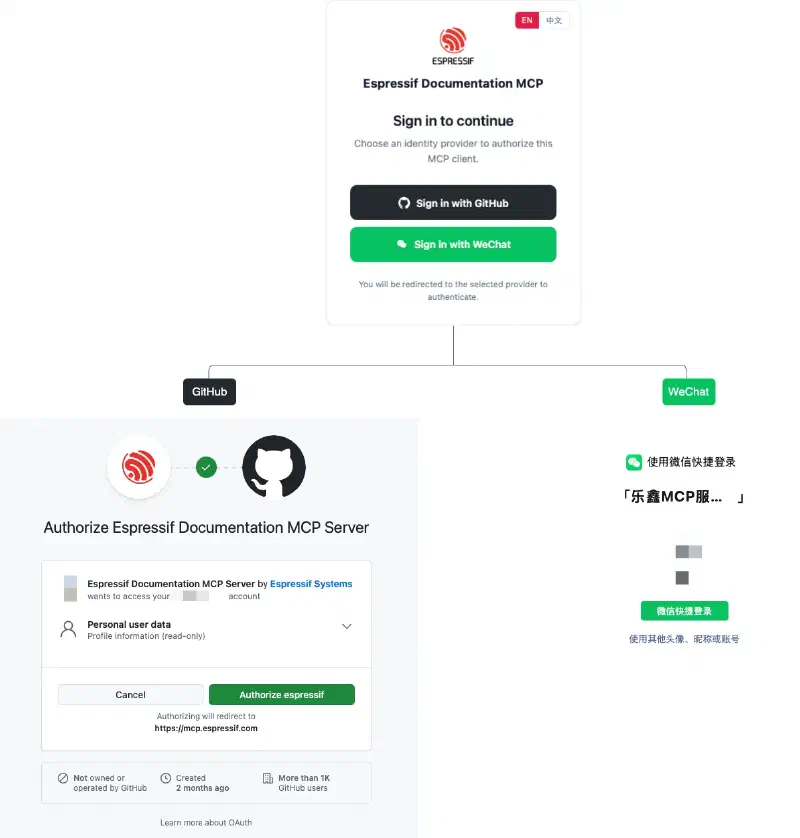
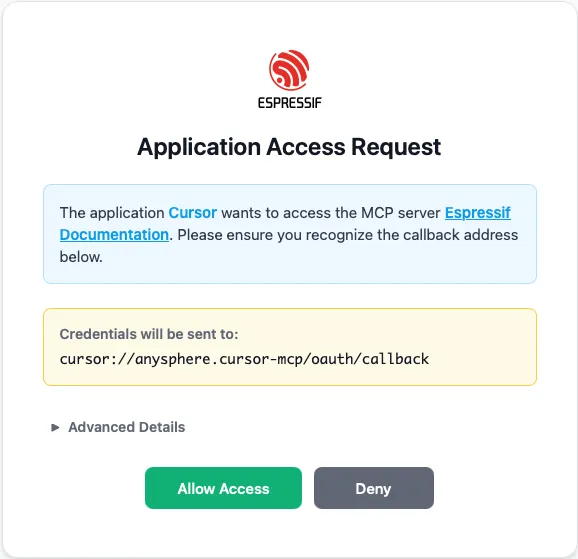
After the MCP server is installed, click “Connect” to authenticate. Allow Cursor to open the external website, and sign in with GitHub or WeChat to authenticate with the MCP server.
- Open VS Code on your PC.
- In the Espressif Documentation chatbot widget, under “MCP Server”, click “Add to VS Code”. You may need to allow the website to open VS Code.
If clicking “Add to VS Code” does nothing:
Add the following to your ~/.vscode/mcp.json file:
{
  "servers": {
    "espressif-docs": {
      "url": "https://mcp.espressif.com/docs"
    }
  }
}
Save the file, click “Start” above the code you just added to start the MCP server, and continue from Step 4.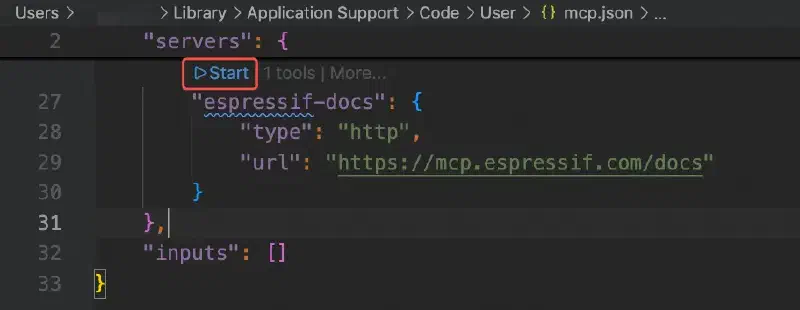
On Linux, clicking Add to VS Code or editing the ~/.vscode/mcp.json file may have no effect if the system has not registered the vscode:// URL protocol handler.
To verify, run the following command in a terminal:
xdg-open "vscode://test"If nothing happens or an error is shown, the URL handler is not registered. This is a system-level issue and must be fixed before the MCP server can be added via browser.
Click “Install” from the MCP installation page.

Allow VS Code to open the external website, and sign in with GitHub or WeChat to authenticate with the MCP server.
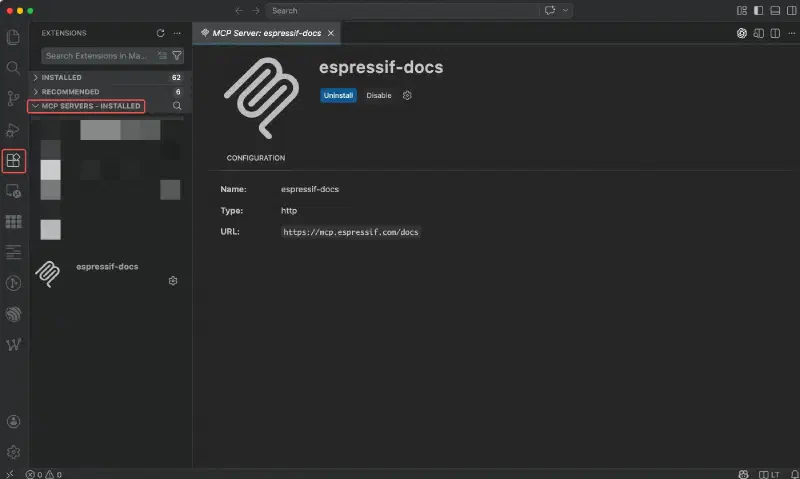
When authentication finishes, the MCP server appears under Extension > MCP SERVERS – INSTALLED.
Under “MCP Server”, click “Add to Claude Code” to copy the CLI command.
Paste and execute the command in your terminal.
Upon success, you will see the following message printed in the terminal:
Added HTTP MCP server espressif-docs with URL: https://mcp.espressif.com/docs to local config
File modified: /Users/user/.claude.json [project: /Users/user]
Authenticate with the MCP server:
- Start Claude Code in your terminal by running
claude - Type
/mcpto open the MCP management panel - Select the MCP server, and then select
Authenticate - A browser window will open. Sign in with GitHub or WeChat to authenticate with the MCP server.
- Start Claude Code in your terminal by running
Add the following snippet to your Claude Desktop config file to install the Docs MCP server:
- macOS:
~/Library/Application Support/Claude/claude_desktop_config.json - Linux:
~/.config/Claude/claude_desktop_config.json - Windows:
%APPDATA%\Claude\claude_desktop_config.json
{- macOS:
“mcpServers”: { “espressif-docs”: { “command”: “npx”, “args”: [“mcp-remote”, “https://mcp.espressif.com/docs”] } } }
2. Save the file and restart Claude Desktop. An external browser window will open automatically. Sign in with GitHub or WeChat to authenticate with the MCP server.
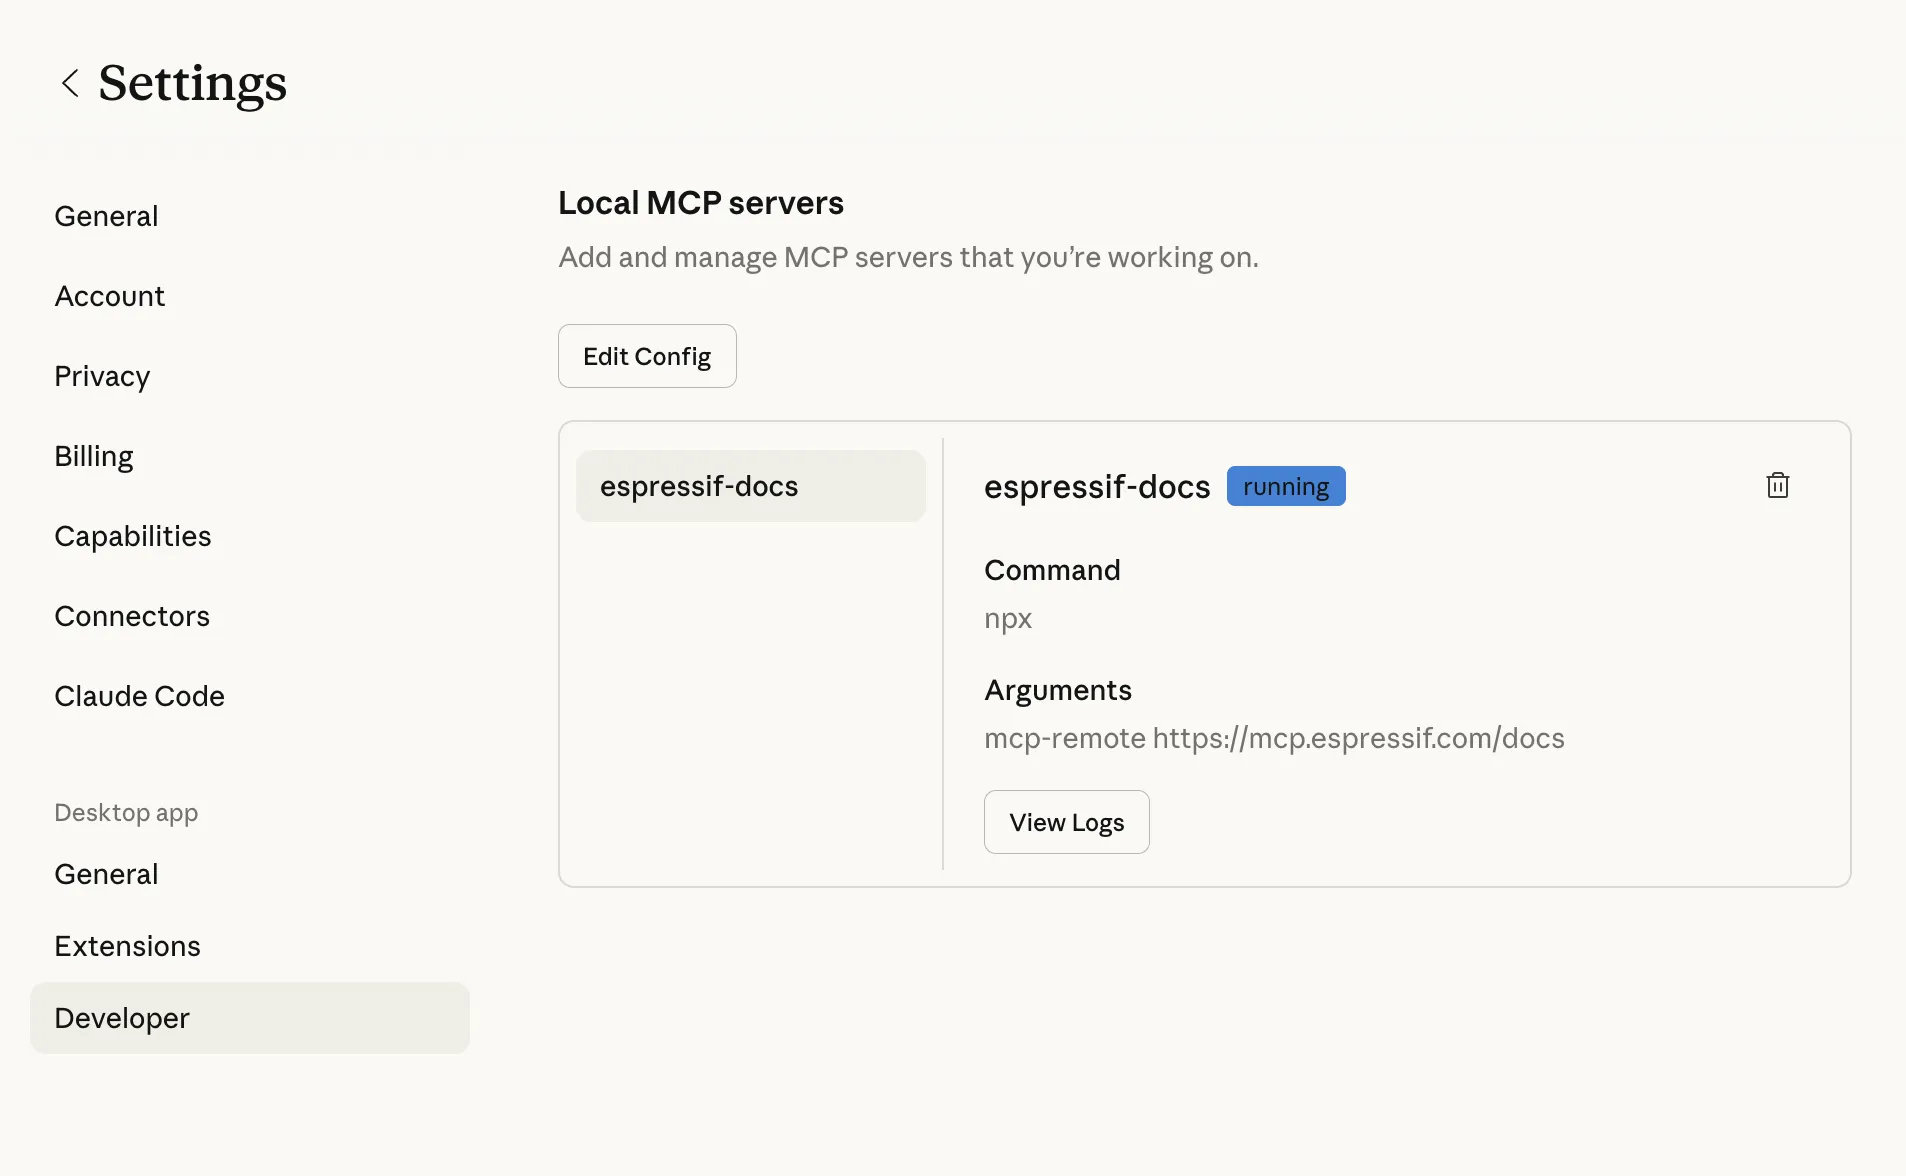
3. After successful authentication, you will see the MCP servers appear in **"Settings > Developer > Local MCP servers"**.
- Add the following snippet to
~/.gemini/antigravity/mcp_config.jsonto install the Docs MCP server in Antigravity:{
“mcpServers”: { “espressif-docs”: { “serverUrl”: “https://mcp.espressif.com/docs" } } }
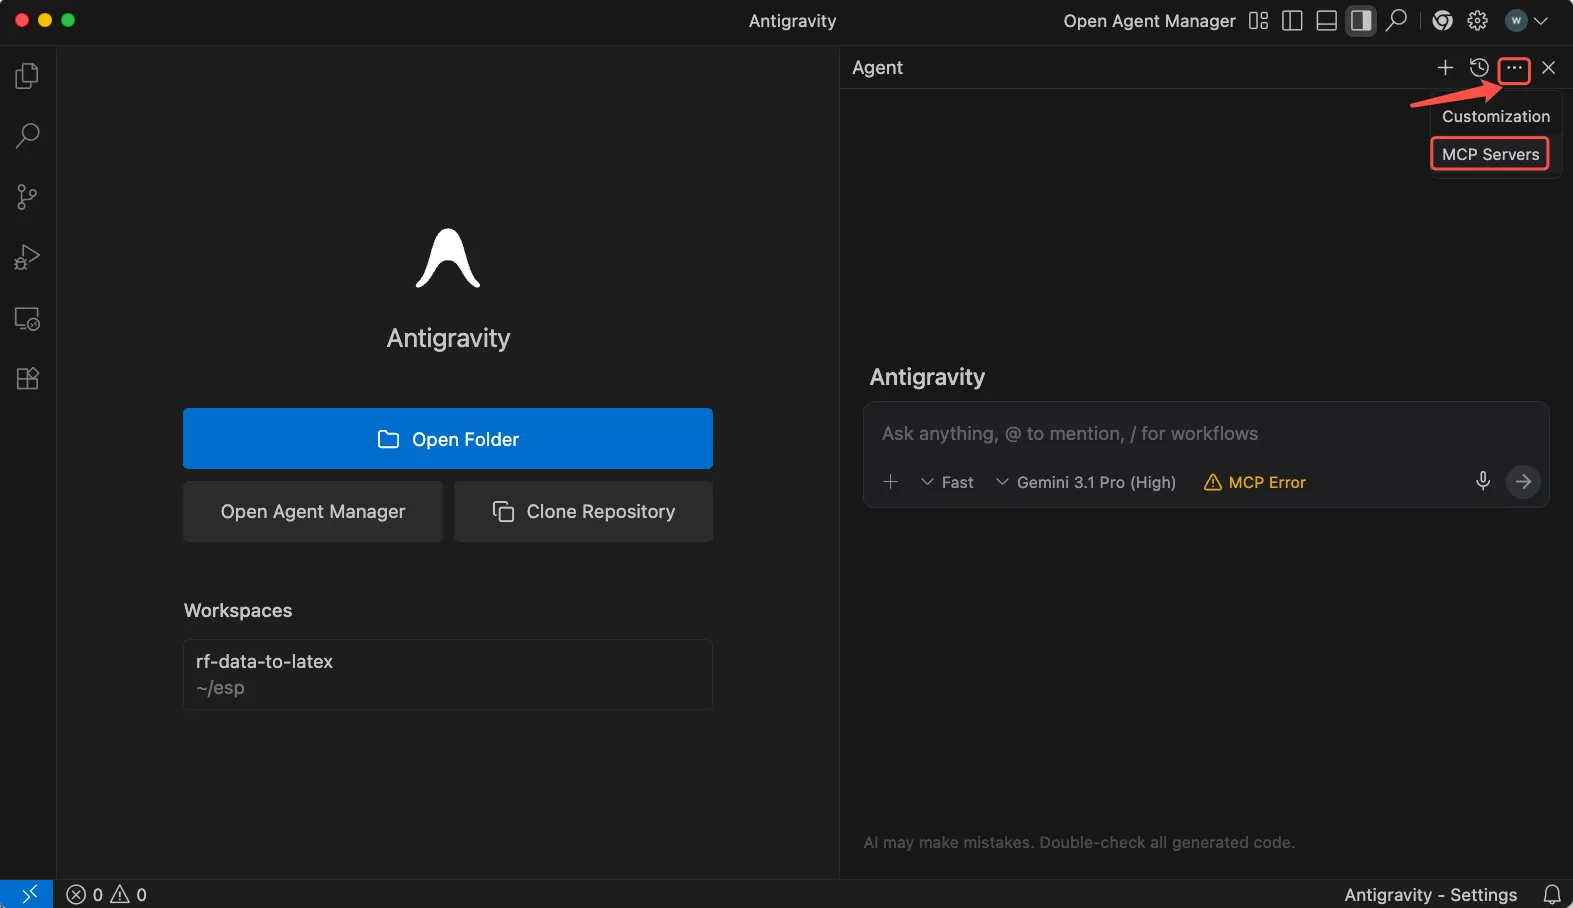
2. Save the file and restart Antigravity. The **"Manage MCP servers"** page should appear automatically.
If it doesn't, at the top of the Antigravity's agent panel, click **"... MCP Servers > Manage MCP Servers"**.
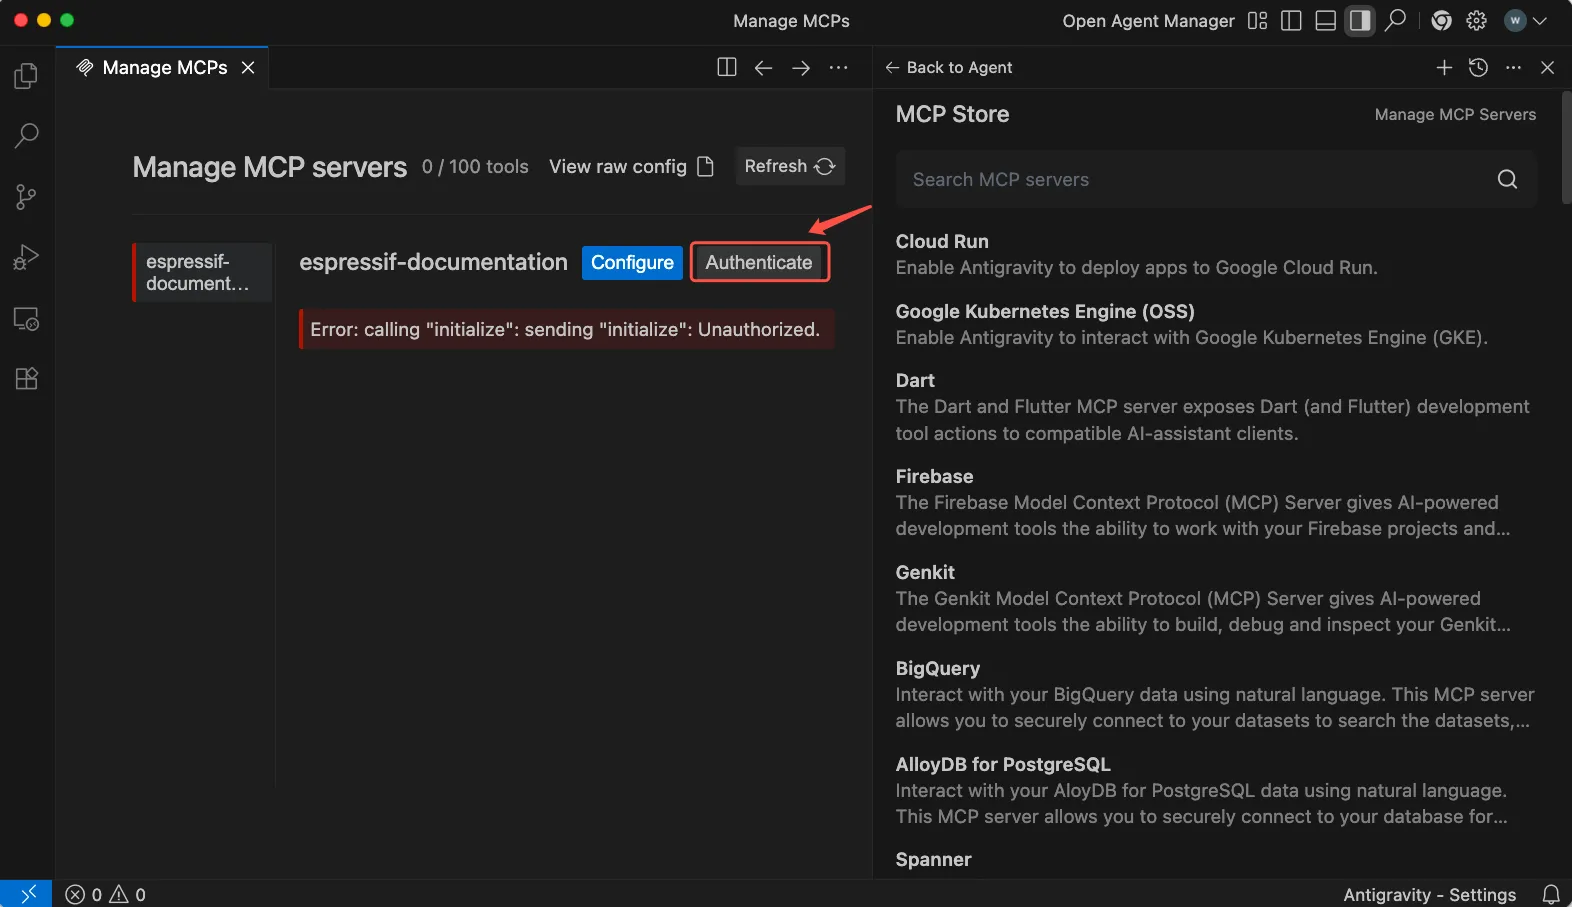
3. On the **"Manage MCP Servers"** page, click **"Authenticate"**. The **"Settings – Customizations"** dialog will open.
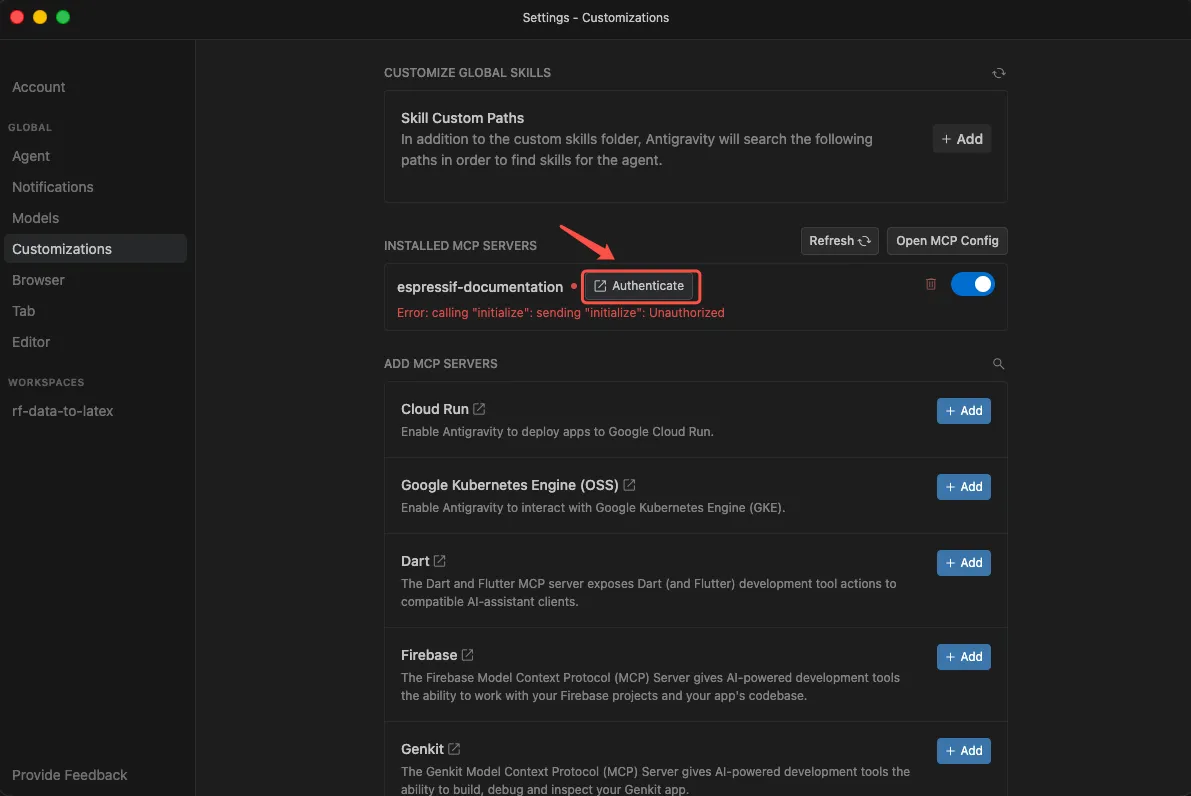
4. Click **"Authenticate"** in **"Settings - Customizations"**. An external browser window will open automatically. Sign in with GitHub or WeChat to authenticate with the MCP server.

5. After granting access, copy the code shown on the **"Google Antigravity Authentication"** page, paste it into **"Settings – Customizations"**, and click **"Submit"**.
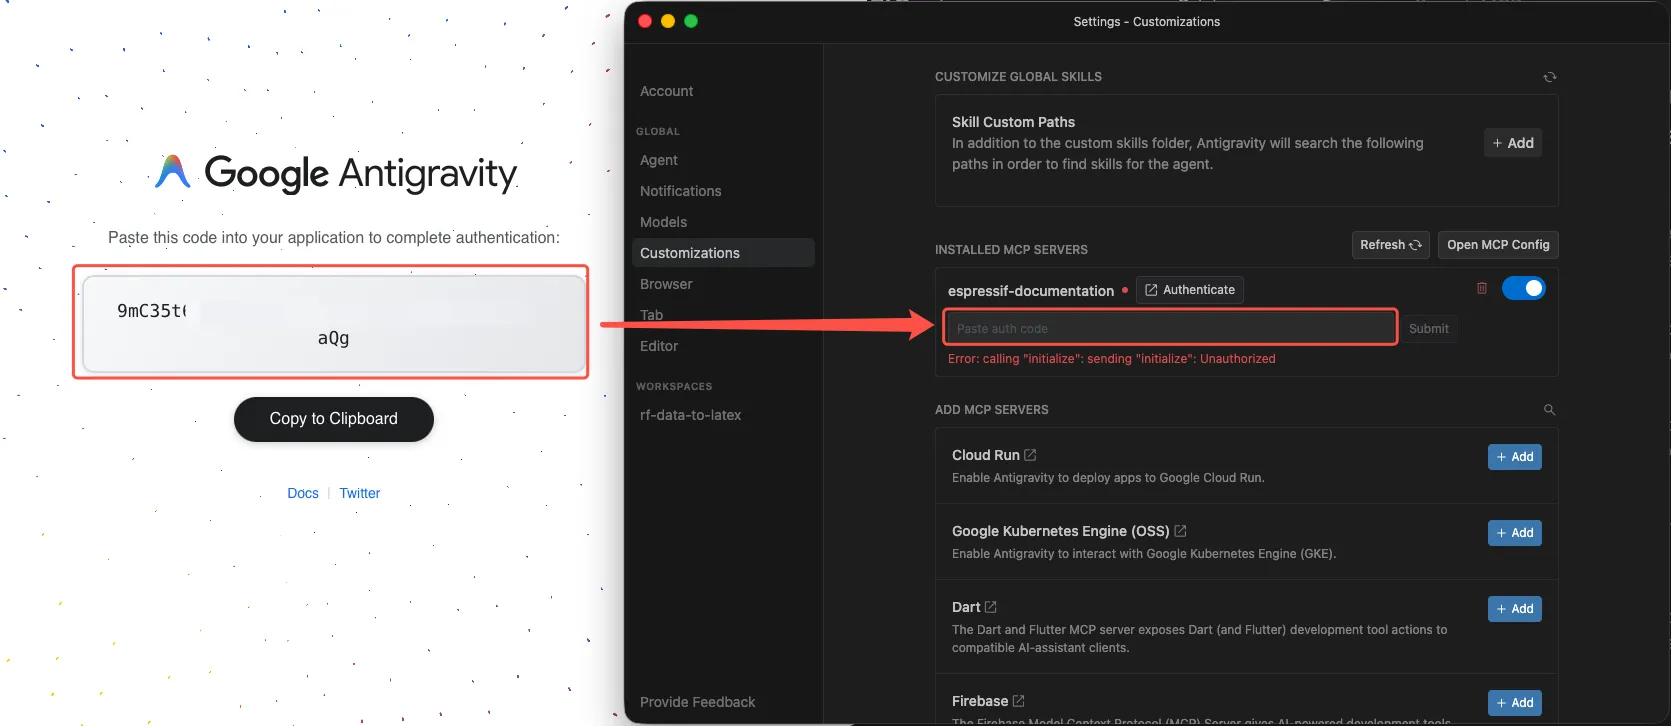
6. After successful authentication, the **"INSTALLED MCP SERVERS"** list in **"Settings - Customizations"** will refresh automatically, showing the server status and enabled tools.- Add the following snippet to
~/.gemini/antigravity-cli/mcp_config.jsonto install the Docs MCP server in Antigravity CLI:{
“mcpServers”: { “espressif-docs”: { “serverUrl”: “https://mcp.espressif.com/docs" } } }
2. Authenticate with the MCP server:
- Start Antigravity CLI in your terminal by running ``agy``
- Navigate to ``/mcp`` → ``espressif-docs`` → ``Authenticate``, and press ``Enter`` at each prompt.
- A browser window will open for you to log in. Sign in with GitHub or WeChat to authenticate with the MCP server.

- Copy the authorization code and paste it into Antigravity CLI in your terminal.
> If you see `Authentication failed: no pending auth state for server espressif-docs`, re-launch ``agy``, type ``/mcp``, and verify if ``espressif-docs`` already shows ``[Authed]``.Add the MCP server to Gemini CLI by executing the command in your terminal:
gemini mcp add --transport http espressif-docs https://mcp.espressif.com/docsAuthenticate with the MCP server:
- Start Gemini CLI in your terminal by running
gemini - Type
/mcp auth espressif-docs, and pressEnter - A browser window will open for you to log in. Sign in with GitHub or WeChat to authenticate with the MCP server.
- Start Gemini CLI in your terminal by running
- Add the MCP server to Codex by executing the command in your terminal:
codex mcp add espressif-docs --url "https://mcp.espressif.com/docs" - An external browser window will open automatically. Sign in with GitHub or WeChat to authenticate with the MCP server.
Add the following snippet to your OpenCode config file to install the Docs MCP server:
- macOS/Linux:
~/.config/opencode/opencode.jsoncor~/.config/opencode/opencode.json - Windows:
%USERPROFILE%\.config\opencode\opencode.jsonc
{ "$schema": "https://opencode.ai/config.json", "mcp": {- macOS/Linux:
“espressif-docs”: { “type”: “remote”, “url”: “https://mcp.espressif.com/docs", “oauth”: {} } } }
2. Save the file, and then run the following command in your terminal:opencode mcp auth espressif-docs
3. An external browser window will open automatically. Sign in with GitHub or WeChat to authenticate with the MCP server.

4. Once finished, you will see the following message printed in terminal.┌ MCP OAuth Authentication │ ◇ Authentication successful! │ └ Done
MCP is an open protocol supported by many AI applications. If yours is not listed in this section, such as Windsurf or Zed, you can also install the MCP server.
- Follow your application’s documentation to install the MCP server via a configuration file or the command line using the server URL
https://mcp.espressif.com/docs. - Authenticate with the MCP server as directed by your application.
Example Prompts#
You can start experimenting with the Documentation MCP server for the following use cases:
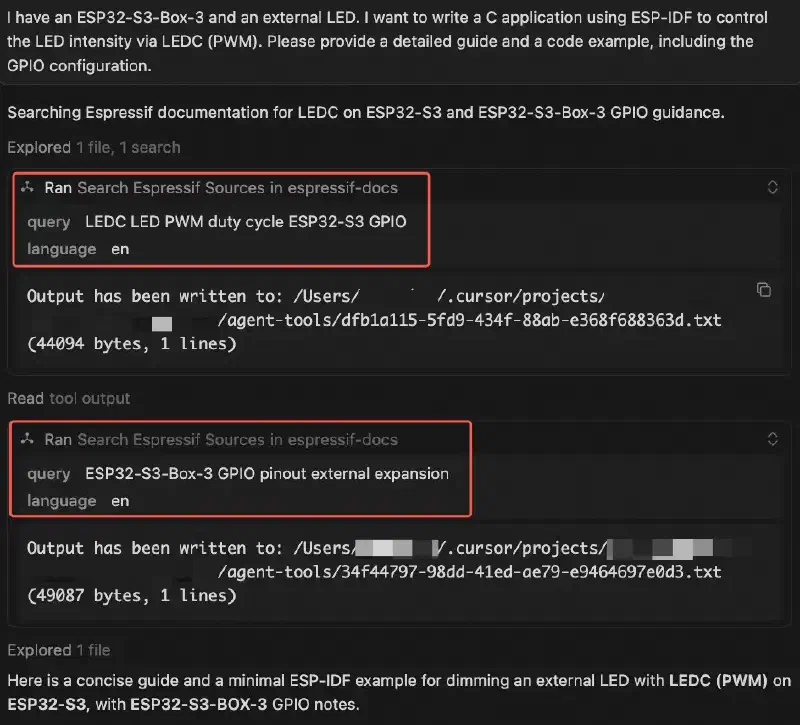
Generate code
I have an ESP32-S3-Box-3 and an external LED. I want to write a C application using ESP-IDF to control the LED intensity via LEDC (PWM). Please provide a detailed guide and a code example, including the GPIO configuration.
Review code
Review the SPI initialization code against the ESP-IDF SPI Master driver documentation. Highlight and correct any wrong API usage, deprecated functions, or missing configuration steps.
Troubleshoot
I’m getting this error: “CMake Error at run_serial_tool.cmake:67 (message): idf.py: error: argument –port: expected one argument”. Look up what causes this in the ESP-IDF documentation and suggest a fix.
Update code following the style guide
Update the code to follow the Espressif IoT Development Framework Style Guide.
Generate files
Based on the ESP-IDF partition table documentation, generate a partition table CSV for a 4 MB flash with a 1 MB factory app partition, a 512 KB OTA_0 partition, a 512 KB OTA_1 partition, and a 16 KB NVS partition.
Update configuration options
Check Espressif documentation for the recommended I2C pins on ESP32-C3, and modify pin configuration options
I2C_MASTER_SCLandI2C_MASTER_SDAaccordingly.
Migrate to a new ESP-IDF version
My project currently targets ESP-IDF v5.1. Using the ESP-IDF v5.2 and v5.3 migration guides, list the breaking API changes that affect UART and I2C drivers, and update the calls in
main/comm.caccordingly.
Best Practices#
Check the tool call indicator to confirm the MCP server is being queried. If you don’t see it, the agent may be answering from training data or searching the web.
Explicitly instruct the agent if it does not consult the MCP server by default. Add
"refer to Espressif documentation"to your prompt, or define this requirement inAGENTS.md:# AGENTS.md Always use the Espressif documentation MCP server if you need to work with ESP chips or ESP SDKs such as ESP-IDF and ESP-ADF, without me having to explicitly ask.
Limitations#
The Espressif Documentation MCP server has the following limitations:
- Retrieval only — the MCP server retrieves documentation and supplies it as context for AI agents. It does not execute code, modify files, or perform actions — those remain the responsibility of the AI agent.
- Public Espressif documentation only — the knowledge sources cover public Espressif documentation only. They do not include code repositories, GitHub issues, community or third-party forums, internal or unpublished documents, or documentation for all EOL and NRND products.
- Rate limits apply — to ensure fair access for all users, the following per-user limits apply:
- 40 requests per user per hour
- 200 requests per user per day
- Not designed for open-ended learning or exploration — if you want to ask questions, browse topics, or get documentation summaries conversationally, use the Espressif Documentation Chatbot instead.
FAQ#
Do I need internet access to use the MCP server?#
Yes. You need access to the public internet to connect to the MCP server.
Do I need an account to use the MCP server?#
Yes. You need either a GitHub account or a WeChat account to authenticate with the MCP server. Only your anonymized account ID is stored — this is used solely to enforce per-user rate limits and ensure fair usage.
How many documentation MCP servers does Espressif have? Do I need to add them separately for each entry point?#
Espressif has only one documentation MCP server at https://mcp.espressif.com/docs. The entry points below are simply different ways to add it.
- The AI chatbot widget on chat.espressif.com
- The AI chatbot widget on the Espressif official website
- The AI chatbot widget in the ESP-IDF Programming Guide
- The Espressif MCP Servers page
The default MCP server name may differ slightly depending on which entry point you use, but they all connect to the same underlying service.
When should I use the MCP server?#
AI agents call the MCP server automatically when they need context they don’t already have. If the answer can be found in your open project files, the agents will use those instead.
For example, if you have ESP-IDF open in your application, asking about the ESP-IDF programming guide will lead the agent to consult the local source code and docs/ folder, not the MCP server.
Do I need to manually start the MCP server after installation?#
No. The MCP server is a remote service, so there is no local process to start.
Exception: If you configured the MCP server by manually editing mcp.json in VS Code, click Start above the server entry to open the authentication page, see VS Code. Once authenticated, the server connects automatically from that point on.
Why didn’t the agent consult the Espressif Documentation MCP server, even though I asked it to?#
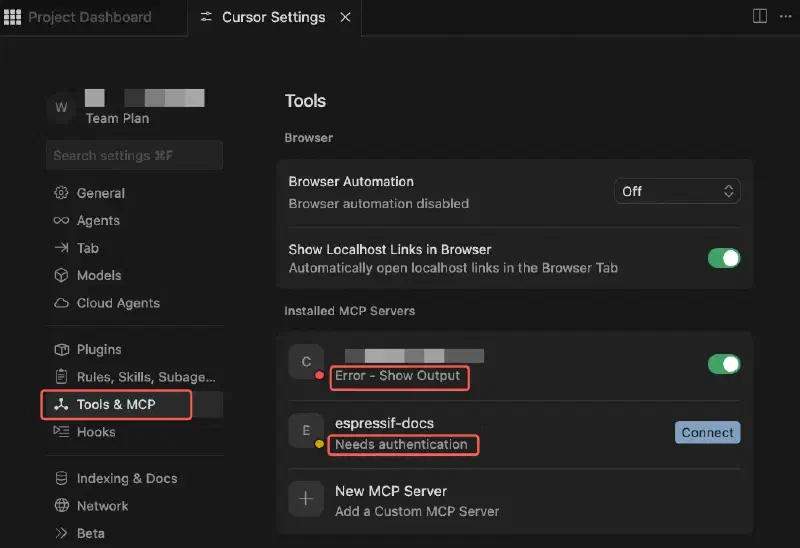
Step 1: Check the MCP server status in your application.
- Cursor: Go to Settings > Tools & MCP.
- VS Code: Open the Extensions panel and go to MCP SERVERS – INSTALLED.
- Claude Code: Run
claude mcp listcommand. - Claude Desktop: Go to Settings > Desktop > Developer > Local MCP servers.
- Antigravity: Go to Antigravity Settings > Customizations > INSTALLED MCP SERVERS.
- Antigravity CLI: Run
agyto launch Antigravity CLI, and type/mcp. - Gemini CLI: Run
gemini mcp listcommand. - Codex: Run
codex mcp listcommand. - OpenCode: Run
opencode mcp listcommand.
If the MCP server is disabled, enable it.
If authentication has expired, re-authenticate or re-add the MCP server.
If an error persists, submit a feedback with the error message shown in your AI application.
Step 2: Check whether the agent is allowed to use the MCP server tools.
- Cursor: Go to Settings > Agents > MCP Allowlist. The agent will prompt you the first time it calls an MCP tool. If it does not, add the tool manually, for example
espressif-docs: search_espressif_sources. - VS Code: Agent tool permissions are managed per-session. The first time the agent calls an MCP tool in a session, it will prompt you to allow or deny it.
- Claude Code: The first time the agent calls an MCP tool, it will prompt you to allow or deny it. You may also run:
claude --allowedTools mcp__espressif-docs__search_espressif_sources - Claude Desktop: Go to Settings > Customize > Connectors > Desktop > Tool permissions. By default, this is set to
Needs approval, meaning you will be prompted each time the agent calls a tool. - Antigravity: Enabled by default. Go to Antigravity Settings > Customizations > INSTALLED MCP SERVERS, and check “tool enabled”.
- Antigravity CLI: The first time the agent calls an MCP tool, it will prompt you to allow or deny it.
- Gemini CLI: Enabled by default.
- Codex: Enabled by default.
- OpenCode: Enabled by default.
Step 3. Try a different AI application.
MCP support varies across AI application. If the MCP server is enabled and allowed but the agent still does not call it, try a different application. For example, if you are using Cursor, try VS Code or Claude Code instead.
If the issue persists across application, the problem likely lies with the MCP server itself. Check the status page to see if there are any known outages.
Can the MCP server answer questions about end-of-life software, e.g., ESP-IDF v4.4?#
No. The knowledge sources cover the latest ESP-IDF version. Documentation for end-of-life versions, such as ESP-IDF v4.4, or any version other than the latest, is not included. If your project targets an EOL version, the MCP server may return documentation that does not match your SDK version.
Why is the agent linking to documents in English instead of Chinese?#
The MCP server searches either the English or Chinese documentation depending on the language of your query. If your AI agents do not specify the query language, English documentation is returned by default.
Each response includes links to the source documentation pages, so you can refer to the full context of the returned content.
Related Resources#
- 📺 Video: Espressif Documentation MCP Server Getting Started — A complete walkthrough covering installation, GitHub authentication, and migrating a project from ESP-IDF 5.1 to 6.0 using MCP-retrieved documentation.