
Introduction#
When you start a project without a Board Support Package (BSP), a large part of the first milestone is board initialization. Before the application can do anything useful, you need to select the target, configure peripherals, assign GPIOs, initialize the display, touch controller, buttons, audio, sensors, storage, power management, and any other hardware feature on the board.
That setup takes time, requires detailed knowledge of the schematic, and can be fragile. A wrong pin, missing dependency, or slightly different peripheral configuration can break the bring-up flow. If the same hardware is reused across products, or if a prototype later becomes a custom PCB, the same board-specific work has to be repeated and maintained again.
Enter the BSP#
A BSP packages this hardware knowledge into a reusable component. It contains the drivers, peripheral initialization and deinitialization, board configuration, target settings, and APIs needed to use the board features. Instead of repeating the same setup in every application, your projects call a common board layer.
We introduced this idea in Using ESP-BSP with DevKits, where Espressif-maintained BSPs make supported development kits easier to use from the first build.
The same approach is just as useful for custom hardware. Creating a BSP for your own board gives your team one place to describe the schematic, reuse initialization code, keep application code cleaner, and move more easily between prototype and production hardware. It also makes the board definition easier to version and share as the hardware evolves.
The challenge is that creating a BSP by hand still takes effort.
The problem every custom board hits#
Imagine that you or your software team creates a prototype on ESP32-S3-BOX-3, ESP32-C3-LCDKit, M5Stack Tab5, or another board from esp-bsp. Display, touch, audio, and SD card support work perfectly because Espressif maintains the BSP.
Then the hardware team designs a custom board with a different touch controller, a different pin mapping, and no speaker. Now part of the board support work has to be started from scratch.
There is a better workflow.
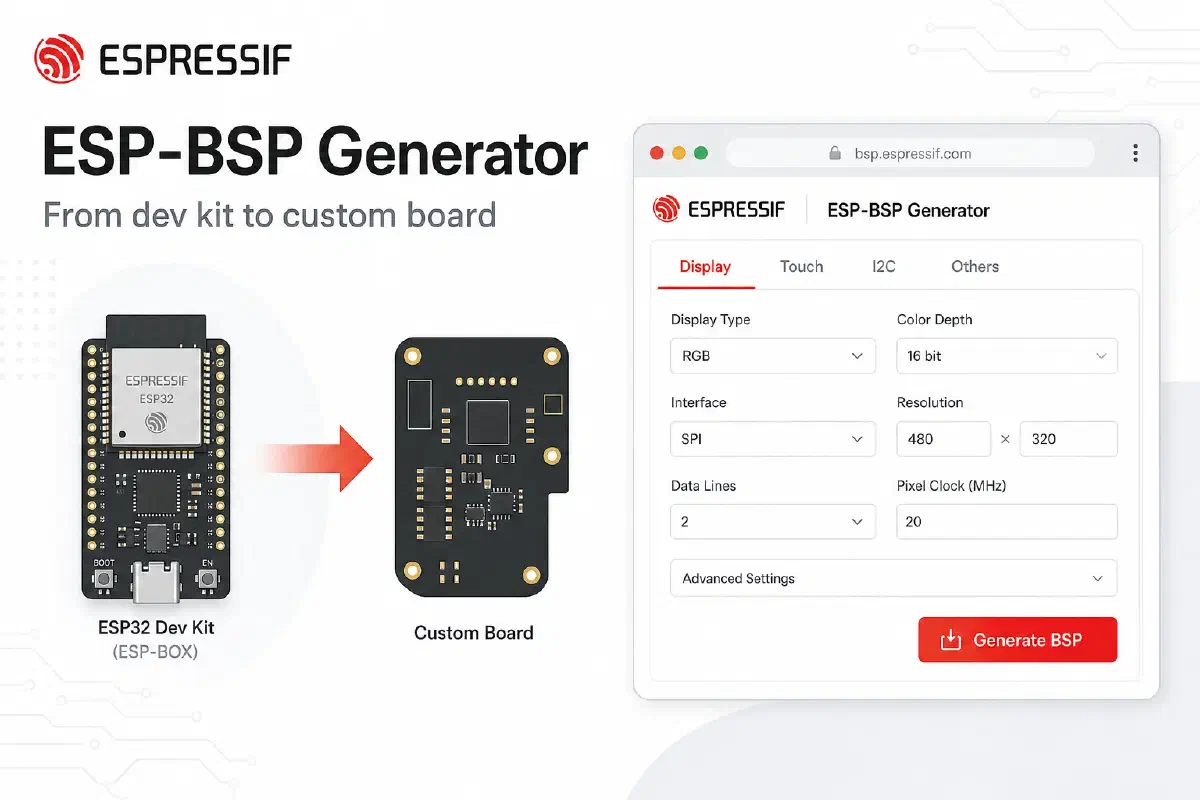
Enter the BSP Generator#
The ESP-BSP Generator is a web tool for creating an ESP-IDF BSP component without starting from an empty folder. Instead of manually copying an existing board, editing source files, updating Kconfig, and checking every dependency by hand, you describe your hardware in a guided form.
You can start from a proven esp-bsp board, adjust the pins and enabled features to match your schematic, and generate a production-style BSP component for your own hardware. The generated package follows the same conventions as Espressif BSPs, including the component layout, board APIs, and configuration files.
The result is a board layer that feels familiar to the application, but is customized for your PCB.
Start with what already works#
The generator is designed around reuse: you do not need to describe the whole board from an empty form. Start with the supported board that is closest to your prototype, load its existing BSP configuration, and then adapt it to your schematic. The unchanged parts stay in place; the custom work is focused on the features, drivers, and pin assignments that are different on your PCB.
To get started:
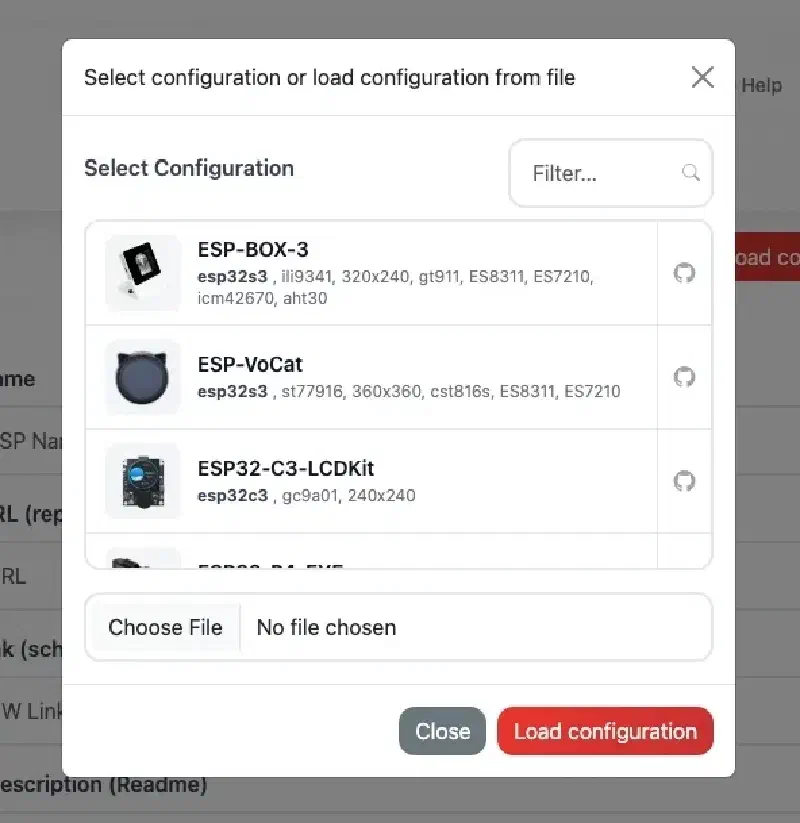
- Open the ESP-BSP Generator.
- Click Load configuration and pick a starter board that matches your prototype (e.g. ESP-BOX-3, ESP32-S3-EYE, ESP32-C3-LCDKit).
- The form fills in the MCU, features, drivers, and pin assignments - the same structure as the official BSP in esp-bsp/bsp/.
Hover over or tap the ? icons for hints. Save the JSON - that file is your single source of truth for the board definition.
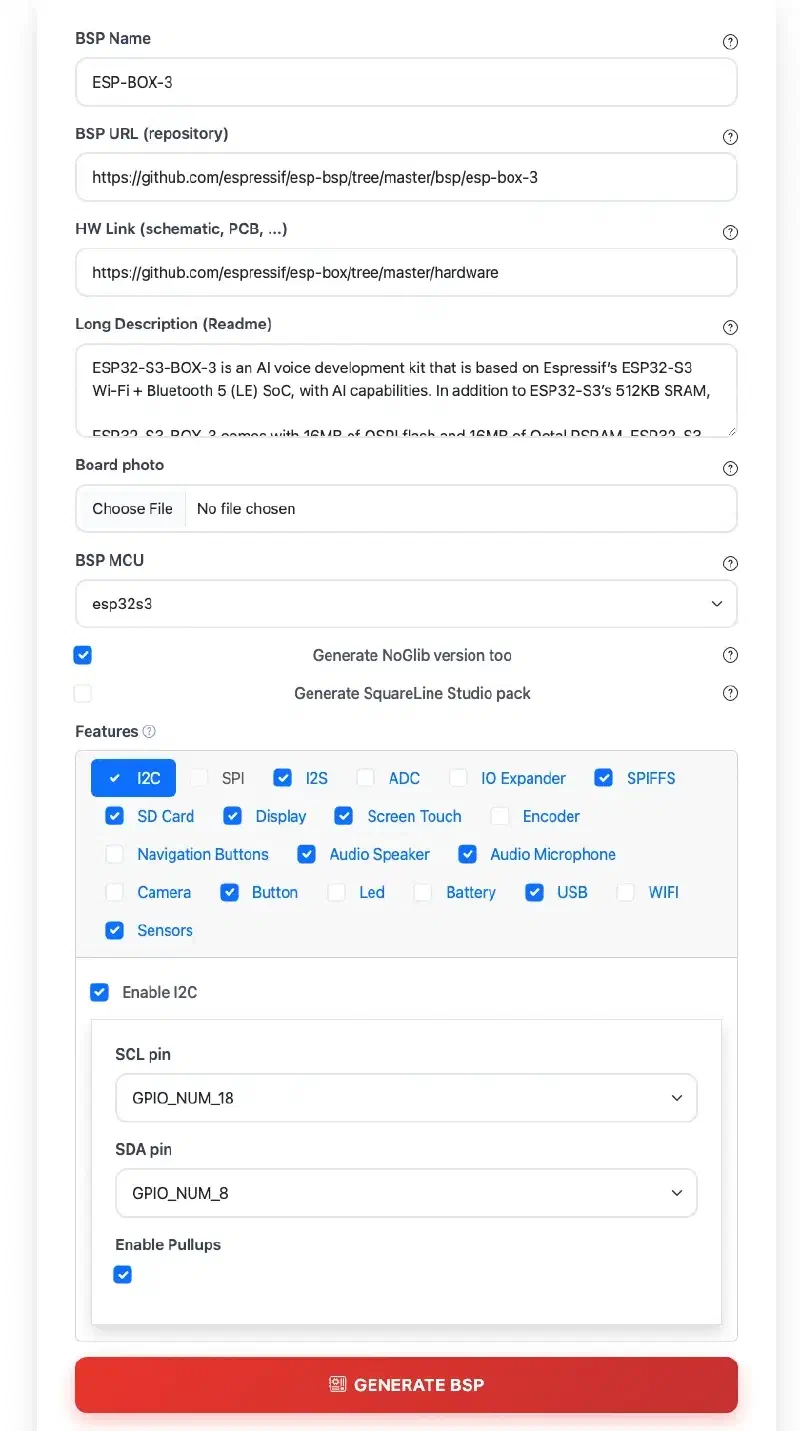
Before you touch pins and drivers, take a moment to make the BSP yours:
- Update BSP Name – It becomes the component folder name and how the board is identified in generated files.
- Update Long Description – The existing configuration’s description is copied into the generated
README.md- If you enable the SquareLine Studio pack, the description is also copied into the board’s
.slbmetadata.
- If you enable the SquareLine Studio pack, the description is also copied into the board’s
- Upload board photo for the README
- If you enable the SquareLine Studio pack, the photo will also be used for the SquareLine preview image.
- Add HW link - the page describing the board with schematics and more info about pinout
- Update BSP URL - it is written into
idf_component.ymland used as the canonical reference for your package.- If you plan to publish the component to the ESP Component Registry, especially make sure to update it.
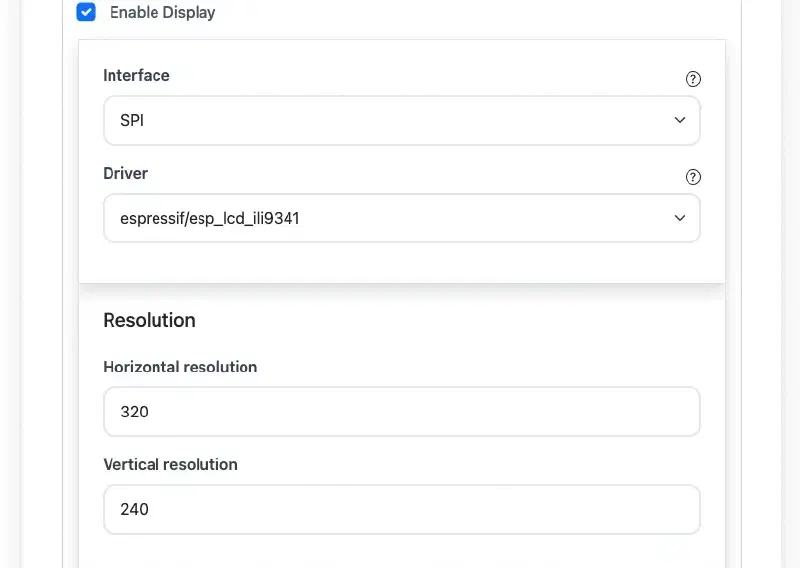
Configure features for your PCB#
Each capability is a feature tab: Display, Touch, Buttons, Audio, SD card, Camera, sensors, USB, battery, and more. Enable what your schematic actually has; disable what you removed.
Typical custom-board edits:
| On the dev kit | On your custom board |
|---|---|
| 3 navigation buttons | 2 buttons, different GPIOs |
| FT5x06 touch on I2C | Same controller, different I2C pins |
| RGB LCD + backlight PWM | SPI display, fixed backlight |
| On-board microphone | No audio - tab stays off |
The generator checks dependencies (touch over I2C needs I2C enabled, and so on) before it builds anything.
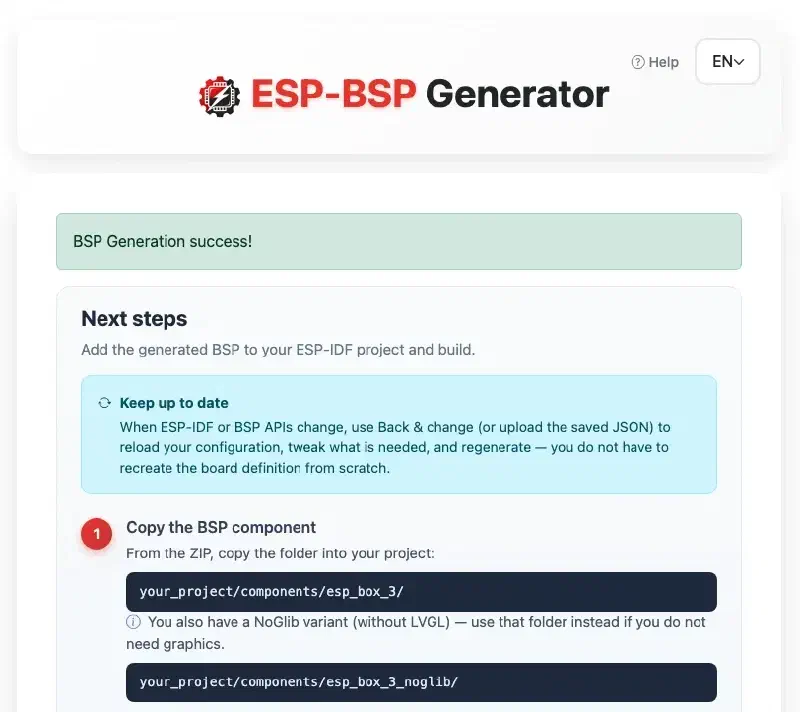
Generate once, integrate like any esp-bsp component#
Click Generate BSP. You get a ZIP with:
- A full ESP-IDF component (
CMakeLists.txt,Kconfig, headers, sources) sdkconfig.defaultsgenerated to your choicesREADME.mdwith capabilities and dependency tableAPI.mdAPI reference (Doxygen-style, same idea as official BSPs)- (optional) noglib variant (BSP without LVGL)
- (optional) SquareLine Studio OBP pack for UI designers
Your application keeps calling the same BSP entry points:
#include "bsp/esp-bsp.h"

void app_main(void)
{
    bsp_display_start();
    bsp_display_backlight_on();
    // ... your UI / logic unchanged in spirit
}
Wire the new component in main/idf_component.yml:
dependencies:
  my_custom_board:
    path: ../components/my_custom_board
Copy sdkconfig.defaults to the project root, set the target, and build. The application structure stays familiar - only the board layer changed.
Swap the component, keep the software#
This is the payoff for product teams:
- Prototype firmware uses
esp-box-3BSP fromesp-bsp - Production firmware uses
my_custom_boardBSP from the generator - Application code uses largely the same
#includeand BSP APIs
You are not maintaining a fork of esp-bsp forever. You maintain a small, generated board package that follows the same conventions as espressif/esp-bsp: component layout, bsp_* helpers, LVGL integration via esp_lvgl_port, and examples you can compare under esp-bsp/examples/.
Your board definition lives in JSON#
Every successful run produces a JSON configuration file inside the BSP folder (e.g. my_board/my_board.json). Treat it as the single source of truth for your hardware - not the generated .c files.
That JSON is a structured snapshot of everything you configured in the form:
- Board metadata - name, MCU, repository URL, HW link, description, photo reference, and generator options (noglib, SquareLine, …)
BSP_FEATURES- enabled capabilities and how they are wired: GPIO pins, bus interfaces (I2C, SPI, RGB, …), display and touch drivers, audio codecs, SD card bus width, sensor types, and the rest of the per-feature settings
In other words: the schematic decisions you made in the UI are stored in one portable file. The C sources, Kconfig, sdkconfig.defaults, README.md, and SquareLine pack are outputs derived from that JSON file and the current generator templates.
How to use the JSON file in practice:
- Check it into git alongside your firmware - the JSON is the board definition worth keeping; regenerate the BSP from it instead of editing or versioning the generated
.cfiles. - Reload it anytime via Load configuration on the generator home page, or Back & change on the success screen once BSP generation finished.
- Share it with colleagues or across projects so everyone starts from the same board description.
- Diff it between PCB spins to see exactly what changed (a new sensor tab, different I2C pins, display driver swap).
You edit the board in JSON (through the form); you do not maintain the BSP by hand.
ESP-IDF upgraded? Regenerate, don’t rewrite#
The JSON holds your board; the generator templates hold how a BSP should be built for today’s ESP-IDF and component ecosystem. When the world moves on – a new ESP-IDF major version released, esp-bsp patterns updated, new drivers in the registry appear, or you need to add a feature – you do not need to merge hundreds of lines across bsp_*.c by hand.
Load your saved JSON, adjust only what actually changed, and click Generate BSP again. The tool re-renders the full component from the current templates: sources, Kconfig, sdkconfig.defaults, API.md, README.md, and optional SquareLine pack. Your pin map and feature choices stay intact; the generated code picks up template fixes and API updates automatically.
Typical reasons to regenerate:
- ESP-IDF upgrade or new target support
- esp-bsp / driver template changes in the generator
- PCB spin - load JSON, tweak pins or features, generate a fresh BSP
- New optional output - e.g. enable SquareLine Studio pack on a later run
You refresh the implementation from templates - the JSON keeps the intent.
The success page walks through integration steps; the in-app Help modal window covers load/save, features, and SquareLine OBP install paths.
SquareLine Studio? Covered#
SquareLine Studio is a visual UI editor for LVGL - you design screens, widgets, and animations in a desktop app and export C code into your ESP-IDF project. If your flow includes UI design, enable Generate SquareLine Studio pack (Display feature required). The ZIP includes an Open Board Platform bundle (.slb, .zip, .png) ready to copy into ~/SquareLine/boards/ — designers stay in SquareLine; firmware stays on the same BSP pins and resolution you defined in the form.
Try it in five minutes#
- Go to bsp-generator.espressif.tools
- Load
ESP-BOX-3or any starter board close to your hardware - Change one GPIO, rename the BSP, and click Generate
- Drop the component into a blank ESP-IDF project and run
idf.py build
That four-step flow is the whole idea: prototype on a dev kit from esp-bsp, then regenerate a BSP when the PCB is yours.
Conclusion#
Custom hardware should not force every project to repeat the same board bring-up work. By turning your schematic into a reusable BSP, you keep board-specific code in one component, preserve a familiar application structure, and make future PCB spins easier to support.
The ESP-BSP Generator makes that workflow practical: start from a known board, adapt it to your hardware, save the JSON, and regenerate the BSP whenever the board or ESP-IDF ecosystem changes.