
In the previous article, we explored how Python can run on NuttX and interact with hardware through POSIX-compatible character drivers. We transferred a Python script over Wi-Fi, ran it on an ESP32-S3, and watched the board’s RGB LED change color based on CPU load, all without recompiling firmware.
That experiment raised a question: what if we could make this workflow even more accessible? What if there was a web-based interface to manage the device, upload scripts, and run them from a browser?
That’s the motivation behind NuttX Web Panel.
NuttX as a computing platform#
NuttX’s POSIX compliance makes it unique among RTOSes. Applications originally targeting Linux or other Unix-based systems can often be ported to NuttX with minimal changes. This applies not only to C programs but also to interpreted languages like Python.
This creates an interesting possibility: NuttX can act as a computing platform where applications are interpreted rather than compiled into firmware. Developers can write Python scripts on a host machine, transfer them to the device, and run them immediately. There is no need to set up a cross-compilation toolchain, rebuild firmware, or reflash the device. This makes NuttX a particularly attractive platform for testing hardware and prototyping products.
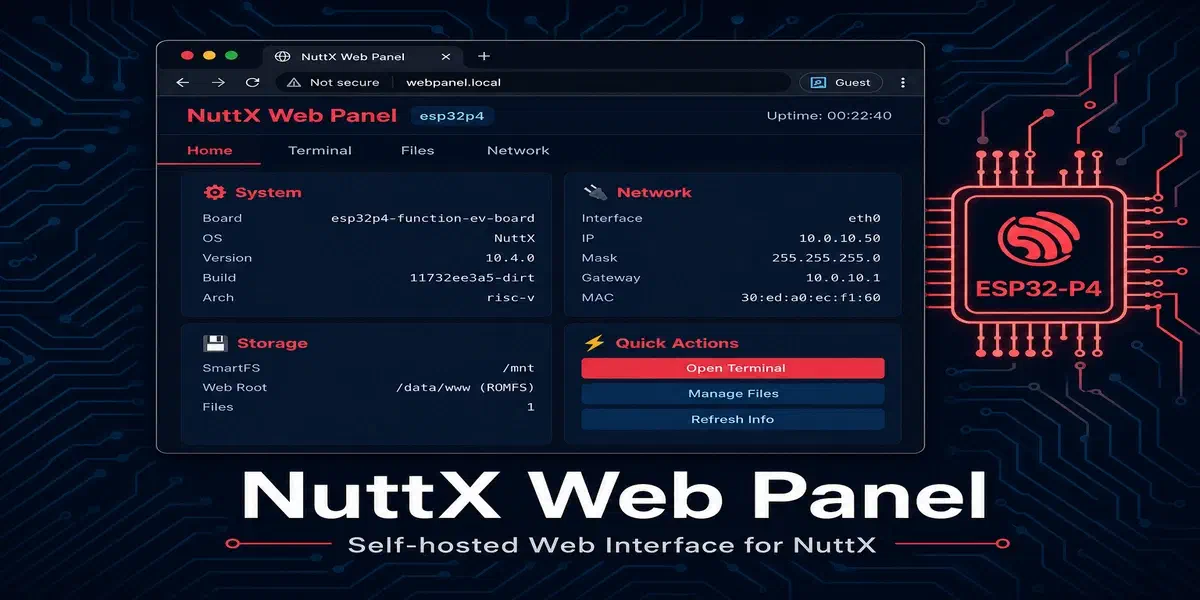
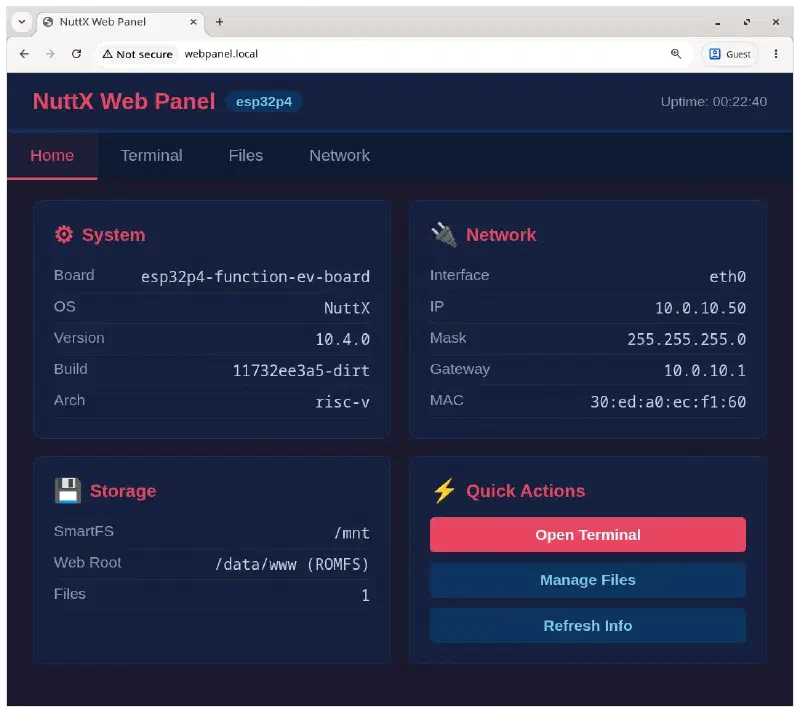
NuttX Web Panel is part of this effort. It provides a browser-based interface to interact with a NuttX device, combining system monitoring, a terminal, and file management into a single self-hosted web page. Think of it as a first step toward making NuttX devices as easy to manage as consumer routers or IoT hubs that offer web-based configuration panels.
What does NuttX Web Panel offer?#
NuttX Web Panel is a self-hosted web application that runs entirely on the device. Once the board boots and connects to the network, users can access it from any browser on the same network. The interface provides four main sections:
- Home: displays system information such as the NuttX version, board name, architecture, network configuration, and uptime.
- Terminal: a browser-based NSH terminal powered by WebSockets. It opens a real NuttX shell session, allowing users to run commands, launch applications, and interact with the system as if connected via a serial console.
- Files: a file manager for the device’s writable storage (
/mnt). Users can browse files, upload new ones (including Python scripts), delete files, and even run Python scripts directly from the interface. - Network: displays network interface details and allows renewing the DHCP lease.
The following screenshot shows NuttX Web Panel running on an ESP32-P4, accessible at http://webpanel.local using mDNS local service discovery:
How it works#
NuttX Web Panel does not rely on external services or cloud infrastructure. The entire application runs on the device, leveraging modules that are already available in NuttX’s application repository (nuttx-apps). Here is a brief overview of the key components:
THTTPD web server#
The web interface is served by THTTPD, a lightweight HTTP server that has been part of nuttx-apps for a long time. THTTPD serves the static HTML/CSS/JavaScript files from a ROMFS partition (embedded in the firmware) and dispatches dynamic requests to CGI handlers.
CGI handlers#
The dynamic functionality (system info, file listing, file upload, and DHCP renew) is implemented as CGI programs. NuttX’s BINFS filesystem exposes built-in applications as files in a virtual directory, and THTTPD invokes them as CGI scripts. This is possible thanks to NuttX’s UNIONFS, which merges the ROMFS (static content) and BINFS (CGI programs) into a single filesystem tree served by THTTPD.
WebSocket Terminal via libwebsockets#
The browser-based terminal uses libwebsockets, a lightweight WebSocket library that was recently enabled for server-side operation in nuttx-apps. When a user clicks “Connect” in the Terminal tab, the browser opens a WebSocket connection to a daemon running on the device. This daemon spawns an NSH session attached to a POSIX pseudo-terminal (PTY) and relays data between the WebSocket and the PTY master file descriptor. The result is a fully interactive NuttX shell in the browser, powered by xterm.js.
mDNS for service discovery#
The device advertises itself on the local network using mDNS, so users can access the web panel at http://webpanel.local instead of needing to know the IP address. An event-based mDNS starter was developed to automatically launch the mDNS daemon when the device gets an IP address via DHCP.
SmartFS for writable storage#
User files (including uploaded Python scripts) are stored on a SmartFS partition backed by SPI flash. This partition is mounted at /mnt and persists across reboots.
Python on NuttX Web Panel#
One of the most powerful features of NuttX Web Panel is its integration with Python. The webpanel defconfig for ESP32-P4 includes the Python interpreter, enabling users to upload and run Python scripts directly from the browser.
Example: Task monitor script#
Working with Python on NuttX also makes it easier to test hardware with tools many developers already use, including AI coding agents that can draft scripts against NuttX’s POSIX-compatible interfaces. As an example of a Python script that can be uploaded and run on NuttX Web Panel, consider the following task monitor script. It reads the PROCFS filesystem to collect information about running tasks, memory usage, and system uptime, then prints an organized summary table:
taskmon.py — click to expand
#!/usr/bin/env python3
"""taskmon.py — NuttX task monitor.

Continuously reads /proc/<pid>/* for every running task and prints
an organized summary table.  Designed to run on NuttX with CPython.

Usage:
    python /mnt/taskmon.py            # one snapshot
    python /mnt/taskmon.py -c         # continuous (refreshes every 2s)
    python /mnt/taskmon.py -c -i 5    # continuous, 5-second interval
    python /mnt/taskmon.py -v         # verbose: include stack + group info
"""

import os
import sys
import time

PROC = "/proc"


# ── /proc readers ────────────────────────────────────────────────────

def _read(path):
    try:
        with open(path, "r") as f:
            return f.read()
    except OSError:
        return None


def _parse_kv(text):
    d = {}
    for line in text.splitlines():
        if ":" in line:
            k, v = line.split(":", 1)
            d[k.strip()] = v.strip()
    return d


def list_pids():
    pids = []
    try:
        for e in os.listdir(PROC):
            try:
                pids.append(int(e))
            except ValueError:
                pass
    except OSError:
        pass
    pids.sort()
    return pids


def read_status(pid):
    text = _read(f"{PROC}/{pid}/status")
    return _parse_kv(text) if text else None


def read_cmdline(pid):
    text = _read(f"{PROC}/{pid}/cmdline")
    return text.strip() if text else None


def read_stack(pid):
    text = _read(f"{PROC}/{pid}/stack")
    return _parse_kv(text) if text else None


def read_group_status(pid):
    text = _read(f"{PROC}/{pid}/group/status")
    return _parse_kv(text) if text else None


def read_uptime():
    text = _read(f"{PROC}/uptime")
    if text is None:
        return None
    try:
        return float(text.strip())
    except ValueError:
        return None


def read_version():
    text = _read(f"{PROC}/version")
    return text.strip() if text else "?"


def read_meminfo():
    text = _read(f"{PROC}/meminfo")
    if text is None:
        return []
    lines = text.splitlines()
    if len(lines) < 2:
        return []
    heaps = []
    for line in lines[1:]:
        parts = line.split()
        if len(parts) >= 8:
            heaps.append({
                "name": parts[7],
                "total": int(parts[0]),
                "used": int(parts[1]),
                "free": int(parts[2]),
                "maxused": int(parts[3]),
                "nused": int(parts[5]),
            })
    return heaps


# ── Task collection ──────────────────────────────────────────────────

def collect_task(pid, verbose=False):
    status = read_status(pid)
    if status is None:
        return None

    info = {"pid": pid}
    info["name"] = status.get("Name", "?")
    info["type"] = status.get("Type", "?")
    info["state"] = status.get("State", "?")
    info["priority"] = status.get("Priority", "?")
    info["scheduler"] = status.get("Scheduler", "?")

    cmdline = read_cmdline(pid)
    if cmdline:
        info["cmdline"] = cmdline

    stack = read_stack(pid)
    if stack:
        sz = stack.get("StackSize", "?")
        used = stack.get("StackUsed", "?")
        info["stack_size"] = sz
        info["stack_used"] = used
        if verbose:
            info["stack_base"] = stack.get("StackBase", "?")

    if verbose:
        grp = read_group_status(pid)
        if grp:
            info["parent"] = grp.get("Parent", "?")
            info["group_main"] = grp.get("Main task", "?")

    return info


def collect_all(verbose=False):
    tasks = []
    for pid in list_pids():
        t = collect_task(pid, verbose)
        if t:
            tasks.append(t)
    return tasks


# ── Formatting ───────────────────────────────────────────────────────

def fmt_uptime(secs):
    if secs is None:
        return "?"
    h = int(secs) // 3600
    m = (int(secs) % 3600) // 60
    s = int(secs) % 60
    return f"{h:02d}:{m:02d}:{s:02d}"


def stack_pct(size_s, used_s):
    try:
        size = int(size_s)
        used = int(used_s)
        if size > 0:
            return f"{100.0 * used / size:.0f}%"
    except (ValueError, TypeError):
        pass
    return "?"


def print_snapshot(tasks, uptime, meminfo, version, verbose=False, clear=False):
    if clear:
        print("\033[2J\033[H", end="")  # clear screen + home

    print(f"NuttX Task Monitor — {version}")
    print(f"Uptime: {fmt_uptime(uptime)}    Tasks: {len(tasks)}")

    for heap in meminfo:
        pct = 100.0 * heap["used"] / heap["total"] if heap["total"] else 0
        print(
            f"Heap ({heap['name']}): "
            f"{heap['used']:,} / {heap['total']:,} bytes used ({pct:.1f}%), "
            f"{heap['free']:,} free, {heap['nused']} blocks"
        )

    print()

    if verbose:
        hdr = (
            f"{'PID':>5}  {'PPID':>5}  {'PRI':>4}  {'SCHED':>10}  "
            f"{'TYPE':>8}  {'STACK':>12}  {'FILL':>5}  "
            f"{'STATE':<24}  COMMAND"
        )
    else:
        hdr = (
            f"{'PID':>5}  {'PRI':>4}  {'TYPE':>8}  "
            f"{'STACK':>12}  {'FILL':>5}  "
            f"{'STATE':<24}  COMMAND"
        )

    print(hdr)
    print("-" * len(hdr))

    for t in tasks:
        sz = t.get("stack_size", "?")
        used = t.get("stack_used", "?")
        fill = stack_pct(sz, used)
        stack_str = f"{used}/{sz}" if sz != "?" else "?"
        cmd = t.get("cmdline", t["name"])

        if verbose:
            ppid = t.get("parent", "?")
            print(
                f"{t['pid']:5d}  {ppid:>5}  {t['priority']:>4}  "
                f"{t['scheduler']:>10}  {t['type']:>8}  "
                f"{stack_str:>12}  {fill:>5}  "
                f"{t['state']:<24}  {cmd}"
            )
        else:
            print(
                f"{t['pid']:5d}  {t['priority']:>4}  {t['type']:>8}  "
                f"{stack_str:>12}  {fill:>5}  "
                f"{t['state']:<24}  {cmd}"
            )


# ── Main ─────────────────────────────────────────────────────────────

def main():
    continuous = False
    verbose = False
    interval = 2.0

    args = sys.argv[1:]
    i = 0
    while i < len(args):
        if args[i] in ("-c", "--continuous"):
            continuous = True
        elif args[i] in ("-v", "--verbose"):
            verbose = True
        elif args[i] in ("-i", "--interval") and i + 1 < len(args):
            i += 1
            interval = float(args[i])
        elif args[i] in ("-h", "--help"):
            print(__doc__)
            return
        i += 1

    try:
        while True:
            tasks = collect_all(verbose)
            uptime = read_uptime()
            meminfo = read_meminfo()
            version = read_version()
            print_snapshot(tasks, uptime, meminfo, version, verbose,
                           clear=continuous)
            if not continuous:
                break
            time.sleep(interval)
    except KeyboardInterrupt:
        print("\nStopped.")


if __name__ == "__main__":
    main()
This script is a good example of what Python on NuttX enables: it uses standard Python libraries (os, sys, time) to read NuttX’s PROCFS filesystem and display system information. Notice how it accesses /proc/<pid>/status, /proc/<pid>/stack, and /proc/meminfo, the same interfaces you would use on a Linux system.
python taskmon.py.To use it with NuttX Web Panel: upload taskmon.py through the Files tab. For .py files, the file list shows a Run button that opens the Terminal tab and sends the command automatically. You can also switch to the Terminal tab and run it manually:
nsh> python /mnt/taskmon.py -vThe following video shows uploading and running taskmon.py through NuttX Web Panel:
(also available on BiliBili)
NuttX Periphery: A direct path to hardware#
For scripts that need to interact with peripherals directly, nuttx-periphery provides a higher-level Python API on top of NuttX character drivers. The package was recently contributed by Filipe Cavalcanti. With nuttx-periphery, controlling GPIO, I2C, SPI, and other peripherals from Python becomes as simple as:
from nuttx_periphery import GPIO, GPIOPinType

gpio = GPIO("/dev/gpio0")
gpio.set_pin_type(GPIOPinType.GPIO_OUTPUT_PIN)
gpio.write(True)
NuttX Web Panel is a natural place to try this workflow: upload a script, run it from the browser, and observe the result on the device. A deeper look at peripheral control with nuttx-periphery will be the subject of the next article in this series.
Building NuttX Web Panel for ESP32-P4#
Hardware requirements#
NuttX Web Panel was developed and tested on the ESP32-P4-Function-EV-Board. ESP32-P4 is a high-performance SoC with a dual-core RISC-V processor, plenty of RAM, and Ethernet support, making it well-suited for running a web server alongside the Python interpreter.
Software requirements#
For those new to NuttX, we recommend reviewing the guide Getting Started with NuttX and ESP32 to configure your development environment for building NuttX applications.
Compiling and flashing#
Clean any previous configuration and set the defconfig to enable the NuttX Web Panel on ESP32-P4:
make -j distclean && ./tools/configure.sh -S esp32p4-function-ev-board:webpanelBuild the firmware and flash it:
make flash ESPTOOL_PORT=/dev/ttyACM0 -s -j$(nproc)Accessing the Web Panel#
After flashing, the device will boot, connect to the network via Ethernet (DHCP), and start the web panel automatically. The startup sequence is handled by NuttX’s init scripts (rcS), which launch the webpanel application and the mdnsd_event daemon in the background.
Once the device gets an IP address, open a browser and navigate to:
http://webpanel.localIf mDNS is not available on your network, check the device’s serial console for the assigned IP address and use it directly.
What’s next?#
NuttX Web Panel is the very first effort toward a web-based interface for NuttX. A formal roadmap is yet to be defined, but the foundation is in place. Some potential directions include:
- Peripheral configuration: configure GPIO, I2C, SPI, and other peripherals through the web interface.
- Real-time monitoring: display live charts for CPU load, memory usage, and task activity.
- Script management: a more complete Python script editor and execution environment.
- Authentication: add basic authentication to secure the web panel.
The goal is for NuttX Web Panel to evolve into a general-purpose, self-hosted web interface that makes NuttX devices easier to manage and interact with, especially for developers who are exploring hardware and building prototypes.
Conclusion#
NuttX Web Panel brings together several pieces that make NuttX a compelling platform for embedded development: a POSIX-compatible RTOS, a capable web server, WebSocket support, Python integration, and POSIX character drivers. Most of the building blocks were already available in nuttx-apps (THTTPD, libwebsockets, mDNS, SmartFS), and the Web Panel ties them together into a cohesive user experience.
Combined with nuttx-periphery and Python, NuttX Web Panel turns a microcontroller into something closer to a general-purpose computing platform: one where applications can be written in a high-level language, transferred over the network, and executed immediately. This is a fundamentally different workflow from traditional embedded development, and it opens the door to a wider audience of developers.
Stay tuned for more updates about Python on NuttX and the Web Panel!