
Introduction#
In today’s fast-paced world of IoT and embedded systems, creating an intuitive and responsive Graphical User Interface (GUI) can make or break the user experience of your product. Espressif’s powerful microcontrollers, like the ESP32-S2 or the ESP32-S3, offer incredible capabilities for embedded applications. However, developing a professional-grade GUI that leverages these capabilities can be challenging. That’s where Embedded Wizard comes into play. Embedded Wizard is an award-winning GUI development solution by independent software company TARA Systems that enables engineers to create high-performance, visually appealing interfaces with ease. With the introduction of Embedded Wizard 15, the GUI framework now goes even further by incorporating AI-assisted development. Additionally, with Embedded Wizard Connect for Figma, developers and designers can now seamlessly transfer UI designs from Figma into the Integrated Development Environment (IDE), Embedded Wizard Studio, simplifying the transition from design to implementation. In this article, we’ll explore how Embedded Wizard integrates seamlessly with Espressif’s ecosystem, helping you to rapidly create and deploy stunning GUIs on your ESP32-based projects.
Why Choose Embedded Wizard for Your Espressif Project?#
1. Optimized Performance and Efficiency#
Embedded Wizard is designed to run efficiently on resource-constrained devices, making it an ideal choice for Espressif’s microcontrollers. The framework only requires a minimum of 16KB of RAM and includes an advanced graphics engine that ensures smooth animations and transitions even on devices with limited processing power and memory. Embedded Wizard’s lightweight runtime library ensures that your GUIs run smoothly, with support for complex animations, transitions, and real-time data visualization.
2. Cross-Platform Development#
One of the standout features of Embedded Wizard is its ability to generate platform-independent code. This means you can develop your GUI once and deploy it across multiple devices, including various Espressif microcontrollers. This cross-platform capability not only saves development time but also simplifies the process of maintaining and updating your GUI across different hardware.
3. Rich Set of Features#
Embedded Wizard offers a comprehensive set of ready-to-use widgets, effects, and animations which can be customized to create a unique user experience. Whether you need touch input, multi-language support, or scalable vector graphics, Embedded Wizard has you covered.
4. AI-Assisted Development#
With Embedded Wizard 15, Embedded Wizard Studio includes an AI Console that supports development tasks within the tool. It can be used to generate code, assist with refactoring, and provide suggestions for resolving errors or warnings. Interaction is based on natural language input, which can help reduce manual effort during prototyping and debugging.
5. Design-to-Code Workflow with Figma#
Embedded Wizard Connect for Figma allows UI designs created in Figma to be imported into Embedded Wizard Studio. This makes it possible to reuse existing design assets instead of recreating layouts manually. Changes to the design can be applied by reimporting updated files, which helps keep the implementation aligned with the design throughout development.
6. Seamless Integration with Espressif’s Hardware#
Embedded Wizard has been optimized for Espressif microcontrollers, providing direct support for Espressif platforms. This seamless integration allows you to leverage the full potential of Espressif hardware, from touch inputs to display outputs, with minimal setup. In addition, Embedded Wizard comes with a comprehensive Knowledge Base, with easy-to-follow tutorials for Espressif platforms like the ESP-WROVER-KIT, ESP32-S2-Kaluga, and ESP32-S3-BOX. This ensures that you can get started quickly without needing to worry about low-level implementation details.
Getting Started: Building Your GUI on ESP32#
Let’s walk through a simple step-by-step guide of building a GUI with Embedded Wizard. While this example uses the ESP32-S3-BOX, the principles outlined here can be applied to any hardware you are working with.
1. Design the GUI Application#
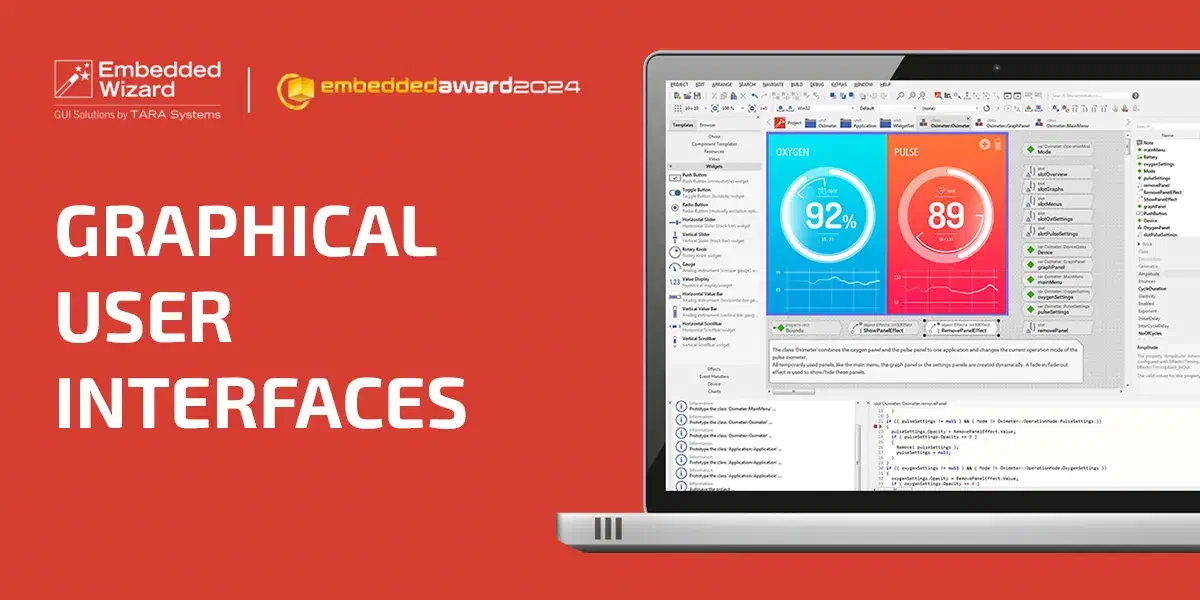
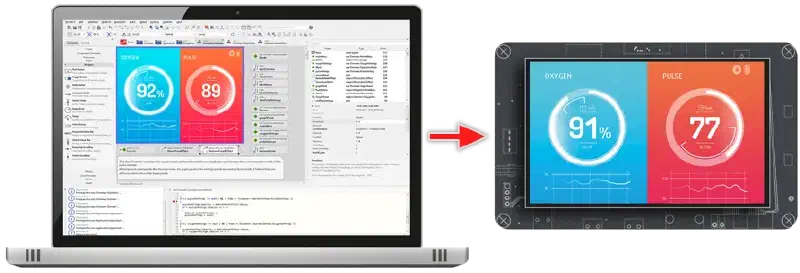
Start by selecting your preferred hardware platform and using the Embedded Wizard Studio to design the look and behavior of your GUI application. This Integrated Development Environment (IDE) allows you to easily create interfaces by clicking, dragging, and connecting visual and logical components. Application logic is written in Chora, a platform-independent language similar to C++ and JavaScript. The design process leverages the Mosaic framework, which includes essential components like ready-to-use widgets and event handlers. You can also import UI layouts directly from Figma using Embedded Wizard Connect. This allows designers to create interfaces in Figma without restrictive templates and transfer them seamlessly into Embedded Wizard Studio. Updated designs can be reimported at any time, enabling fast iteration without rebuilding layouts manually.
2. Prototype, Test, and Debug#
Throughout the design process, use the integrated Prototyper to instantly evaluate your application’s appearance and behavior. This enables real-time simulation without needing to compile or upload binaries to the target hardware.
3. Generate Optimized Code#
After finalizing the design, instruct the Embedded Wizard Studio to generate source code optimized for your ESP32-S3-BOX. This step translates your Chora logic and the Mosaic framework into target-specific code, optimizing images and fonts used in your application. The generated output includes a set of .c and .h files that define the GUI application’s appearance and functionality.
4. Integrate and Build#
Incorporate the generated files into your build system. Include files from the Embedded Wizard SDK, which ensure proper hardware function utilization for correct drawing operations. Compile and link all files into a single binary, adding any additional software components as needed.
5. Deploy and Run#
Deploy the compiled binary to your ESP32-S3-BOX by writing it to the device’s flash memory. The GUI application runs natively on the device without requiring interpreters or just-in-time compilers, thanks to the efficient source code generation process. This ensures minimal flash and RAM usage, providing optimal performance.
Conclusion#
Embedded Wizard and Espressif’s ESP32 family are a powerful combination for creating high-quality, responsive GUIs in embedded systems. By leveraging Embedded Wizard’s advanced features and seamless integration with Espressif hardware, you can accelerate your development process and bring your IoT products to market faster.