
The Transport Layer Security(TLS) is an integral part of the IoT world. It facilitates a secure way of communication between the IoT device and the cloud service. The TLS uses asymmetric key cryptography for security that consists of a private key and corresponding public key (certificate). As the name suggests public key is shared with everyone and the private key is kept secured on the IoT device. It is pivotal to keep the private key secure in order to protect the identity of the IoT device. This article explains how to keep the device private key secure with the Digital Signature peripheral present in Espressif’s SoCs.
The Digital Signature (DS) peripheral is a new security feature introduced in the Espressif’s ESP32-S2 SoC. This peripheral is also available in ESP32-C3 and ESP32-S3 SoCs. It produces hardware accelerated RSA digital signatures, without the RSA private key being accessible by software. This allows the private key to be kept secured on the device without anyone other than the device hardware being able to access it.
How does the DS peripheral keep the private key secure ?#
The DS peripheral makes use of the eFuse Controller available on the ESP32-S2 chip. For technical details about the eFuse Controller please refer to the *eFuse Controller * section of the ESP32-S2 Technical Reference Manual.
The ESP32-S2 has a total of 11 eFuse blocks each of the size of 256 bits. The eFuse block no.4 to block no.9 out of the total 11 blocks are available as key blocks and can be used to program a 256 bit key. All the blocks in the eFuse are one time programmable. Also, once a key is programmed in one of these key blocks, the software read operation on that block can be disabled. Thus making the key accessible only to the hardware of the ESP32-S2 chip.
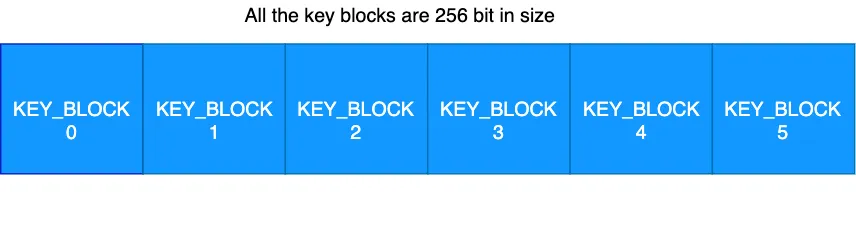
The eFuse key blocks shown above can be used for multiple purposes e.g. Digital Signature, Flash Encryption, Secure Boot etc.
As you might have noticed, only a 256 bit key can be stored in a key block of the eFuse Controller. A typical RSA key has recommended minimum length of 1024 bits. Then how can we secure the RSA private key which has a considerably larger length?
Using the DS peripheral to secure the RSA private key#
The process to secure RSA private key involves multiple steps. Note that all the technical steps are not mentioned here for simplicity. Please refer to the DS documentation in the ESP-IDF programming guide for more details. The following diagram explains the process in a simple manner.

As the above diagram shows, the process to secure the RSA private key and use the DS peripheral follows these steps -
Setup Mode — One-Time Device Configuration#
RSA Sign/Verify mode — Regular RSA key usage#
The DS peripheral will use the DS key from the eFuse to internally decrypt the cipher-text to obtain the RSA private key. Then this RSA private key can be used to perform the operations such as sign/verify. This way the encrypted RSA private key can be used to perform a TLS connection.
Only the DS peripheral (hardware) now has the access of the DS key. This way the RSA private key is kept secure on the device with help of the DS peripheral.
Can we generate the RSA private key on the device?#
This article talks about a workflow where the RSA private key is generated and encrypted on the host machine (e.g. PC) and then stored in the flash of the device. This has been done for simplifying the workflow. But it is very well possible to generate the RSA private key on the device itself during manufacturing. Along with the RSA key, the other parameters e.g. IV, DS key can also be randomly generated on the device. Thus, the RSA key can be encrypted on the device using parameters which are completely randomly generated on the device itself. This way the RSA private key never leaves the device. The cipher-text (encrypted RSA private key) generated on the device can then be backed up safely if required.
What does a developer have to do to use the DS peripheral in their product ?#
The Espressif’s ESP-IDF provides all the necessary support for using the DS peripheral on the ESP32-S2 SoC. This support is added through the ESP-TLS component. A developer needs to perform the following steps in order to use the DS peripheral in their project for a TLS connection.
TL;DR:#
One-Time Device Configuration:#
Step 1: First step is to configure the DS peripheral on the ESP32-S2 Soc. It can be done with the configure_ds.py script. To use the script we will have to set the appropriate idf_target (chip) in the project. The idf_target can be set to esp32s2 with following command:
$ idf.py set-target esp32s2
The command to configure the DS peripheral for development purpose is as follows:
$ python configure_ds.py --port /* USB COM port */ --private-key /* RSA priv key */
The script documentation can be found here. The private key in above command indicates the device RSA private key.
The script performs step i) to step iii) as mentioned above. It also creates an NVS partition containing the encrypted private key parameters to be stored onto the flash. This data is required by the DS peripheral and is called as the DS context.
The content of the NVS partition generated will be as follows:
Step 2: In order to use the NVS partition generated in the previous step. We will have to create a custom partition table in our example project which lists the required partition. The following custom partition table can be used for that purpose.
The pre_prov * *partition in the above partition table represents the entry for NVS partition containing the DS context. The example project can be made to use the custom partition in the configuration menu (*idf.py menuconfig -> Partition Table). *Now the partition can be flashed onto the device with help of the parttool.py script. The commands will be as follows:
$ idf.py partition_table partition_table-flash
$ parttool.py --port /* Serial port */--partition-table-offset 0x8000 write_partition --partition-name="pre_prov" --input /* Path to NVS partition */
Regular RSA key usage:#
Step 3: The support of DS peripheral is added through the ESP-TLS and is enabled by default. To use the peripheral for a TLS connection, the application will have to pass the DS context to the ESP-TLS along with the device certificate (public key).
The contents of the NVS partition generated by the configure_ds.py script are listed in step 1. The application will have to read the contents by using respective NVS read/write API functions in order to create a DS context. The DS context and the client (device) certificate can be passed to an ESP-TLS connection as follows:
This way the ESP-TLS will use the DS peripheral for that particular TLS connection.
The DS peripheral uses the hardware RSA accelerator. Hence, the RSA sign/verify operation using the DS peripheral will be faster as compared to software RSA sign/verify operation. Refer the ESP32-S2 TRM for more technical details.
Readily available example for the DS peripheral#
The ESP-IDF provides the example mqtt/ssl_ds to showcase the use of the DS peripheral . The example connects to the broker test.mosquitto.org using ssl transport with client certificate(RSA) and as a demonstration subscribes/unsubscribes, sends a message on certain topic. The RSA signature operation required in the ssl connection is performed with help of the Digital Signature (DS) peripheral.
The example follows all of the above mentioned steps. A detailed explanation of the steps to perform the example is also provided in the example README.
If you would like to know more about TLS security then please see the article TLS and IOT
If you would like to know more about the other security features in the ESP32 series then you can see this article Understanding ESP32’s Security Features