Edge computing is a distributed computing paradigm that brings computation and data storage closer to the device’s location. Edge Artificial Intelligence (edge-AI) is an exciting development within edge computing because it allows traditional technologies to run more efficiently, with higher performance and less power. Trained neural networks are used to make inferences on small devices. The potential applications areas of edge AI includes manufacturing, healthcare, the retail industry, surveillance, smart home, and finance banking.

Espressif System provides a framework ESP-DL that can be used to deploy your high-performance deep learning models on ESP32-S3.
In this article, you will understand how to read sensor data and using ESP-DL to deploy a deep-learning model on ESP32-S3.
Prerequisite for using ESP-DL#
Before getting a deep dive into ESP-DL, we assume that readers have knowledge about:
- Building and training neural networks. (Check out the basics of deep learning)
- ESP-IDF release/v4.4 environment. (For more details, follow setting-up ESP-IDF environment or tool chain for ESP-IDF)
- Working knowledge of basic C and C++ language
- Converting model into ESP-DL formate
Note: Please use ESP-IDF release/v4.4 on the commit “cc71308e2fdce1d6d27fc52d39943f5d0fb83f35” to reproduce the same results
1. Model Deployment#
A convolution neural network is designed using accelerometer data to recognize human activity.
*In this blog we will not focus on the development and conversion of neural networks to ESP-Dl format.
1.1 ESP-IDF Project Hierarchy#
The Project directory should look like this:
├── CMakeLists.txt
├── components
│   ├── bus
│   ├── mpu6050
│   └── esp-dl
├── dependencies.lock
├── main
│   ├── app_main.cpp
│   └── CMakeLists.txt
├── model
│   ├── Activity_coefficient.cpp
│   ├── Activity_coefficient.hpp
│   └── model_define.hpp
├── partitions.csv
├── sdkconfig
├── sdkconfig.defaults
├── sdkconfig.defaults.esp32
├── sdkconfig.defaults.esp32s2
└── sdkconfig.defaults.esp32s3
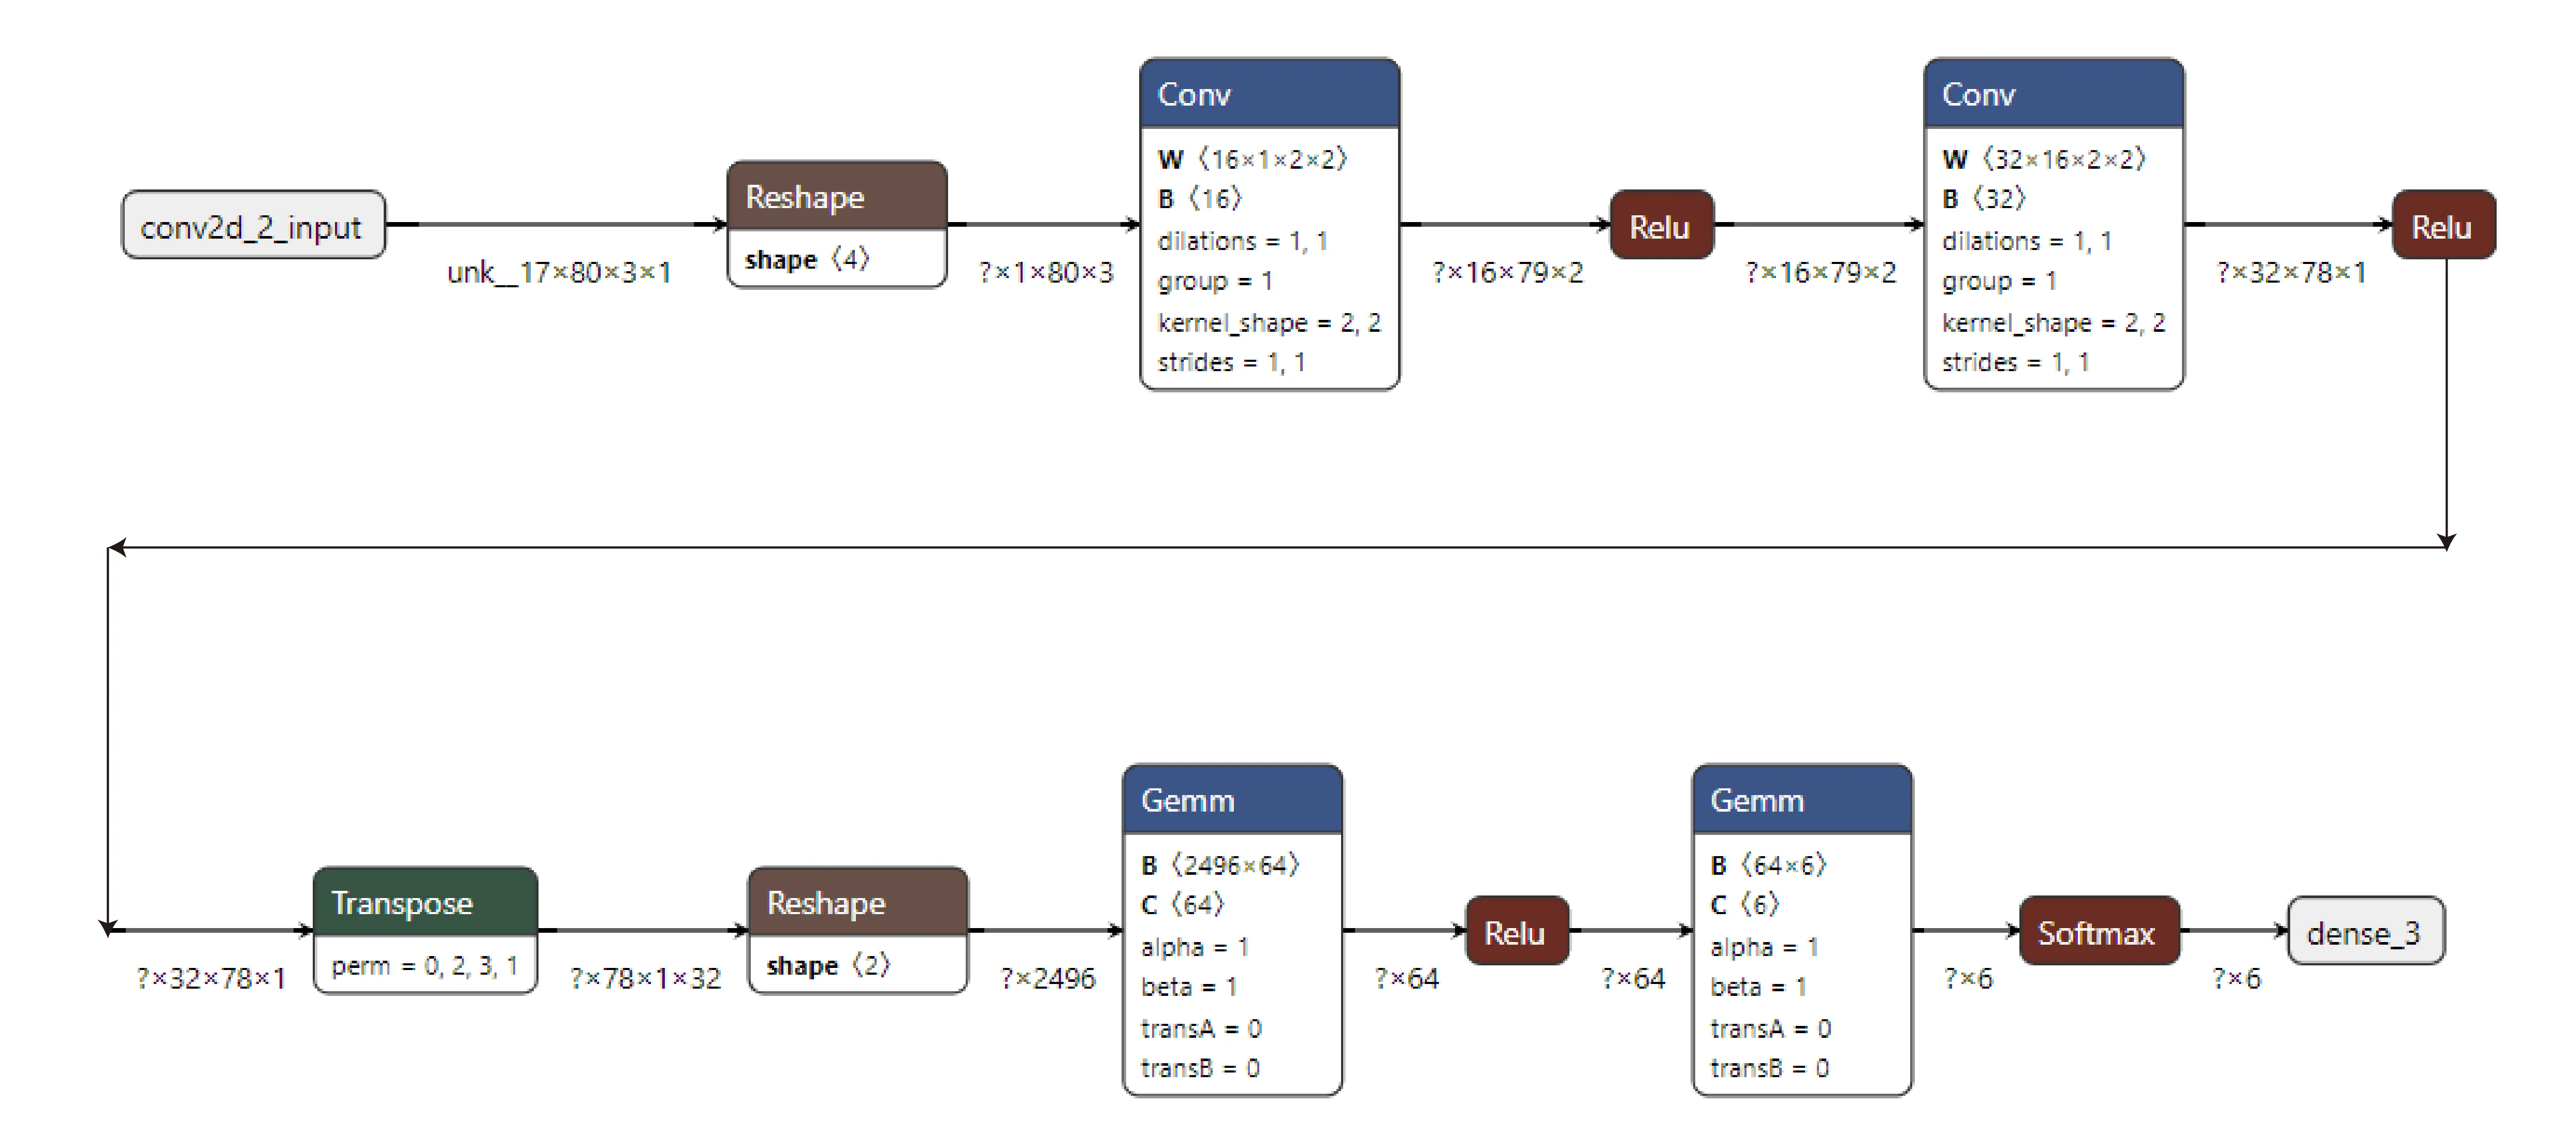
2. Model Define#
We will define our model in the ‘model_define.hpp’ file. Following the steps below with detailed explanation. When open in Netron our model looks like Figure 1 below.
2.1 Import Libraries#
Import all the relevant libraries. Please check here for all the currently supported libraries by ESP-DL.
#pragma once
#include "dl_layer_model.hpp"
#include "dl_layer_base.hpp"
#include "dl_layer_max_pool2d.hpp"
#include "dl_layer_conv2d.hpp"
#include "dl_layer_concat.hpp"
#include "Activity_coefficient.hpp"
#include "dl_layer_reshape.hpp"
#include "dl_layer_softmax.hpp"
#include <stdint.h>

using namespace dl;
using namespace layer;
using namespace Activity_coefficient;
2.2 Declare Layers#
The next step is to declare each layer.
- Input is not considered a layer so it is not defined here.
- Except for the output layer, all the layers are declared as private layers.
class ACTIVITY : public Model<int16_t>
{
private:
    Conv2D<int16_t> l1;
    Conv2D<int16_t> l2;
    Reshape<int16_t> l3;
    Conv2D<int16_t> l4;
    Conv2D<int16_t> l5;

public:
    Softmax<int16_t> l6;
2.3 Initialize Layers#
After declaring the layers, Initialize each layer with its weight, biases, activation functions and shape.
ACTIVITY () :
            l1(Conv2D<int16_t>(-13, get_statefulpartitionedcall_sequential_1_conv2d_2_biasadd_filter(), get_statefulpartitionedcall_sequential_1_conv2d_2_biasadd_bias(), get_statefulpartitionedcall_sequential_1_conv2d_2_biasadd_activation(), PADDING_VALID, {}, 1,1, "l1")),
            l2(Conv2D<int16_t>(-13, get_statefulpartitionedcall_sequential_1_conv2d_3_biasadd_filter(), get_statefulpartitionedcall_sequential_1_conv2d_3_biasadd_bias(), get_statefulpartitionedcall_sequential_1_conv2d_3_biasadd_activation(), PADDING_VALID, {}, 1,1, "l2")),
            l3(Reshape<int16_t>({1,1,2496},"l2_reshape")),
            l4(Conv2D<int16_t>(-11, get_fused_gemm_0_filter(), get_fused_gemm_0_bias(), get_fused_gemm_0_activation(), PADDING_VALID, {}, 1, 1, "l3")),
            l5(Conv2D<int16_t>(-9, get_fused_gemm_1_filter(), get_fused_gemm_1_bias(), NULL, PADDING_VALID,{}, 1,1, "l4")),
            l6(Softmax<int16_t>(-14,"l5")){}
2.4 Building Layers#
The next step is to build each layer. For more information about building layers please check the build function of each layer.
void build(Tensor<int16_t> &input)
    {
        this->l1.build(input);
        this->l2.build(this->l1.get_output());
        this->l3.build(this->l2.get_output());
        this->l4.build(this->l3.get_output());
        this->l5.build(this->l4.get_output());
        this->l6.build(this->l5.get_output());
    }
2.5 Call Layers#
In the end, connect these layers and call them one by one by using a call function. For more information about calling layers please check the call function of each layer.
void call(Tensor<int16_t> &input)
    {
        this->l1.call(input);
        input.free_element();

        this->l2.call(this->l1.get_output());
        this->l1.get_output().free_element();

        this->l3.call(this->l2.get_output());
        this->l2.get_output().free_element();

        this->l4.call(this->l3.get_output());
        this->l3.get_output().free_element();

        this->l5.call(this->l4.get_output());
        this->l4.get_output().free_element();

        this->l6.call(this->l5.get_output());
        this->l5.get_output().free_element();

    }
};
3. Model Run#
Once our model is built, declare the input to our model and run the model on ESP32-S3 in ‘app_main.cpp’.
3.1 Import libraries#
#include <stdio.h>
#include <stdlib.h>
#include "esp_system.h"
#include "freertos/FreeRTOS.h"
#include "freertos/task.h"
#include "dl_tool.hpp"
#include "model_define.hpp"
#include "i2c_bus.h"
#include "mpu6050.h"
#include "driver/i2c.h"
#include "esp_log.h"
3.2 Declare Input#
The input to our neural network is taken from the MPU6050 accelerometer sensor. To read sensor data in real time, we use the mpu6050 driver from espressif. Every 4 seconds, the data will be stored in an array and fed to the network for predictions.
int input_height = 80;
int input_width = 3;
int input_channel = 1;
int input_exponent = -13;
float acc_xyz[240] = {0};
int index_acc=0;
#define I2C_MASTER_SCL_IO 16      /*!< gpio number for I2C master clock */
#define I2C_MASTER_SDA_IO 17      /*!< gpio number for I2C master data  */
#define I2C_MASTER_NUM I2C_NUM_0  /*!< I2C port number for master dev */
#define I2C_MASTER_FREQ_HZ 400000 /*!< I2C master clock frequency */
static i2c_bus_handle_t i2c_bus = NULL;
static mpu6050_handle_t mpu6050 = NULL;

extern "C" void app_main(void)
{
    i2c_config_t conf = {
        .mode = I2C_MODE_MASTER,
        .sda_io_num = I2C_MASTER_SDA_IO,
        .scl_io_num = I2C_MASTER_SCL_IO,
        .sda_pullup_en = GPIO_PULLUP_ENABLE,
        .scl_pullup_en = GPIO_PULLUP_ENABLE,
        .clk_flags = 0,
    };

    conf.master.clk_speed = I2C_MASTER_FREQ_HZ;
    i2c_bus = i2c_bus_create(I2C_MASTER_NUM, &conf);
    mpu6050 = mpu6050_create(i2c_bus, MPU6050_I2C_ADDRESS);
    uint8_t mpu6050_deviceid;
    mpu6050_acce_value_t acce;
    mpu6050_get_deviceid(mpu6050, &mpu6050_deviceid);
    printf("mpu6050 device ID is: 0x%02x\n", mpu6050_deviceid);
    mpu6050_set_acce_fs(mpu6050, ACCE_FS_4G);
while(1){
for (int i=0 ;i<80; i++)
{
    mpu6050_get_acce(mpu6050, &acce);
    acc_xyz[index_acc]=acce.acce_x;
    index_acc=index_acc+1;
    acc_xyz[index_acc]=acce.acce_y;
    index_acc=index_acc+1;
    acc_xyz[index_acc]=acce.acce_z;
    index_acc=index_acc+1;
    vTaskDelay(50 / portTICK_RATE_MS);
}
index_acc=0;
int16_t *model_input = (int16_t *)dl::tool::malloc_aligned_prefer(input_height*input_width*input_channel, sizeof(int16_t *));
    for(int i=0 ;i<input_height*input_width*input_channel; i++){
        float normalized_input = acc_xyz[i] / 1.0; //normalization
        model_input[i] = (int16_t)DL_CLIP(normalized_input * (1 << -input_exponent), -32768, 32767);
    }
3.3 Set Input shape#
Set the data in a tensor to feed the neural network.
Tensor<int16_t> input;

input.set_element((int16_t *) model_input).set_exponent(input_exponent).set_shape({input_height,input_width,input_channel}).set_auto_free(false);
3.4 Call model#
Call the model by calling the method forward and passing input to it. Use latency to calculate the time taken by ESP32-S3 to run the neural network.
ACTIVITY model;
                dl::tool::Latency latency;
                latency.start();
                model.forward(input);
                latency.end();
                latency.print("\nActivity model", "forward");3. Future Directions
3.5 Monitor output#
The output is taken out from the public layer i.e l6. The result can be printed in the terminal.
float *score = model.l6.get_output().get_element_ptr();
                float max_score = score[0];
                int max_index = 0;
                for (size_t i = 0; i < 6; i++)
                {
                    printf("%f, ", score[i]*100);
                    if (score[i] > max_score)
                    {
                        max_score = score[i];
                        max_index = i;
                    }
                }
                printf("\n");
                switch (max_index)
                {
                    case 0:
                    printf("0: Downstairs");
                    break;
                    case 1:
                    printf("1: Jogging");
                    break;
                    case 2:
                    printf("2: Sitting");
                    break;
                    case 3:
                    printf("3: Standing");
                    break;
                    case 4:
                    printf("4: Upstairs");
                    break;
                    case 5:
                    printf("5: Walking");
                    break;
                    default:
                    printf("No result");
                }
                printf("\n");
    }
}
4. Conclusion#
In conclusion, the current project offers exciting possibilities for various applications, including predictive maintenance in industrial settings, boxing punch recognition in sports using an accelerometer, and fall detection in healthcare. These are just a few examples that can be explored further. For those interested in accessing the source code, it is available on the GitHub repository.