


[If you have been following the Espressif blogs and announcements, you must already be aware of ESP RainMaker and its various features. If not, please check out the info here so that you get an idea about what ESP RainMaker is before you proceed further.]
One important aspect of RainMaker is that the cloud is very thin and acts as a tunnel between the ESP nodes and clients like mobile phones, Alexa, GVA, etc. This makes it very flexible and extensible allowing users to create any type of device with any kind of functionality and access it from the phone apps. There are some defaults that we have defined, but they are not mandatory to use and you can create your own device/param types.
The functionality that a RainMaker node supports is communicated by the node using something called as the node configuration. This, broadly has 2 parts.
Most RainMaker users are now well versed with the concept of devices since they are very much visible in the examples. However, the concept of “services” may not be clear because it is hidden under the APIs like esp_rmaker_system_service_enable(), esp_rmaker_schedule_enable() or esp_rmaker_timezone_service_enable() and used internally by the phone apps.
Structurally, a service is very similar to a device. It has a “name” and “type” and a set of parameters. That’s one reason why all device specific APIs are applicable even to services. This applies not just to the firmware APIs, but even to the cloud APIs. The same GET /user/nodes?node_details=true, GET /user/nodes/config and GET/PUT /user/nodes/params APIs that are used for devices are applicable for services.
You can find some standard services here, but the purpose of this post is to help understand how to add your own custom service.
Defining the Use Case#
Naturally, before you even write a service, you need to define your use case, which will then help you define the parameters of the service. Let’s consider a use case of “Diagnostics” wherein you want the users to trigger some diagnostics on the node and get the diagnostic data in the phone app.
Creating the service#
The code snippet below is the minimal code required to create a service. It basically has 4 components
If the overall number of values in diagnostic data is small, it would be ok to define separate integer/bool/float/string parameters for each (“Timestamp” in above example). But if the data is going to be large, it is recommended to use an “object” type (“Data” in above example) and then pass whatever JSON object you want.
- Creating the service.
- Registering a callback.
- Creating and adding parameters as applicable.
- Adding it to the node.
/* Create the service using esp_rmaker_service_create(). However, note that a service uses esp_rmaker_device_t
 * as the data type, since it is structurally same as a device.
 */
esp_rmaker_device_t *diag_service = esp_rmaker_service_create("Diagnostics","my.service.diag", NULL);

/* Register the write callback. Read callback would normally be NULL */
esp_rmaker_device_add_cb(diag_service, diag_write_cb, NULL);

/* Create and add paramaters of various types as applicable.
 * Parameter types (like my.param.diag-trigger) are not mandatory, but useful to have.
 */
esp_rmaker_device_add_param(diag_service, esp_rmaker_param_create("Trigger", "my.param.diag-trigger", esp_rmaker_bool(false), PROP_FLAG_WRITE));
esp_rmaker_device_add_param(diag_service, esp_rmaker_param_create("Timestamp", "my.param.diag-timestamp", esp_rmaker_int(0), PROP_FLAG_READ));
esp_rmaker_device_add_param(diag_service, esp_rmaker_param_create("Data", "my.param.diag-data", esp_rmaker_obj("{}"), PROP_FLAG_READ));

/* Add the service to the node */
esp_rmaker_node_add_device(node, diag_service);
Note that none of these parameters are mandatory and are shown just for reference.
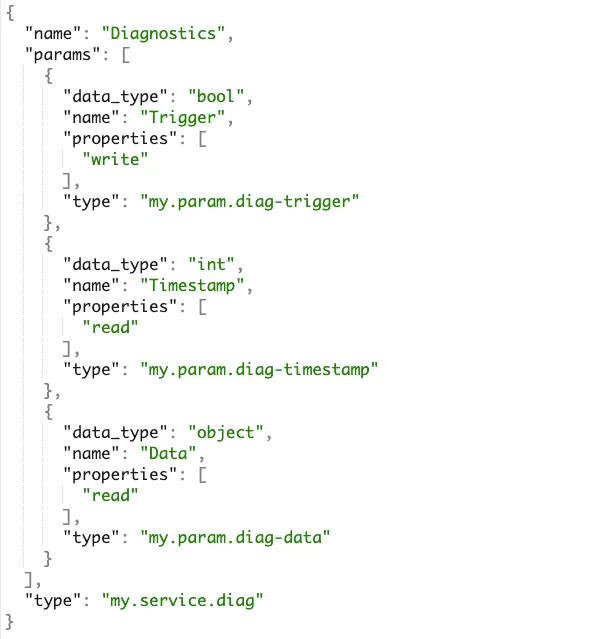
The above service will show up in the node configuration as this object under the services array:
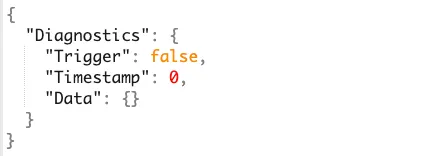
Similarly, the following will show up in the node parameters object
Handling Service callbacks#
As you can see in the code snippet above, we have registered diag_write_cb as the service write callback. Let us see a sample implementation of this.
#include <json_generator.h>
static esp_err_t diag_write_cb(const esp_rmaker_device_t *device, const esp_rmaker_param_t *param,
const esp_rmaker_param_val_t val, void *priv_data, esp_rmaker_write_ctx_t *ctx)
{
/* This ctx check is just to find if the request was received via Cloud, Local network or Schedule.
* Having this is not required, but there could be some cases wherein specific operations may be allowed
* only via specific channels (like only Local network), where this would be useful.
*/
if (ctx) {
ESP_LOGI(TAG, "Received write request via : %s", esp_rmaker_device_cb_src_to_str(ctx->src));
}
/* Check if the write is on the "Trigger" parameter. We aren't really checking true/false as that
* is not much of a concern in this context. But you can add checks on the values too.
*/
if (strcmp(esp_rmaker_param_get_name(param), "Trigger") == 0) {
/* Here we start some dummy diagnostics and populate the appropriate values to be passed
* to "Timestamp" and "Data".
*/
ESP_LOGI(TAG, "Starting Diagnostics");
time_t current_timestamp = 0;
time(¤t_timestamp);
char buf[100] = {0};
json_gen_str_t jstr;
json_gen_str_start(&jstr, buf, sizeof(buf), NULL, NULL);
json_gen_start_object(&jstr);
json_gen_obj_set_bool(&jstr, "diag1", true);
json_gen_obj_set_int(&jstr, "diag2", 30);
json_gen_obj_set_float(&jstr, "diag3", 54.1643);
json_gen_obj_set_string(&jstr, "diag4", "diag");
json_gen_end_object(&jstr);
json_gen_str_end(&jstr);
/* The values are reported by updating appropriate parameters */
esp_rmaker_param_update_and_report(esp_rmaker_device_get_param_by_name(device, "Data"),
esp_rmaker_obj(buf));
esp_rmaker_param_update_and_report(esp_rmaker_device_get_param_by_name(device, "Timestamp"),
esp_rmaker_int((int)current_timestamp));
}
return ESP_OK;
}
The above code snippet should be self explanatory because of the comments.
As you can see, 4 different values of 4 different types could be reported via a single parameter, which is better than having 4 different parameters, which would bloat up the node configuration. Note that the JSON Generator library usage is shown just for reference as it is used at most places in ESP RainMaker. You can choose any other libraries or functions to create the object.
Testing the Service#
Before you add some logic in your phone apps to use the service, it would be better to test it first from the RainMaker CLI. Once you have the CLI set-up, you can use a command like this to start the diagnostics:
$ ./rainmaker.py setparams --data '{"Diagnostics":{"Trigger":true}}' <node_id>
Once the device gets this command, the device serial console will show up such prints
I (74726) esp_rmaker_param: Received params: {"Diagnostics": {"Trigger": true}}
I (74726) app_main: Received write request via : Cloud
I (74726) app_main: Starting Diagnostics
I (74736) esp_rmaker_param: Reporting params: {"Diagnostics":{"Data":{"diag1":true,"diag2":30,"diag3":54.16430,"diag4":"diag"}}}
I (74746) esp_rmaker_param: Reporting params: {"Diagnostics":{"Timestamp":1639738352}}
You can then query the node parameters to see the results using:
$ ./rainmaker.py getparams \<node_id\>
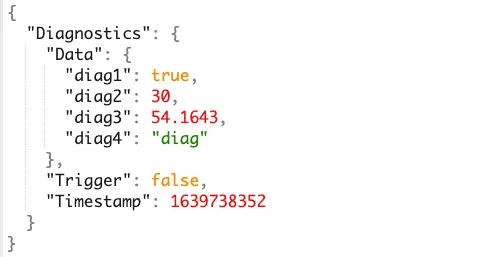
It will show up this object:
As you can see here, we could add a new custom functionality in RainMaker without changing/configuring anything in the cloud backend. That’s how the “tunnelling” concept of RainMaker works, making it very extensible.
A few samples for RainMaker services can be found here:
