Introduction#
Swift is a powerful and intuitive programming language, renowned for its expressive syntax, modern features, and safety. Originally designed for developing applications across Apple’s ecosystem—macOS, iOS, watchOS, and tvOS—Swift has gained popularity for its performance and developer-friendly nature.
What is Embedded Swift?#
Embedded Swift is subset of Swift programming language which extends the capabilities of Swift to the realm of embedded systems. It allows developers to write firmware and applications for microcontrollers using Swift, bringing modern programming paradigms to resource-constrained devices. By leveraging Embedded Swift, you can benefit from Swift’s features like optionals, generics, and strong type safety, even in an embedded context.
In this article, we’ll explore how to use Embedded Swift to develop graphical applications for microcontrollers. We’ll demonstrate how to integrate C libraries like SDL3 (Simple DirectMedia Layer 3), commonly used in desktop applications, into your Swift projects for embedded systems. With the help of the ESP-IDF (Espressif IoT Development Framework) and ESP-BSP (Board Support Package), we’ll create cross-platform applications that can run on various ESP32 boards with minimal effort.
Specifically, we’ll focus on the ESP32-C3 and ESP32-C6 microcontrollers, showcasing how to build and deploy Swift applications that utilize SDL3 for graphics rendering.
If you’re new to Embedded Swift, we recommend that you start by checking the article Build Embedded Swift Application for ESP32-C6.
The full project is available at GitHub repository.
What is SDL3?#
SDL3 (Simple DirectMedia Layer 3) is a cross-platform software development library written in C, designed to provide low-level access to audio, keyboard, mouse, joystick, and graphics hardware. It is widely used for creating multimedia applications, games, and graphical user interfaces on various platforms, including Windows, macOS, and Linux.
Combining Embedded Swift and SDL3#
Integrating SDL3 with Embedded Swift on the ESP32 platform allows developers to harness the strengths of both technologies.
Let’s explore an example where the main logic is written in Embedded Swift using SDL3 for loading and displaying text and graphical assets.
Prerequisites#
Before getting started, make sure you have the following tools installed:
- Swift 6.1 (nightly): Download and install Swift for your operating system.
- ESP-IDF 5.5: Clone the ESP-IDF repository and set it up according to the installation guide.
Setting Up the Development Environment#
Install Swift#
Download and install Swift 6.1 (nightly) from the official Swift website or use Swiftly installation tool. Ensure that the swiftc compiler is available in your system’s PATH.
Configure TOOLCHAINS environment variable with the version of the installed Swift 6.
export TOOLCHAINS=$(plutil -extract CFBundleIdentifier raw /Library/Developer/Toolchains/swift-DEVELOPMENT-SNAPSHOT-2024-10-30-a.xctoolchain/Info.plist)
# Make sure to have ninja installed
sudo apt install ninja-build

# Installation using Swiftly - https://swiftlang.github.io/swiftly/
curl -L https://swiftlang.github.io/swiftly/swiftly-install.sh | bash

swiftly install main-snapshot
Install ESP-IDF#
git clone https://github.com/espressif/esp-idf.git
cd esp-idf
./install.sh
. ./export.sh
Integrating SDL3 with Embedded Swift#
To use SDL3 in your Swift application, we’ll use a wrapper component in ESP-IDF that allows integration with C libraries. This is facilitated through a bridging header.
Using BridgingHeader.h#
Create a BridgingHeader.h file in your project and include the necessary C headers:
#include <stdio.h>

/* ESP-IDF headers */
#include "freertos/FreeRTOS.h"
#include "freertos/task.h"
#include "sdkconfig.h"

/* SDL3 headers */
#include "SDL3/SDL.h"
#include "SDL3_ttf/SDL_ttf.h"

/* ESP-IDF pthread support required by SDL3 */
#include "pthread.h"

/* ESP-BSP Board support package */
#include "bsp/esp-bsp.h"

/* ESP-IDF filesystem stored in flash memory */
#include "esp_vfs.h"
#include "esp_littlefs.h"
This header enables your Swift code to interact with the included C libraries.
Writing the Application#
Our main Swift file, Main.swift, contains the core logic of the application. The application initializes SDL, loads graphical assets, handles touch events, and renders sprites on the screen.
Overview of Main.swift#
Here’s a simplified version of Main.swift with initialization of pthread required by SDL3. ESP-IDF by default uses vTask, so the solution is to wrap the initial SDL call into pthread.
func sdl_thread_entry_point(arg: UnsafeMutableRawPointer?) -> UnsafeMutableRawPointer? {
    // Initialize SDL
    if SDL_Init(UInt32(SDL_INIT_VIDEO | SDL_INIT_EVENTS)) == false {
        print("Unable to initialize SDL")
        return nil
    }
    print("SDL initialized successfully")

    guard let window = SDL_CreateWindow(nil, 320, 200, 0) else {
        return nil
    }

    // Create SDL renderer
    guard let renderer = SDL_CreateRenderer(window, nil) else {
        print("Failed to create renderer")
        return nil
    }

    SDL_SetRenderDrawColor(renderer, 22, 10, 33, 255)
    SDL_RenderClear(renderer)
    SDL_RenderPresent(renderer)

    // ... Main loop
}

@_cdecl("app_main")
func app_main() {
    print("Initializing SDL3 from Swift.")

    // Initialize pthread attributes
    var sdl_pthread = pthread_t(bitPattern: 0)
    var attr = pthread_attr_t()

    pthread_attr_init(&attr)
    pthread_attr_setstacksize(&attr, 32000) // Set the stack size for the thread

    // Create the SDL thread
    let ret = pthread_create(&sdl_pthread, &attr, sdl_thread_entry_point, nil)
    if ret != 0 {
        print("Failed to create SDL thread")
        return
    }

    // Detach the thread
    pthread_detach(sdl_pthread)
}
Loading Assets with LittleFS#
To load fonts and images, we use the LittleFS filesystem. The FileSystem.swift file initializes the filesystem, allowing access to assets stored in a flashed partition:
func SDL_InitFS() {
    print("Initializing File System")

    var config = esp_vfs_littlefs_conf_t(
        base_path: strdup("/assets"),
        partition_label: strdup("assets"),
        partition: nil,
        format_if_mount_failed: 0,
        read_only: 0,
        dont_mount: 0,
        grow_on_mount: 0
    )

    let result = esp_vfs_littlefs_register(&config)
    if result != ESP_OK {
        print("Failed to mount or format filesystem")
    } else {
        print("Filesystem mounted")
    }
}
Drawing Sprites Loaded from Files#
With the filesystem initialized and assets stored in the LittleFS partition, we can proceed to load images and render them using SDL3. This section demonstrates how to load a sprite from a file and display it on the screen, providing a foundation for creating interactive graphical applications.
Loading Images with SDL3#
To display images, we need to load them into our application as textures. In our example, we have two types of sprites: coins and dangers (e.g., obstacles). These images are stored in BMP format in the /assets directory.
Here’s how we load these images:
// Initialize SDL_ttf for font rendering
TTF_Init()

// Load the font
let font = TTF_OpenFont("/assets/FreeSans.ttf", 42)
if font == nil {
    print("Font load failed")
}

// Load the coin image
let coinSurface = SDL_LoadBMP("/assets/coin_gold.bmp")
if coinSurface == nil {
    print("Failed to load coin image")
}
let coinTexture = SDL_CreateTextureFromSurface(renderer, coinSurface)
SDL_DestroySurface(coinSurface)

// Load the danger image
let dangerSurface = SDL_LoadBMP("/assets/slime_normal.bmp")
if dangerSurface == nil {
    print("Failed to load danger image")
}
let dangerTexture = SDL_CreateTextureFromSurface(renderer, dangerSurface)
SDL_DestroySurface(dangerSurface)
Explanation of Font Functions#
- Initializing SDL_ttf: We call
TTF_Init()to initialize the SDL_ttf library, which is necessary for font rendering. - Loading the Font:
TTF_OpenFont()loads the font file from the filesystem. In this case, we’re using FreeSans.ttf. - Creating Textures:
SDL_CreateTextureFromSurface()converts the surface into a texture for rendering.
Displaying a Sprite and Text#
After initializing the filesystem with LittleFS and setting up SDL, we can proceed to load an image and display it at a fixed position on the screen. Additionally, we’ll render some text to display alongside the image. This simple example demonstrates how to work with sprites and text rendering in SDL3 using Embedded Swift.
Loading and Displaying an Image#
First, we’ll load an image from the filesystem and create a texture that can be rendered on the screen.
// Load the image from the assets directory
let imageSurface = SDL_LoadBMP("/assets/coin_gold.bmp")
if imageSurface == nil {
    print("Failed to load image: \(String(cString: SDL_GetError()))")
}

// Create a texture from the surface
let imageTexture = SDL_CreateTextureFromSurface(renderer, imageSurface)
SDL_DestroySurface(imageSurface)
Explanation of Image Functions#
SDL_LoadBMP(): Loads a BMP image file from the specified path into an SDL_Surface.SDL_CreateTextureFromSurface(): Converts the surface into an SDL_Texture, which is optimized for rendering.SDL_DestroySurface(): Frees the memory associated with the surface since it’s no longer needed after creating the texture.
Next, we’ll define a rectangle that specifies where and how large the image will appear on the screen.
// Define the destination rectangle for the image
var imageRect = SDL_FRect(x: 100.0, y: 80.0, w: 128.0, h: 128.0)
Rendering Text with SDL_ttf#
To display text, we’ll use the SDL_ttf library, which allows us to render TrueType fonts.
if TTF_Init() != 0 {
    print("Failed to initialize SDL_ttf: \(String(cString: TTF_GetError()))")
}

let font = TTF_OpenFont("/assets/FreeSans.ttf", 24)
if font == nil {
    print("Failed to load font: \(String(cString: TTF_GetError()))")
}

// Create the text to render
let message = "Hello, ESP32!"
var messageBuffer = Array(message.utf8CString)

// Render the text to a surface
let textColor = SDL_Color(r: 255, g: 255, b: 255, a: 255)
let textSurface = TTF_RenderText_Blended(font, &messageBuffer, 0, textColor)
if textSurface == nil {
    print("Failed to render text: \(String(cString: TTF_GetError()))")
}

// Create a texture from the text surface
let textTexture = SDL_CreateTextureFromSurface(renderer, textSurface)
SDL_DestroySurface(textSurface)

// Define the destination rectangle for the text
var textRect = SDL_FRect(x: 80.0, y: 220.0, w: 160.0, h: 40.0)
Using ESP-BSP for Board Support#
To make the application portable across different ESP32 boards, we use the ESP-BSP (Board Support Package). This allows us to switch between boards easily.
Configuring idf_component.yml#
In the idf_component.yml file, we specify dependencies and define rules for different boards:
dependencies:
  joltwallet/littlefs: "==1.14.8"
  georgik/sdl: "==3.1.7~6"
  georgik/sdl_ttf: "^3.0.0~3"
  idf:
    version: ">=5.5.0"

  espressif/esp32_p4_function_ev_board_noglib:
    version: "3.0.1"
    rules:
    - if: "${BUILD_BOARD} == esp32_p4_function_ev_board_noglib"

  espressif/esp32_c3_lcdkit:
    version: "^1.1.0~1"
    rules:
    - if: "${BUILD_BOARD} == esp32_c3_lcdkit"

  espressif/esp_bsp_generic:
    version: "==1.2.1"
    rules:
    - if: "${BUILD_BOARD} == esp_bsp_generic"
This configuration allows us to build the project for different targets using the idf.py command with the @boards/… syntax.
Building and Running the Application#
Build for ESP32-P4-Function-Ev-Board:
idf.py @boards/esp32_p4_function_ev_board.cfg flash monitor
Running the Simulation#
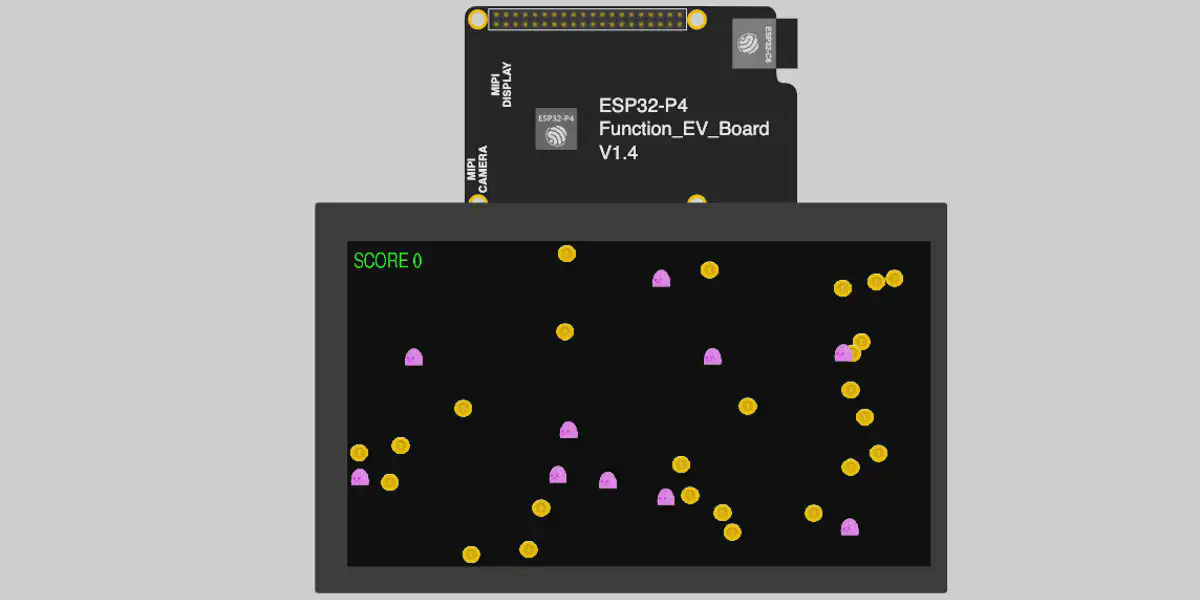
You can run the application in an online simulation using Wokwi. This allows you to test the application without physical hardware.
You can run the simulation also in VS Code or JetBrains IDE with installed Wokwi plugin. Open boards/.../diagram.json and click play button.
Using GitHub Actions for CI/CD#
To automate the build, test, and release processes of our ESP32 Swift application, we utilize GitHub Actions. Continuous Integration/Continuous Deployment (CI/CD) is essential for maintaining code quality and ensuring that your application works as expected across different environments. In this section, we’ll delve into how our CI/CD pipeline is set up, focusing on aspects particularly relevant to embedded developers who may be new to these practices.
Overview of the CI/CD Pipeline#
Our CI/CD process is divided into three main workflows:
- Build Workflow: Compiles the application for different boards and uploads the build artifacts.
- Test Workflow: Runs simulations using Wokwi to verify that the application functions correctly.
- Release Workflow: Creates a GitHub release and attaches the compiled binaries.
The key idea is that the build step generates artifacts (compiled binaries), which are then consumed by the test and release steps. This modular approach ensures that each step is isolated and can be debugged or rerun independently.
Build Workflow#
The build workflow automates the compilation of the application for various ESP32 boards. Here’s a simplified snippet of the build.yml file with focus on how we install Swift and set up the ESP-IDF action.
Installing Swift Compiler: Before building the project, we download and install the Swift compiler. This step is crucial because the ESP-IDF action doesn’t come with Swift support out of the box.
Building with ESP-IDF and Swift: We use the espressif/esp-idf-ci-action GitHub Action to set up the ESP-IDF environment. The command parameter allows us to execute custom build commands, where we specify the build configuration and merge the binaries.
    - name: Install pkg-config
    run: sudo apt-get update && sudo apt-get install -y pkg-config

    - name: Install Swift Compiler
    run: |
        wget https://download.swift.org/development/ubuntu2204/swift-DEVELOPMENT-SNAPSHOT-2024-10-30-a/swift-DEVELOPMENT-SNAPSHOT-2024-10-30-a-ubuntu22.04.tar.gz
        tar xzf swift-DEVELOPMENT-SNAPSHOT-2024-10-30-a-ubuntu22.04.tar.gz
        export PATH="$PATH:${{ github.workspace }}/swift-DEVELOPMENT-SNAPSHOT-2024-10-30-a-ubuntu22.04/usr/bin"
        swiftc --version

    - name: Build with ESP-IDF and Swift
    uses: espressif/esp-idf-ci-action@v1.1.0
    with:
        esp_idf_version: latest
        target: ${{ env.TARGET }}
        path: '.'
        command: |
        idf.py @boards/${{ matrix.board }}.cfg build &&
        cd build.${{ matrix.board }} &&
        esptool.py --chip ${{ env.TARGET }} merge_bin -o ${{ github.event.inputs.prefix }}-${{ matrix.board }}.bin "@flash_args"
Test Workflow#
The test workflow runs simulations of our application using Wokwi, a virtual environment for embedded systems. This step verifies that the application behaves as expected before releasing it.
- Using Wokwi CI Server: We set up the Wokwi CI server, which allows us to run simulations of our firmware.
- name: Use Wokwi CI Server
  uses: wokwi/wokwi-ci-server-action@v1
Running Simulation with Wokwi: This step runs the actual simulation. Note that we use a secret token WOKWI_CLI_TOKEN for authentication with Wokwi’s services. You can obtain this token by signing up at Wokwi CI Dashboard and adding it to your repository’s secrets.
- name: Run Simulation with Wokwi
  uses: wokwi/wokwi-ci-action@v1
  with:
    token: ${{ secrets.WOKWI_CLI_TOKEN }}
    path: boards/${{ matrix.board }}
    elf: build.${{ matrix.board }}/${{ github.event.inputs.prefix }}-${{ matrix.board }}.bin
    timeout: 20000
    expect_text: 'Entering main loop...'
    fail_text: 'Rebooting...'
    serial_log_file: 'wokwi-logs-${{ matrix.board }}.txt'
Conclusion#
By integrating Embedded Swift with SDL3 on the ESP32-C3 and ESP32-C6, you can leverage modern programming languages and desktop-class libraries to develop rich graphical applications for embedded systems. The use of ESP-BSP simplifies targeting multiple boards, making your applications more portable.
We encourage you to explore the GitHub repository for the full source code and additional details.


