Note: This article has been reviewd to reflect the latest Zephyr features as of Q4 2024.
Zephyr is a very low footprint RTOS maintained by the Linux Foundation and ported to several architectures. This RTOS has been gaining massive support from many silicon manufacturers and an ever-growing list of contributors on its mainline.
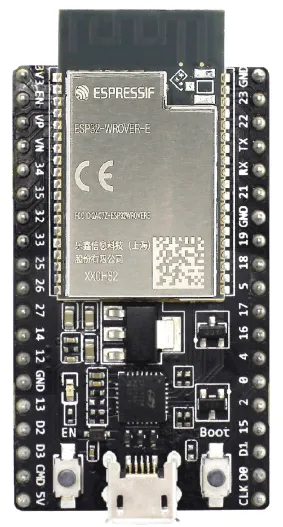
Espressif has been expanding support for Zephyr RTOS on ESP32, an extremely popular SoC among hobbyists but also widely used in commercial applications. Since its release, this SoC became famous for integrating both Wifi and Bluetooth stacks on a single chip and for being very cost-competitive. In this post, all the required steps to prepare your host’s environment to use Zephyr on ESP32 will be explained. In the end, we will run a hello world application to validate our setup. In this step-by-step guide, the ESP32 DevKitC_WROVER board will be used.
The first thing to do is to prepare Zephyr’s development environment. I briefly list the steps required for Linux (Ubuntu 22.04.1 LTS), for the most up-to-date documentation, and for support for other Operating Systems you can see Zephyr’s official Getting Started guide and, specifically, you can see most of the original instructions included in this post in the ESP32 SoC section of the Zephyr Project documentation.
Updating Linux#
Before we start, update your repositories list.
sudo apt update
sudo apt upgrade
Installing dependencies#
Run apt to install dependencies:
sudo apt install --no-install-recommends \
git cmake ninja-build gperf ccache dfu-util device-tree-compiler wget \
python3-dev python3-pip python3-setuptools python3-tk python3-wheel \
xz-utils file make gcc gcc-multilib g++-multilib libsdl2-dev libmagic1
Verify the versions of the main dependencie:
cmake --version
python3 --version
dtc --versio
The current minimum required versions for this tools are:
- CMake: 3.20.5
- Python: 3.10
- Devicetree compiler: 1.4.6
Getting Zephyr and installing Python dependencies#
Install west and ensure that ~/.local/bin is part of your PATH environment variable:
pip3 install -- user -U west
echo ‘export PATH=~/.local/bin:”$PATH”’ >> ~/.bashrc
source ~/.bashrc
Here is a worthy observation: west is the tool that manages the entire life-cycle of a Zephyr-based project. This is made clearer below. Now, get Zephyr’s source code:
west init ~/zephyrproject
cd ~/zephyrproject
west update
Be patient, these last commands will fetch Zephyr’s repository and all the HALs (including Espressif’s) already ported to this RTOS. Note that we do not explicitly call a git command to clone the repositories, west takes care of everything.
Zephyr’s requirements.txt file declares additional Python dependencies. Install them through pip3.
pip3 install --user -r \
~/zephyrproject/zephyr/scripts/requirements.txt
Installing Zephyr’s toolchain#
Zephyr’s SDK adds several additional tools for the host. Download and verify the Zephyr SDK bundle:
Note: You can change
0.16.8to another version in the instructions below if needed; the Zephyr SDK Releases page contains all available SDK releases.
cd ~
wget https://github.com/zephyrproject-rtos/sdk-ng/releases/download/v0.16.8/zephyr-sdk-0.16.8_linux-x86_64.tar.xz
wget -O - https://github.com/zephyrproject-rtos/sdk-ng/releases/download/v0.16.8/sha256.sum | shasum --check --ignore-missing
Extract the Zephyr SDK bundle archive:
tar xvf zephyr-sdk-0.16.8_linux-x86_64.tar.xz
Note: It is recommended to extract the Zephyr SDK bundle at one of the following locations:
- $HOME
- $HOME/.local
- $HOME/.local/opt
- $HOME/bin
- /opt
- /usr/local
The Zephyr SDK bundle archive contains the
zephyr-sdk-<version>directory and, when extracted under$HOME, the resulting installation path will be$HOME/zephyr-sdk-<version>.
Run the Zephyr SDK bundle setup script:
cd zephyr-sdk-0.16.8
./setup.sh
Note: You only need to run the setup script once after extracting the Zephyr SDK bundle. You must rerun the setup script if you relocate the Zephyr SDK bundle directory after the initial setup.
Install udev rules, which allow you to flash most Zephyr boards as a regular user:
sudo cp ~/zephyr-sdk-0.16.8/sysroots/x86_64-pokysdk-linux/usr/share/openocd/contrib/60-openocd.rules /etc/udev/rules.d
sudo udevadm control --reload
./setup.sh
Installing Espressif binary blobs#
To successfully build your ESP32 application on Zephyr, install Espressif binary blobs:
cd ~/zephyrproject
west blobs fetch hal_espressif
Building the application#
Remember I mentioned west takes part in all stages of a Zephyr’s project life-cycle? Well, we’ll see it in action here again. Build the hello_world project for the ESP32 board from the sample code folder.
cd ~/zephyrproject/zephyr/samples/hello_world
west build -b esp32_devkitc_wrover/esp32/procpu zephyr/samples/hello_world --pristine
Flashing the binary#
Flashing the binary is quite simple: use a usb cable to connect you ESP board to you PC usb port and do the following:
west flash
Afer executing the last command you must see the following messages:
ninja: no work to do.
-- west flash: using runner esp32
-- runners.esp32: reset after flashing requested
-- runners.esp32: Flashing esp32 chip on None (921600bps)
esptool.py v4.7.0
Found 33 serial ports
Serial port /dev/ttyUSB0
Connecting....
Detecting chip type... Unsupported detection protocol, switching and trying again...
Connecting....
Detecting chip type... ESP32
Chip is ESP32-D0WD-V3 (revision v3.1)
Features: WiFi, BT, Dual Core, 240MHz, VRef calibration in efuse, Coding Scheme None
Crystal is 40MHz
MAC: b0:b2:1c:b4:6b:28
Uploading stub...
Running stub...
Stub running...
Changing baud rate to 921600
Changed.
Configuring flash size...
Auto-detected Flash size: 8MB
Flash will be erased from 0x00001000 to 0x00020fff...
Flash params set to 0x0230
Wrote 131072 bytes at 0x00001000 in 1.8 seconds (590.9 kbit/s)...
Hash of data verified.

Leaving...
Hard resetting via RTS pin...
Now execute the command:
west espressif monitor
If you have been following everything up to this point, after some ESP32’s boot messages, you should see the expected hello message:
ets Jul 29 2019 12:21:46

rst:0x1 (POWERON_RESET),boot:0x13 (SPI_FAST_FLASH_BOOT)
configsip: 0, SPIWP:0xee
clk_drv:0x00,q_drv:0x00,d_drv:0x00,cs0_drv:0x00,hd_drv:0x00,wp_drv:0x00
mode:DIO, clock div:2
load:0x3ffb0000,len:6412
ho 0 tail 12 room 4
load:0x40080000,len:33216
entry 0x40083a04
I (31) boot: ESP Simple boot
I (31) boot: compile time Oct 17 2024 16:55:10
W (31) boot: Unicore bootloader
I (31) spi_flash: detected chip: generic
I (34) spi_flash: flash io: dio
I (37) boot: chip revision: v3.1
I (40) boot.esp32: SPI Speed      : 40MHz
I (44) boot.esp32: SPI Mode       : DIO
I (47) boot.esp32: SPI Flash Size : 8MB
I (51) boot: Enabling RNG early entropy source...
I (55) boot: DRAM: lma 0x00001020 vma 0x3ffb0000 len 0x190c   (6412)
I (61) boot: IRAM: lma 0x00002934 vma 0x40080000 len 0x81c0   (33216)
I (67) boot: padd: lma 0x0000ab08 vma 0x00000000 len 0x54f0   (21744)
I (74) boot: IMAP: lma 0x00010000 vma 0x400d0000 len 0x2eb4   (11956)
I (80) boot: padd: lma 0x00012ebc vma 0x00000000 len 0xd13c   (53564)
I (86) boot: DMAP: lma 0x00020000 vma 0x3f400000 len 0xc6c    (3180)
I (92) boot: Image with 6 segments
I (95) boot: DROM segment: paddr=00020000h, vaddr=3f400000h, size=00C6Ch (  3180) map
I (103) boot: IROM segment: paddr=00010000h, vaddr=400d0000h, size=02EB4h ( 11956) map

I (143) heap_runtime: ESP heap runtime init at 0x3ffb40c0 size 175 kB.

*** Booting Zephyr OS build v3.7.0-4642-g4152ab3cbba2 ***
Hello World! esp32_devkitc_wrover/esp32/procpu
There you have it! Your development environment was properly configured and you have run your first application using Zephyr on ESP32!
Supported Features#
ESP32 support for Zephyr is growing. By the time I am writing this post, it includes the following peripherals and features:
- UART
- I2C
- GPIO
- SPI
- SPI FLASH
- SPI RAM
- Timers
- Wi-FI
- Bluetooth
- GPIO
- TWAI
- E-Fuse
- ADC
- DAC
- MCPWM
- LEDPWM
- PCNT
- TRNG
- WATCHDOG
- ETH MAC
- SDHC
- FLASH ENCRIPTION
- OPENOCD
- MCUBOOT
Please follow here for overall future road-map for ESP32 support.
Summary#
In this post, we saw how to set the environment for Zephyr RTOS and how to build a sample project for an ESP32 based board.
Stay tuned to Zephyr’s documentation and repository for the most recent supported peripherals. Espressif Team keeps actively working on porting and supporting its SoCs on Zephyr.
Oct/2024 - Reviewd by Márcio Ribeiro