

This guide consists of the following parts:
- Publication essentials – prepare the article summary, tags, and a feature image
- Guidelines for structuring content – suggestions for creating and structuring content
- Supported media and content types – Overview of shortcodes extending markdown syntax
Create publication essentials#
The essentials include an article summary, tags, and a feature image.
You don’t need to create those at the beginning, but:
- Attempting to write an article summary early on can help you better understand how to structure your content and which mode of writing to choose, such as an overview, tutorial, or a how-to guide, etc.
- Trying to think about tags in advance can help you understand the key topics around which to structure your content.
Write an article summary#
Before you begin writing your article, it is a good exercise to summarize in one paragraph:
- The main topic of your article (1 or 2 sentences).
- What value it brings to the reader (1 or 2 sentences).
In addition to helping you better understand how to write your content, it will also help readers decide if they want to read your article as well as to set their expectations.
After you finish writing, revisit your summary to see if it needs any adjustments. You might be surprised by how the focus of your writing can shift during the process without you realizing it.
Tag the content#
Assign tags to your content following the guidelines in Tagging content.
Prepare a featured image#
A featured image appears above the article’s title. A nice and relevant image attracts readers like a magnet, that is why consider giving more thought to it.
Here are the guidelines for preparing the featured image:
- Image size should be 1200 x 600 pixels
- This image will be cropped in 2 different sizes as seen in the template below
- You can place the template over your image with transparency to ensure the following:
- If you use text in your image, it should be within the text safe space
- Any important elements should be clearly seen in both cropping sizes
- Your featured image should be in WebP as requested in Use WebP for raster images
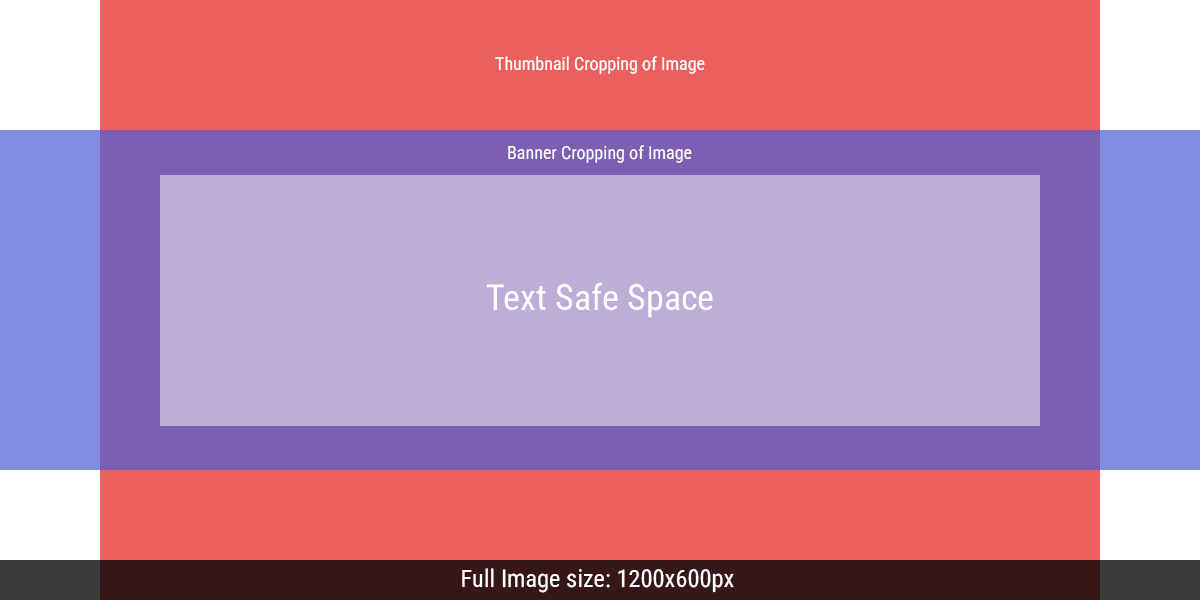
Feature image template
A featured image can be added in the following ways from the highest to lowest priority:
- Article-specific image file: In the same folder as your article’s
index.md, place your featured image and make sure its file name includes the substringfeature, for example:featured-lcd-screen.webp. - Image from a URL: In the article’s front matter, add the parameter
featureimageand assign a URL to it, for example:This parameter is from Blowfish theme’s Front Matter.featureimage: "https://espressif.com/logo-guidelines/chinese-horizontal-logo.png" - Generic image file: If you have no chance to create your own image, try to find a generic image in
assets/img/featuredand assign the path tofeatureAsset, for example:featureAsset: "img/featured/image.webp"
Follow the guidelines for structuring content#
This is totally up to you how you write the content as long as it is valuable for the community.
At the moment, we are systematizing typical patterns of how developer portal articles are usually written. As a result, we will publish recommended article recipes in the near future.
Review supported media and content types#
Apart from the usual content types supported by markdown, such as visuals or code blocks, you can use other content types enabled by Hugo shortcodes. This section briefly introduces the most relevant shortcodes implemented on the Espressif Developer Portal.
In addition to that, you can also use the standard Hugo embedded shortcodes and Blowfish theme shortcodes. But please note that Hugo and Blowfish versions (see the badges in the project README) might lag behind the latest ones. Make sure that you check the documentation for the respective versions.
If you need other content types or shortcodes implemented, either create a discussion on GitHub or offer a PR with the required functionality. It will be very much appreciated!
Links to pages#
When you link to other places on the Developer Portal, you can use:
- Absolute paths:
- Start with
/ - The root is mapped against
content/_index.md(see examples below)
- Start with
- Relative paths:
- To refer to a parent page, use
. - To refer to a sibling page, use the name of its folder directly
- To refer to a parent page, use
- Append
#heading-idto link to a section
Note that while resolving links, Hugo uses logical paths.
Use absolute paths when the destination is two or more levels above in the hierarchy or across major sections, for example:
- From a workshop to a blog article:
[Soft AP tutorial](/blog/2025/04/soft-ap-tutorial/) - From a workshop assignment or a blog article to another workshop:
[ESP-IDF Workshop: Basic](/workshops/esp-idf-basic/)
Use relative paths when referring to a sibling page or a page one level across in the hierarchy:
- From a blog article to another article from the same year:
Go to [Part 2](../06/debugging-with-vscode-part-2/) - From one workshop assignment to another one:
In/workshops/esp-idf-basic/assignment-1-1/, link to theNext assignment → [Assignment 1.2](assignment-1-2/) - From a workshop assignment to its overview page:
[Back to overview page](.)
[Back to navigation menu](.#agenda)
Use anchors to refer to a specific heading on a page:
- On the current page:
See [how to use links](#links-to-pages), results in “See how to use links” - On any other page:
[Soft AP tutorial](/blog/2025/04/soft-ap-tutorial/#introduction), results in “Soft AP tutorial”
Admonitions#
Admonitions are callout boxes for notes, tips, warnings, and similar messages. The Developer Portal supports two ways to add them:
- GitHub-style admonitions — standard GFM markdown blockquotes that many editors and platforms (including GitHub) render without extra tooling.
- Alerts — the Blowfish
alertshortcode, which requires Hugo to build the si
GitHub-style admonitions#
The Blowfish theme renders GitHub-style admonitions from plain markdown. Write a blockquote whose first line starts with an alert type: NOTE, TIP, IMPORTANT, WARNING, and CAUTION in square brackets:.
> [!NOTE]
> Use admonitions to highlight important information.Use admonitions to highlight important information.
Blowfish supports additional features, such as the alert sign (+ or -) to control whether the admonition is folded or not:
> [!TIP]- Custom Title
> A collapsible admonition with custom title.
Custom Title
A collapsible admonition with custom title.
Alerts#
To add an alert, use the following shortcode:
{{< alert >}}
  Use alerts only when they are really needed.
{{< /alert >}}You can also change its parameters:
{{< alert icon="circle-info" cardColor="#b3e0f2" iconColor="#04a5e5">}}
  Now you see a customized icon, its color, and the alert color.
{{< /alert >}}Diagrams as code#
Hugo supports a number of Diagrams as code tools, including Mermaid. The Blowfish theme adds Chart.js to the list.
As an example of how diagrams as code work, see a rendered Mermaid diagram and its raw code.
Images#
Adding images#
Please avoid using a standard markdown syntax for adding an image:
Instead, use the figure shortcode provided by the Blowfish theme that is used on this website. It offers more control over image display and render. The images are optimized for different device resolutions which reduces website load time. An example of a shortcode is given below, but more parameters are available:
{{< figure
    src="image.webp"
    alt=""
    caption=""
    >}}
Use WebP for raster images#
For raster images, please use the WebP format only. The Developer Portal’s CI blocks the images in PNG anf JPEG format.
The WebP format was chosen for the following reasons:
- The images in WebP are comparable in quality to PNG and JPEG but are 5-7 times smaller in size
- Smaller image size is important
- It prevents the git repo from growing out of proportion very fast
- It allows serving web pages faster
To convert your images to WebP, use one of the following ways:
Use imagemagick:
convert image.jpg -quality 60 image.webpUse cwebp:
cwebp -q 60 image.jpg -o image.webp
The quality value 60 usually yields good results. For very good quality, you can use the value 80.
Animated images#
Including an animated screenshot of some action done in GUI can sometimes replace a thousand words.
You can do this, but please don’t use the GIF format for its bad compression rates. Instead, create a .mp4 file and further compress it with FFmpeg if needed.
After that, include your .mp4 video using this shortcode:
{{< video src="video/my-video.mp4" >}}MP4 files increase developer portal size and slow down page loading. If your animated image exceeds 200 KB, consider using Asciinema casts or Video.
Code blocks#
A code block can be inserted using the standard markdown syntax – backticks. The Developer Portal supports additional parameters in fenced code blocks, including the ones from highlight shortcode and Blowfish’s title parameter.
Here are the most useful additional parameters:
| Parameter | Description |
|---|---|
title="string" | Add a code block header (typically used for a code filename) |
hl_lines="2 4-6" | Highlight lines, e.g "2 4-6" or [4,"7-9"] |
lineNos=true | Add line numbers |
lineNoStart="10" | Start from given line number (default 1) |
anchorLineNos=true | Make line numbers linkable anchors (also set lineAnchors) |
lineAnchors="id" | For each anchorLineNos=true code block, set ID to make links unique |
Here is an example of a code block with a filename and highlighted lines:
```c {title="main/blink_main.c" hl_lines="3"}
void app_main(void)
{
    ESP_ERROR_CHECK(gpio_set_direction(BLINK_GPIO, GPIO_MODE_OUTPUT));
    ESP_LOGI(TAG, "Blink LED configured on GPIO %d", BLINK_GPIO);
}
```void app_main(void)
{
ESP_ERROR_CHECK(gpio_set_direction(BLINK_GPIO, GPIO_MODE_OUTPUT));
ESP_LOGI(TAG, "Blink LED configured on GPIO %d", BLINK_GPIO);
}Here is another example of a code block with line numbers that also have linkable anchors enabled:
```c {lineNos=true anchorLineNos=true lineAnchors="led-strip"}
led_strip_config_t strip_config = {
  // Set the GPIO8 that the LED is connected
  .strip_gpio_num = 8,
  // Set the number of connected LEDs, 1
  .max_leds = 1,
  // Set the pixel format of your LED strip
  .led_pixel_format = LED_PIXEL_FORMAT_GRB,
  // LED model
  .led_model = LED_MODEL_WS2812,
  // In some cases, the logic is inverted
  .flags.invert_out = false,
};
``` 1led_strip_config_t strip_config = {
2 // Set the GPIO8 that the LED is connected
3 .strip_gpio_num = 8,
4 // Set the number of connected LEDs, 1
5 .max_leds = 1,
6 // Set the pixel format of your LED strip
7 .led_pixel_format = LED_PIXEL_FORMAT_GRB,
8 // LED model
9 .led_model = LED_MODEL_WS2812,
10 // In some cases, the logic is inverted
11 .flags.invert_out = false,
12};Tabs#
Tabs look neat:
Linux code blockUpdate homebrew, then run:
macOS code blockAt the same time, the markup is very simple:
{{< tabs group="config" >}}
  {{< tab label="Linux" >}}
```md
Linux code block
```
  {{< /tab >}}
  {{< tab label="macOS" >}}
Update homebrew, then run:
```md
macOS code block
```
  {{< /tab >}}
{{< /tabs >}}
Some explanations:
- Use the tabs shortcode to create a tab block
- Use the nested tab shortcode to create as many tabs as you need
- Within a tab, place any markdown content you want, it will be rendered like any other markdown content
- Set
md=falseon atabwhen its content includes other shortcodes (for examplealertorvideo)
- Set
- Use the same
groupvalue on multiple tab blocks when readers should switch all of them together (for example, OS tabs repeated in several steps of a tutorial). - On page load, the first tab is selected; use
default="<tab-name>"to have that tab selected
Example with default and icon:
console.log("Hello");print("Hello"){{< tabs group="lang" default="Python" >}}
{{< tab label="JavaScript" icon="code" >}}
```javascript
console.log("Hello");
```
{{< /tab >}}
{{< tab label="Python" icon="sun" >}}
```python
print("Hello")
```
{{< /tab >}}
{{< /tabs >}}You can indent a tab block by preceding the tabs and tab shortcodes with the required number of spaces. But don’t indent the tab content.
Asciinema casts#
Asciinema allows you to record terminal sessions using a lightweight text-based format.
If you want to use an asciinema cast in your article, see asciinema casts.
Video#
To embed a video in your article, upload it to a video streaming platform such as YouTube and use the YouTube shortcode provided by Hugo to include it in your content. If you don’t have your own YouTube channel, we can upload your video to ours.
If you give your consent and share the video file with us, we can also upload it to BiliBili to make it accessible in more geographic areas.
GitHub card#
The Github Card shortcode adds a card with information about the linked GitHub repository.
Dynamic content#
If your page is going to be updated frequently, consider implementing injection of dynamic content. Usually, it is used for product status pages, such as ESP32-C61 status.
For more information, see Dynamic content.
Next step#
Next article → Validate and publish content
Back to the Contribution guide