
Assignment 6: Object detection with YOLO11#
In the previous assignments you worked with task-specific models: face detection, face recognition, and hand gesture classification. In this assignment you will run YOLO11, a general-purpose object detection model trained on the COCO dataset, which can simultaneously locate and classify 80 different types of everyday objects in a single image.
This is the most computationally demanding model in the workshop and will show you both the capabilities and the real constraints of running state-of-the-art detection on a microcontroller.
What is YOLO11?#
YOLO (You Only Look Once) is a family of one-stage object detection models. Unlike two-stage detectors that first propose candidate regions and then classify them, YOLO processes the whole image in a single forward pass through the network, producing bounding boxes and class probabilities simultaneously. This makes it significantly faster than two-stage approaches, although still demanding on constrained hardware.
YOLO11 is the latest generation in the series, developed by Ultralytics. ESP-DL provides a quantized and optimized version called YOLO11N (the nano variant — the smallest and fastest in the YOLO11 family) adapted for ESP32 targets.
The COCO dataset#
The model was trained on COCO (Common Objects in Context), a large-scale dataset with 80 object categories covering everyday items such as people, vehicles, animals, food, furniture, and electronics. The full list of class IDs is:
| ID | Class | ID | Class | ID | Class | ID | Class |
|---|---|---|---|---|---|---|---|
| 0 | person | 20 | elephant | 40 | wine glass | 60 | dining table |
| 1 | bicycle | 21 | bear | 41 | cup | 61 | toilet |
| 2 | car | 22 | zebra | 42 | fork | 62 | tv |
| 3 | motorcycle | 23 | giraffe | 43 | knife | 63 | laptop |
| 4 | airplane | 24 | backpack | 44 | spoon | 64 | mouse |
| 5 | bus | 25 | umbrella | 45 | bowl | 65 | remote |
| 6 | train | 26 | handbag | 46 | banana | 66 | keyboard |
| 7 | truck | 27 | tie | 47 | apple | 67 | cell phone |
| 8 | boat | 28 | suitcase | 48 | sandwich | 68 | microwave |
| 9 | traffic light | 29 | frisbee | 49 | orange | 69 | oven |
| 10 | fire hydrant | 30 | skis | 50 | broccoli | 70 | toaster |
| 11 | stop sign | 31 | snowboard | 51 | carrot | 71 | sink |
| 12 | parking meter | 32 | sports ball | 52 | hot dog | 72 | refrigerator |
| 13 | bench | 33 | kite | 53 | pizza | 73 | book |
| 14 | bird | 34 | baseball bat | 54 | donut | 74 | clock |
| 15 | cat | 35 | baseball glove | 55 | cake | 75 | vase |
| 16 | dog | 36 | skateboard | 56 | chair | 76 | scissors |
| 17 | horse | 37 | surfboard | 57 | couch | 77 | teddy bear |
| 18 | sheep | 38 | tennis racket | 58 | potted plant | 78 | hair drier |
| 19 | cow | 39 | bottle | 59 | bed | 79 | toothbrush |
Available models#
ESP-DL provides two YOLO11N variants for the ESP32-S3:
| Model | Input | Measured time (ms) | mAP50-95 |
|---|---|---|---|
coco_detect_yolo11n_s8_v1 (default) | 640×640 | ~26,000 | 0.370 |
coco_detect_yolo11n_320_s8_v1 | 320×320 | ~7,698 | 0.276 |
Inference on the ESP32-S3 takes 6 to 26 seconds per frame depending on the model variant. This is expected — YOLO11N was designed for inference on microcontrollers but the ESP32-S3 has no dedicated NPU. The ESP32-P4, with its hardware accelerator, reduces this to 0.55–2.5 seconds. For the workshop, use coco_detect_yolo11n_320_s8_v1 to keep iteration times manageable.
Step 1: Create the project#
Create a new project from the example using the ESP-IDF Component Manager:
idf.py create-project-from-example "espressif/esp-dl=3.3.8:yolo11_detect"ESP-DL v3.3.8 is the version against which this workshop was validated. You can omit the version pin ("espressif/esp-dl:yolo11_detect") to get the latest release, but model names or menuconfig options may differ.
Navigate into the project:
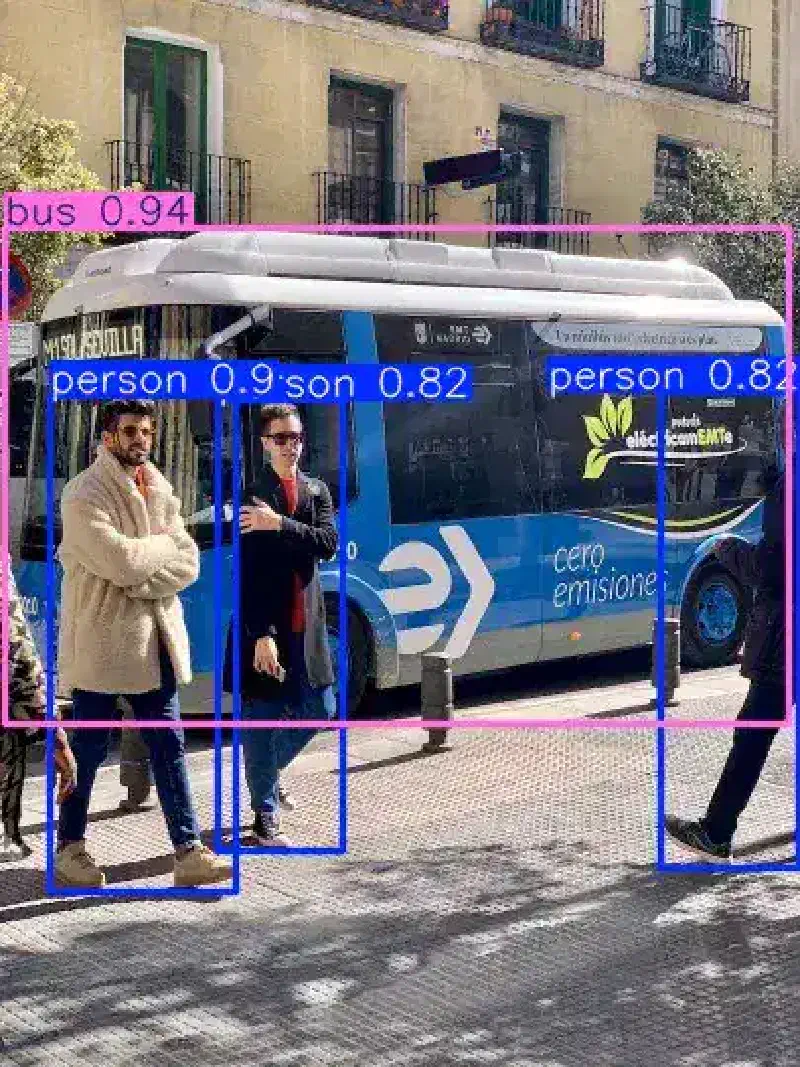
cd yolo11_detectThe example uses a photo of a bus (main/bus.jpg) embedded in flash as the test image. The expected detection results with the default settings (iou=0.7, conf=0.25) are shown below — one bus and three people detected:
Step 2: Select the faster model#
Before building, switch the default model to coco_detect_yolo11n_320_s8_v1 to reduce inference time from ~26 s to ~6 s:
idf.py menuconfigGo to Component config → models: coco_detect and set:
- Default model:
coco_detect_yolo11n_320_s8_v1 - Model to flash: enable
coco_detect_yolo11n_320_s8_v1
Save and exit menuconfig.
Step 3: Build and flash#
idf.py set-target esp32s3
idf.py build flash monitor
After flashing, the board will decode the JPEG, run inference, and print the results. Expect to wait around 6 seconds before output appears:
I (7698) yolo11n: [category: 5, score: 0.924142, x1: 4, y1: 117, x2: 400, y2: 370]
I (7698) yolo11n: [category: 0, score: 0.904651, x1: 25, y1: 200, x2: 120, y2: 453]
I (7698) yolo11n: [category: 0, score: 0.851953, x1: 111, y1: 203, x2: 172, y2: 430]
I (7698) yolo11n: [category: 0, score: 0.851953, x1: 336, y1: 197, x2: 404, y2: 438]
Step 4: Understand the output#
Each line in the output represents one detected object. Unlike the gesture classifier which returns a class name string, YOLO11 returns a category index — an integer from 0 to 79 that maps to the COCO class table above.
[category: 5, score: 0.939913, x1: 2, y1: 115, x2: 399, y2: 366]
  ^             ^                ^-----------------------------^
  COCO class ID Confidence        Bounding box in pixel coords
  (5 = bus)     (0 to 1.0)        (x1,y1) top-left, (x2,y2) bottom-right
The result struct in code is dl::detect::result_t:
for (const auto &res : detect_results) {
    ESP_LOGI(TAG, "[category: %d, score: %f, x1: %d, y1: %d, x2: %d, y2: %d]",
             res.category,   // integer COCO class ID
             res.score,      // confidence 0.0–1.0
             res.box[0],     // x1
             res.box[1],     // y1
             res.box[2],     // x2
             res.box[3]);    // y2
}
To print the class name instead of the ID, add a lookup array and update the log line:
static const char *coco_classes[] = {
    "person", "bicycle", "car", "motorcycle", "airplane", "bus", "train",
    "truck", "boat", "traffic light", "fire hydrant", "stop sign",
    "parking meter", "bench", "bird", "cat", "dog", "horse", "sheep",
    "cow", "elephant", "bear", "zebra", "giraffe", "backpack", "umbrella",
    "handbag", "tie", "suitcase", "frisbee", "skis", "snowboard",
    "sports ball", "kite", "baseball bat", "baseball glove", "skateboard",
    "surfboard", "tennis racket", "bottle", "wine glass", "cup", "fork",
    "knife", "spoon", "bowl", "banana", "apple", "sandwich", "orange",
    "broccoli", "carrot", "hot dog", "pizza", "donut", "cake", "chair",
    "couch", "potted plant", "bed", "dining table", "toilet", "tv",
    "laptop", "mouse", "remote", "keyboard", "cell phone", "microwave",
    "oven", "toaster", "sink", "refrigerator", "book", "clock", "vase",
    "scissors", "teddy bear", "hair drier", "toothbrush"
};

for (const auto &res : detect_results) {
    const char *label = (res.category >= 0 && res.category < 80)
                        ? coco_classes[res.category] : "unknown";
    ESP_LOGI(TAG, "[%s, score: %.2f, box: (%d,%d)-(%d,%d)]",
             label, res.score, res.box[0], res.box[1], res.box[2], res.box[3]);
}
After rebuilding and flashing with this change, the serial output will show human-readable class names instead of category IDs:
I (7698) yolo11n: [person, score: 0.73, box: (108,200)-(172,428)]
I (7698) yolo11n: [person, score: 0.73, box: (26,197)-(114,451)]
I (7698) yolo11n: [bus, score: 0.73, box: (14,116)-(403,366)]
I (7698) yolo11n: [person, score: 0.56, box: (335,215)-(404,435)]
Exercise: Test with a different image#
Replace main/bus.jpg with a JPEG image that contains objects from the COCO class list. Good candidates for a workshop environment are objects you can find around you — a laptop, a bottle, a chair, a person, or a mobile phone.
Prepare your image#
Take a photo or find a JPEG image. The image should:
- Contain one or more objects from the COCO 80-class list
- Be in JPEG format
- Be at least 320×320 pixels (the model resizes internally)
- Have clear, well-lit subjects with minimal blur
Replace the test image:
cp /path/to/your/image.jpg yolo11_detect/main/bus.jpgUpdate the embedded binary symbol references if you kept the original filename — if you replaced bus.jpg with the same name, no code changes are needed.
Rebuild and flash:
idf.py build flash monitorCheck the serial output for detected objects. Use the COCO class table above to decode the category IDs, or add the coco_classes lookup from Step 4.
Things to try#
- Point your phone’s camera at the scene and take a photo, then copy it to the board as the test image. See which objects the model picks up.
- Try an image with multiple object types (for example, a person holding a bottle next to a laptop). Observe how many detections appear and what confidence scores the model assigns to each.
- Try an image with a very small or partially visible object and note whether the model detects it.
The model outputs only detections where the confidence score exceeds the threshold (conf=0.25 by default). Objects that are too small, partially occluded, or at an unusual angle may fall below this threshold and not appear in the output even if they are present in the image.
Questions to consider#
- The
coco_detect_yolo11n_320_s8_v1model takes ~6 s and achieves mAP 0.276, whilecoco_detect_yolo11n_s8_v1takes ~26 s and achieves mAP 0.370. For a battery-powered product, how would you decide which to use? - The model outputs bounding boxes in pixel coordinates relative to its input resolution (320×320 or 640×640). If you wanted to draw those boxes on a 240×240 LCD display, the coordinates would need to be scaled. For a box coordinate
xfrom a 320×320 input, the scaled value would bex * 240 / 320. How would you apply this scaling for both axes, and what happens to the aspect ratio if the display is not square? - Given the inference time on the ESP32-S3, do you think running YOLO11 on live camera frames is practical? What architectural changes would make it more feasible?
Extra exercise: Load the model from the SD card#
By default the model is stored in flash rodata and linked directly into the firmware binary. This approach is convenient but uses 8 MB of flash and requires a full reflash every time you want to update the model. Storing the model on an SD card decouples the model file from the firmware: you can update the model by copying a new file to the card without touching the firmware at all.
The ESP32-S3-EYE has a MicroSD card slot, and ESP-DL supports SD card model loading out of the box.
Loading YOLO11N from the SD card requires the model parameters (~2.7 MB) to be copied into PSRAM at runtime. Combined with the ~6 MB of working memory the model needs for activations, this totals ~8.7 MB — more than the 8 MB PSRAM available on the ESP32-S3-EYE. This exercise is therefore best run on a board with 16 MB+ PSRAM, such as the ESP32-P4-Function-EV-Board. On the ESP32-S3-EYE, follow the steps as a learning exercise and observe the constraint firsthand if you attempt to run it.
Step 1: Find the model files#
After the first build, the component manager downloads the coco_detect component into managed_components/. The compiled model binaries for the ESP32-S3 are at:
managed_components/espressif__coco_detect/models/s3/
├── coco_detect_yolo11n_320_s8_v1.espdl   (~2.7 MB)
└── coco_detect_yolo11n_s8_v1.espdl        (~2.7 MB)
These .espdl files are the quantized model weights in ESP-DL’s binary format. They are the same files that get embedded in flash when using the rodata mode.
Step 2: Copy the model to the SD card#
Format a MicroSD card as FAT32. Create the directory structure expected by the component and copy the model file:
# On your computer, with the SD card mounted
mkdir -p /Volumes/SD/models/s3

# Copy the 320x320 model (recommended for ESP32-S3)
cp managed_components/espressif__coco_detect/models/s3/coco_detect_yolo11n_320_s8_v1.espdl \
/Volumes/SD/models/s3/The directory path on the card (models/s3) is the default value of CONFIG_COCO_DETECT_MODEL_SDCARD_DIR. Do not rename the .espdl file — the component looks for it by its exact name.
Insert the card into the ESP32-S3-EYE MicroSD slot.
Step 3: Reconfigure via menuconfig#
Open menuconfig:
idf.py menuconfigNavigate to Component config → models: coco_detect and change:
- Model location: set to
SDCARD - Disable
FLASHmodel options to save flash space (optional)
Save and exit.
Step 4: Verify the code handles SD card mount#
The example already includes conditional SD card initialisation. Open main/app_main.cpp and confirm this block is present:
#if CONFIG_COCO_DETECT_MODEL_IN_SDCARD
#include "bsp/esp-bsp.h"
#endif

// Inside app_main():
#if CONFIG_COCO_DETECT_MODEL_IN_SDCARD
    ESP_ERROR_CHECK(bsp_sdcard_mount());
#endif
No additional code changes are needed — ESP-DL automatically reads the model from the SD card path when CONFIG_COCO_DETECT_MODEL_IN_SDCARD is set.
Step 5: Build and flash#
idf.py build flash monitorThe firmware is now much smaller — the 8 MB model binary is no longer embedded. At startup you should see the BSP mounting the SD card, then the model loading and inference running as before:
I (832) sdmmc_common: SD card detected
I (1124) yolo11n: [category: 5, score: 0.939913, x1: 2, y1: 115, x2: 399, y2: 366]
...
Why use SD card model loading?#
| Flash rodata | SD card | |
|---|---|---|
| Firmware size | Large (model embedded) | Small (model external) |
| Model update | Requires full reflash | Copy new file to card |
| Boot time | Instant (model in flash) | Slightly slower (file read) |
| PSRAM usage | Low (params stay in flash) | High (params copied to PSRAM) |
| Suitable for ESP32-S3-EYE | Yes | No (PSRAM too small) |
| Suitable for P4 | Yes | Yes |
SD card loading is most useful during development (swap models without reflashing) and in production devices where model updates need to be delivered over-the-air or by replacing the card.
What you learned#
In this assignment you:
- Ran YOLO11N, a general-purpose one-stage object detector trained on 80 COCO classes, on the ESP32-S3
- Understood the trade-off between the 640×640 (higher accuracy, ~26 s) and 320×320 (faster, ~6 s) model variants
- Interpreted the detection output — category index, confidence score, and bounding box coordinates
- Added a class name lookup to make the output human-readable
- Experienced firsthand the computational limits of running large models on a microcontroller without a dedicated NPU