The Problem#
Embedded Rust is exciting. The ecosystem is growing fast. But that growth creates a real challenge for learners:
- Tutorials go stale. APIs change. Examples that worked six months ago might not compile today.
- Examples cover one use case. A blinky tutorial shows you how to blink one LED on one pin. But what if you need a different pin? A different configuration?
- Device and HAL crates are often underdocumented. You need to know how to extract what you need from the source and API surface.
- Copy-paste gets you started, but doesn’t get you far. If you can only reproduce what someone else wrote, you’re stuck the moment you need something different.
The solution: learn to fish, not just eat fish. After this section, you’ll know how to navigate the ecosystem, read documentation, and adapt examples independently.
Embedded Development Options#
There are three main approaches to embedded development:
Bare Metal — Direct hardware access with no OS. Maximum determinism and minimal overhead, but you manage everything yourself. Best for simple, resource-constrained, or timing-critical applications.
RTOS — A lightweight real-time operating system provides task scheduling and timing guarantees. Adds some overhead but enables multitasking with predictable behavior.
Embedded OS — A full operating system (e.g., Linux) running on the device. Highest overhead, but provides rich functionality (networking, filesystems, drivers).
In this workshop, we’ll be doing bare metal Rust using esp-hal, which is officially supported by Espressif.
Standard Library vs. Core Library#
“Out of the Box” Rust is based on the Standard Library (std), which depends on OS system interfaces. For bare metal, we use the Core Library (core) — a platform-agnostic subset with no heap allocation, concurrency, or I/O assumptions.
ESP supports both approaches. The std approach uses esp-idf-hal (community supported). We use the core (bare-metal) approach with esp-hal (officially supported by Espressif).
The Full Rust “no-std” Stack#
The Rust no-std stack comprises several layers. Let’s walk through each one.
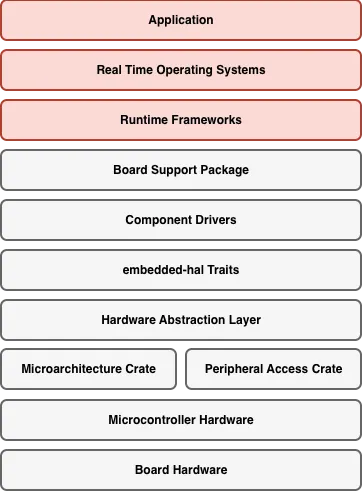
The full embedded Rust no-std ecosystem stack
Microarchitecture Crate#
Provides low-level access to CPU-specific features: interrupt handling, system timer, core registers. For RISC-V (ESP32-C3), this is the riscv crate.
// Example: enabling interrupts at the CPU level
unsafe { riscv::interrupt::enable() };
Peripheral Access Crate (PAC)#
Auto-generated from SVD files. A Rust representation of every register in the chip. Type-safe but low-level. For ESP32-C3: the esp32c3 crate.
// PAC-level: writing directly to a register
peripherals.GPIO.out_w1ts
    .write(|w| unsafe { w.bits(1 << 5) });
Hardware Abstraction Layer (HAL)#
Safe, ergonomic Rust APIs on top of the PAC. This is where we’ll spend most of our time. For ESP32 chips: esp-hal.
// HAL-level: safe, readable, type-checked
let mut led = Output::new(
    peripherals.GPIO5,
    Level::Low,
    OutputConfig::default(),
);
led.set_high();
embedded-hal Traits#
The key to portability. These traits define a standard interface that any HAL can implement — the contract between HALs and driver crates.
// Works on ANY microcontroller that implements embedded-hal
fn blink(
    pin: &mut impl OutputPin,
    delay: &mut impl DelayNs,
) {
    pin.set_high().unwrap();
    delay.delay_ms(500);
    pin.set_low().unwrap();
    delay.delay_ms(500);
}
Component Drivers (Driver Crates)#
Built on top of embedded-hal traits. A driver crate provides a high-level API for a specific sensor or device, making it hardware-agnostic.
// This driver doesn't know about ESP32 —
// it just needs something that implements I2c
let mut imu = Icm42670::new(i2c, Address::Primary);
let accel = imu.accel_norm().unwrap();
Board Support Packages (BSP)#
The highest layer. Pre-configures everything for a specific board: pin assignments, peripheral setup, default configurations.
// Without BSP: you manage pin numbers and config
let led = Output::new(peripherals.GPIO5, Level::Low, OutputConfig::default());

// With BSP: the board knows
let led = board.led();
The Mental Model#
Embedded development follows a consistent pattern:
Instantiate → Configure → Control
This mental model works for every peripheral, every HAL, and every driver crate.
Instantiate#
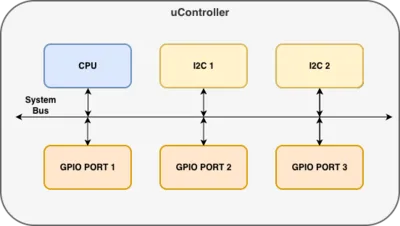
Peripheral singletons in a microcontroller
The singleton pattern ensures only one instance of each peripheral exists. At the PAC level, Peripherals::take() claims ownership of all peripherals at once — this can only be called once.
let peripherals = Peripherals::take().unwrap();Although the methods differ between HALs, they all do the same thing — take a peripheral singleton and create a driver instance:
esp-hal:
let peripherals = esp_hal::init(Config::default());
let led = Output::new(peripherals.GPIO0, Level::High, OutputConfig::default());
rp2040-hal:
let pac = pac::Peripherals::take().unwrap();
let sio = Sio::new(pac.SIO);
let pins = Pins::new(pac.IO_BANK0, pac.PADS_BANK0, sio.gpio_bank0, &mut pac.RESETS);
let led = pins.gpio25.into_push_pull_output();
stm32f4xx-hal:
let pac = Peripherals::take().unwrap();
let gpioa = pac.GPIOA.split();
let led = gpioa.pa5.into_push_pull_output();Configure#
Once we have an instance, it provides methods to configure it:
esp-hal:
let button = Input::new(
    peripherals.GPIO9,
    InputConfig::default().with_pull(Pull::Up),
);
rp2040-hal:
let button = pins.gpio15.into_pull_up_input();Control#
The instance provides methods to control the peripheral:
if button.is_high() {
    led.set_high();
}
Things to Note#
- Configuration is sometimes passed as an argument to instantiation rather than as a separate step
- Off-controller device drivers (e.g., I2C sensors) follow the same concept — they use microcontroller peripheral drivers to provide abstraction
- HALs often implement embedded-hal traits to provide device drivers with a common interface
Navigating Documentation#
Step 1: Navigate to the Peripheral Module#
Each peripheral typically gets its own module in a HAL crate. You can find the module list at the bottom of a HAL crate’s documentation page.
Click here to view the esp-hal ESP32-C3 crate modules.
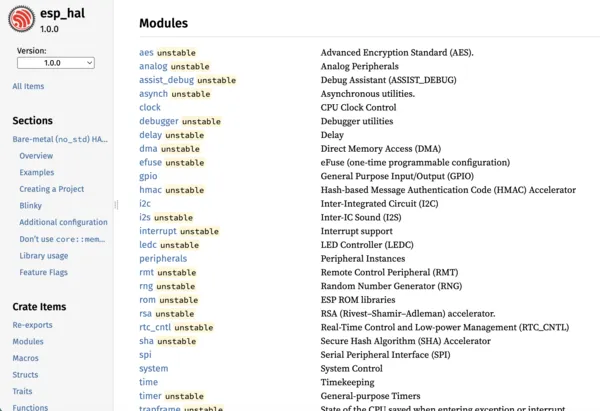
Finding peripheral modules in crate documentation
Step 2: Find an Example#
Simple examples are often shown in the module documentation. Most HAL repos also have a dedicated examples directory on GitHub.
Click here to view the blinky code example in the esp-hal.
Click here to view the examples folder in the esp-hal repository.

Code examples in module documentation
Step 3: Identify the Driver Struct#
Use the example to apply the mental model. Identify the driver struct and how it is instantiated, configured, and controlled.

Identifying the driver struct in documentation
Step 4: Access the Driver Struct#
Navigate to the driver struct’s documentation page to find all configuration and control methods available.
Click here to view the GPIO driver structs list in the esp-hal documentation.
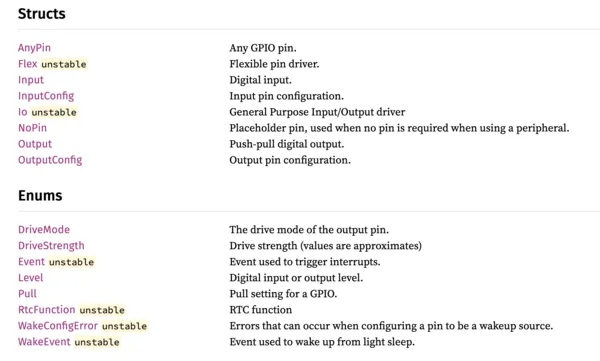
Finding configuration and control methods