The Hardware#
This is the hardware that will be used in the workshop and will be handed to the attendees.
The uFerris (microFerris) Megalops Baseboard#
This hardware can also be purchased from https://shop.theembeddedrustacean.com.
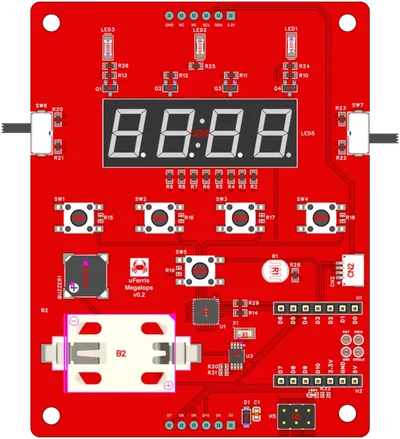
The uFerris learning platform
The Seeed Studio XIAO ESP32-C3:#
This hardware can also be purchased from SeeedStudio.
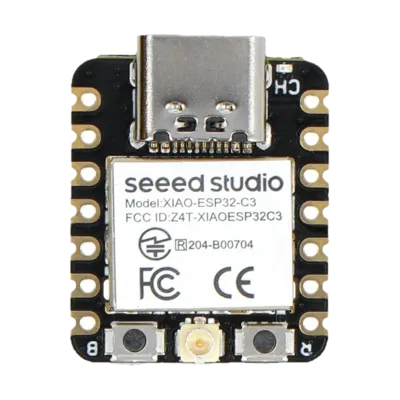
XIAO ESP32-C3 module
- Architecture: 32-bit RISC-V (single core, 160 MHz)
- Memory: 400 KB SRAM, 4 MB Flash
- Connectivity: WiFi 802.11 b/g/n, Bluetooth 5 (LE)
- Peripherals: GPIO, I2C, SPI, UART, ADC, PWM
- USB: Native USB-C (no external programmer needed)
Pre-Workshop Setup#
Please complete this setup before the workshop day. The goal is zero time spent on toolchain issues during the workshop itself.
1. Install Rust#
If you don’t have Rust installed yet:
curl --proto '=https' --tlsv1.2 -sSf https://sh.rustup.rs | shAfter installation, restart your terminal or run:
source $HOME/.cargo/envVerify:
rustc --version
cargo --version
2. Add the RISC-V Target#
The ESP32-C3 uses a RISC-V architecture:
rustup target add riscv32imc-unknown-none-elf3. Install espflash#
espflash is used to flash firmware and monitor serial output:
cargo install espflashVerify:
espflash --version4. Install esp-generate#
esp-generate creates new ESP32 Rust projects from templates:
cargo install esp-generate --locked5. Generate and Build a Test Project#
esp-generate --chip esp32c3 -o unstable-hal -o vscode -o esp-backtrace -o log --headless hello_test
cd hello_test
cargo build --release6. Hardware Verification#
Connect your ESP32-C3 board via USB-C and run:
cargo runYou should see the project build, flash to the board, and then serial output. Press Ctrl+C to exit the monitor.
Troubleshooting#
espflash can’t find the serial port#
ls /dev/ttyACM* /dev/ttyUSB* 2>/dev/nullIf no device appears, create /etc/udev/rules.d/99-esp32.rules:
SUBSYSTEMS=="usb", ATTRS{idVendor}=="303a", ATTRS{idProduct}=="1001", MODE="0666"Then reload:
sudo udevadm control --reload-rules
sudo udevadm trigger
For permission errors:
sudo usermod -a -G dialout $USERLog out and back in.
ls /dev/cu.usbmodem* /dev/cu.usbserial* 2>/dev/nullThe ESP32-C3 uses a built-in USB-JTAG interface. If not recognized, try a different USB cable (some are charge-only).
Get-WMIObject Win32_SerialPort | Select-Object Name, DeviceIDInstall the USB-JTAG driver if the device isn’t recognized.
Board not responding#
- Try a different USB cable (must support data, not just charging)
- Try a different USB port
- Press and hold the BOOT button, then press RESET, then release BOOT — this forces download mode
Simulation Fallback#
If your hardware setup fails, you can use a Wokwi simulation as a fallback:
- Go to the Simplified Embedded Rust book project branch
- Click Code → Codespaces → Create codespace on project
- Wait for the devcontainer to build
- Replace the code in
src/main.rswith your workshop exercise code