
In this assignment, you’ll set a custom partition table using VS Code.
Assignment steps#
- Enable the custom partition table in
menuconfig. - Add a
spiffspartition using the partition table editor. - Build and flash the new partition table.
- Read the partition table again to confirm the change.
Enable the custom partition table in menuconfig#
Open
menuconfig:> ESP-IDF: SDK Configuration Editor (menuconfig)Go to
Partition Table→Custom Partition Table CSV.This tells ESP-IDF to build the project’s partition table from a CSV file that you edit yourself, instead of one of the built-in schemes.
Add a spiffs partition using the partition table editor#
- Open the editor:
> ESP-IDF: Open Partition Table Editor UI - Copy the partition table from Assignment 2.1 as your starting point.
- Add a
spiffspartition after the existing entries.
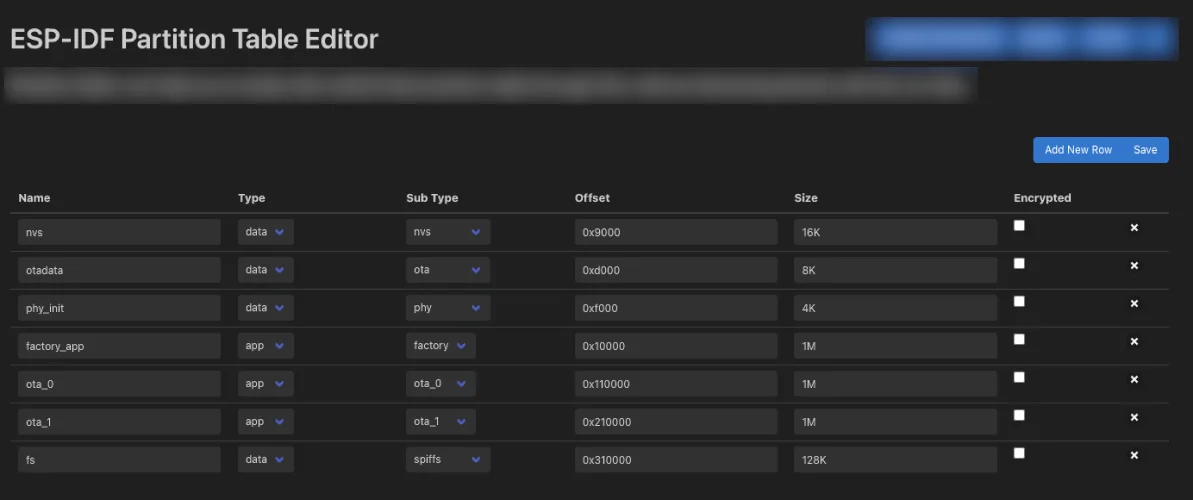
Custom partition table
Build and flash the new partition table#
- Build the partition table:
> ESP-IDF: Build Partition Table - Flash the partition table:
> ESP-IDF: Flash (UART) Your Project
Read the partition table again to confirm the change#
Read the partition table back from flash, as you did in Assignment 2.1, to confirm the new spiffs partition was written correctly.
Read the flash and dump the partition table into a
.binfile usingesptool.py:esptool.py -p <YOUR-PORT> read_flash 0x8000 0x1000 partition_table.bin<YOUR-PORT>is the same port you use to flash the device (e.g./dev/tty.usbmodem1131101orCOM25).Convert the
partition_table.binfile to a readable format usinggen_esp32part.py:python $IDF_PATH/components/partition_table/gen_esp32part.py partition_table.binYou get this output:
Parsing binary partition input...
Verifying table...
# ESP-IDF Partition Table
# Name, Type, SubType, Offset, Size, Flags
nvs,data,nvs,0x9000,16K,
otadata,data,ota,0xd000,8K,
phy_init,data,phy,0xf000,4K,
factory_app,app,factory,0x10000,1M,
ota_0,app,ota_0,0x110000,1M,
ota_1,app,ota_1,0x210000,1M,
fs,data,spiffs,0x310000,64K,
The table now includes the
fspartition, confirming that the custom partition table with thespiffsfilesystem was flashed successfully.
Conclusion#
In this assignment, you built a custom partition table CSV based on the OTA scheme from the previous assignment and added a spiffs partition for a filesystem. You then built, flashed, and verified the new partition table. With the partition table in place, you’re ready to move on to OTA updates.
Next step#
Next step → Lecture 3